iTunes is a media library that can connect to the iTunes Store and download purchased digital music, music videos, TV shows, etc. You can use iTunes to play and manage all your media collections and sync them to your iOS device. The video and audio formats supported by iTunes include MP4, MOV, M4V, MP3, AAC, AIFF, WAV etc. You can transfer files in those formats to iTunes. Can you transfer DVDs to iTunes?
The answer is of course not, because iTunes doesn’t support DVDs. How to import a DVD to iTunes? You need to rip the DVD into an iTunes-supported format and then import a digital copy of the DVD into iTunes. The following content will tell you how to rip DVDs and import them to iTunes. Now, let’s get started!
How to Rip DVDs to iTunes Formats on Mac
To help you choose a good DVD ripper for iTunes, this part will recommend two useful tools and tell you how to rip DVDs to iTunes formats.
#1. Handbrake
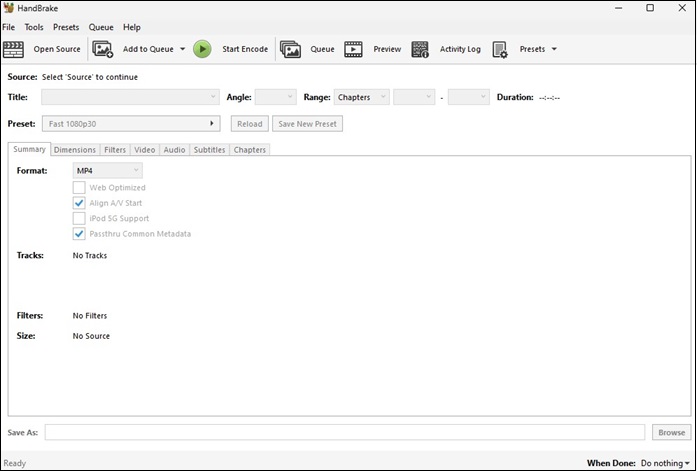
Handbrake is an open-source tool that is compatible with Windows, Mac, and Linux. It not only helps you convert video files but also rip DVDs to popular digital formats supported by iTunes. Also, it has some basic editing tools like rotating and cropping. Before transferring DVDs to iTunes, you can refer to the below steps to rip DVDs with Handbrake.

Step 1. Download and install Handbrake on your computer.
Step 2. Insert your DVD into the DVD drive on your computer and launch Handbrake. Click on the DVD icon on the sidebar, and it will scan the titles on your DVD automatically. You can view the detailed information on the DVD after the scanning is finished.
Note: Handbrake can’t rip DVDs with copy protection. If you want to rip protected DVDs using Handbrake, you need to install Handbrake libdvdcss on your computer in advance.
Step 3. Expand the Title dropdown and choose the title you want to rip. Click on the Browse button under the Destination part to choose the folder for storing.
Step 4. Expand the Preset dropdown, move to Device, choose Apple, and select one resolution you need.
Step 5. You can click on the Start Encode button to begin the ripping process.
#2. WinX DVD Ripper
WinX DVD Ripper allows you to rip DVDs to various formats like MP4, MOV, and other formats supported by iTunes. You can use this easy-to-use tool to rip DVDs at a fast speed. Here’s how:
Step 1. Get WinX DVD Ripper and install it. Then insert a DVD into your computer.
Step 2. Enable WinX DVD Ripper, click the DVD Disc button to select the DVD you want to transfer to iTunes.
Step 3. After the DVD is imported into this application, the Output Profile popup will appear. Go to Device profile, select the Apple Device option, and choose the to iTunes Video option. Because the formats supported by iTunes are compatible with QuickTime, you can choose the General Profiles option and select MP4 Video.
Step 4. Click the Browse button at the bottom of the window to choose its output folder.
Step 5. Click on the RUN button to start converting your DVD to iTunes formats.
How to Transfer DVDs to iTunes on Windows/Mac
After learning how to rip DVDs to iTunes formats, you can go to transfer DVDs to iTunes now! Here are detailed steps:
Step 1. Open iTunes, click on File, and choose Add File to Library or Add Folder to Library.
Step 2. Then find your DVD video from File Explore (Windows) or Finder (Mac), choose it, and click Open to transfer your DVD to iTunes.
If you want to transfer DVDs to iTunes on an iPhone, iPad, or iPod, you can use the sync feature in iTunes.
MiniTool Video ConverterClick to Download100%Clean & Safe
Conclusion
This post has told you how to rip DVDs to iTunes formats and how to transfer DVDs to iTunes. You can follow the above steps to import your favorite DVD videos to iTunes. Hope this post is helpful to you!


![4 Effective Ways to Convert DVD to MP4 on Mac [Detailed Guidance]](https://images.minitool.com/videoconvert.minitool.com/images/uploads/2023/10/convert-dvd-to-mp4-on-mac-thumbnail.jpg)

User Comments :