Continuous learning is the key to staying ahead in a fast-changing world. Lynda is a great online platform for lifelong learning. Sometimes you may want to record courses on this service for future review. This post from the free file converter will guide you on how to record on Lynda. Let’s start!
Lynda (now named LinkedIn Learning) is a popular online learning website to help you master new skills and improve yourself. The courses on Lynda cover a wide range of topics, from technology and business to creative arts and personal development. With it, you can learn at your own pace, anytime and anywhere. Sometimes you may need to save those courses for offline viewing.
Can you download courses from Lynda? Yes, once you have a premium account. But if you don’t have one, you can use the following methods for this task.
How to Record Video from Lynda with MiniTool Video Converter
MiniTool Video Converter is the most recommended screen recording tool for Windows users. This tool is simple to use. The whole process is hassle-free. You can easily record on Lynda with this tool, even though you are new to it. But don’t get fooled by its simplicity. It is feature-rich and can capture everything on your screen, including recording online courses, video calls, gameplay, presentations, tutorials, etc.
Additionally, MiniTool Video Converter offers various customization options. You can adjust the recording area, audio source, frame rate, quality, output folder, duration, and more. You can easily pause, resume, or stop the recording at any time. What’s more, it doesn’t have time limits or watermarks.
How to Record on Lynda with MiniTool Video Converter? You can:
Step 1. Click the button below to get the installer of MiniTool Video Converter and follow the on-screen instructions to install it on your Windows PC.
MiniTool Video ConverterClick to Download100%Clean & Safe
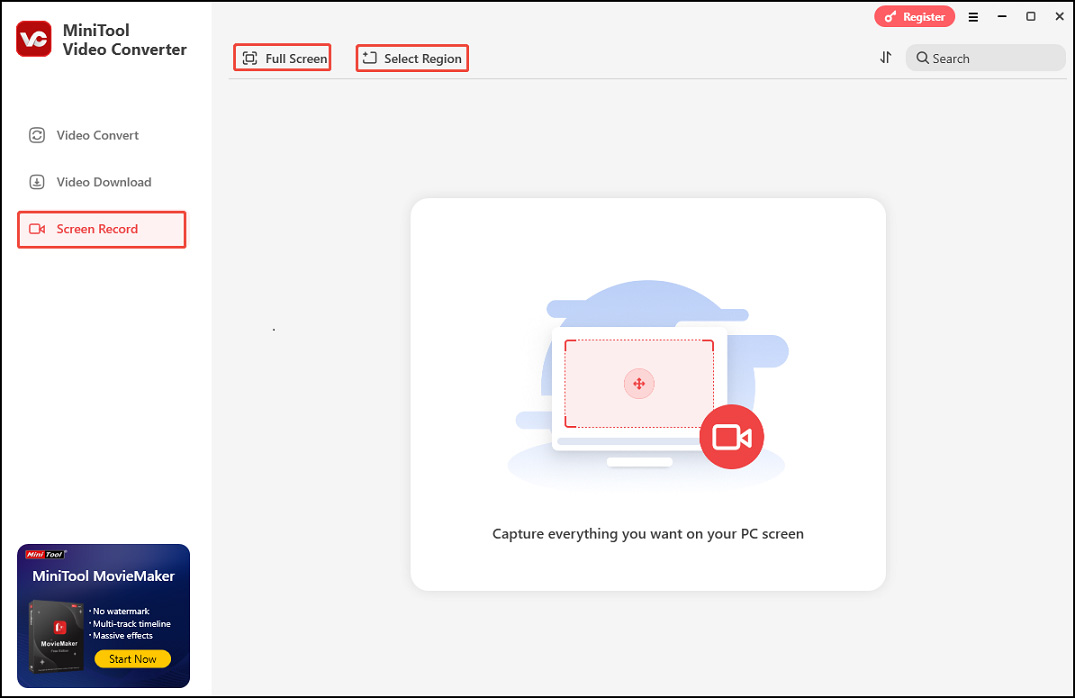
Step 2. Open this program. Choose the Screen Record option. Click Full Screen to capture the whole screen or click Select region and move your cursor to customize the recording area.
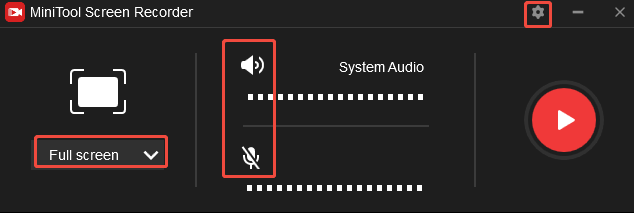
Step 3. Determine if you want to record the system audio or the microphone. Just click the corresponding icons to turn them on/off.
If you want to change the output folder, recording quality, frame rate, and duration, click the gear icon in the top-right corner of the panel to open the advanced Settings window. Don’t forget to click OK to save your changes.
Step 4. Open the course you want to record on Lynda. Click the REC button in the panel or press F6 on your keyboard. After a 3-second countdown, the tool will start recording.
Step 5. During the recording, press F9 to pause and resume the recording process if needed.
Step 6. To end the recording, press F6 again. Then, the MiniTool Screen Recorder panel will reappear on your screen with the recorded video listed on it. Click the play icon beside it to watch or the file icon to locate it.
How to Record Video from Lynda with RecMaster
RecMaster is also a good tool to record on Lynda. You can record the full screen or a custom area according to your needs. It also supports recording with audio and webcam. With this screen recorder, you can also set the recording format, resolution, frame rate, etc.
Let’s see how to record on LinkedIn Learning with RecMaster.
Step 1. Download and install RecMaster on your computer.
Step 2. After installation, run this tool. Choose the Full-screen mode if you want to record the online video course in the whole screen. You can also choose a specific area to record. Then, adjust the recording source.
Step 3. Open the target course and click the REC button to begin recording.
Step 4. Click the Stop button to end it.

How to Record on Lynda with iTop Screen Recorder
iTop Screen Recorder can also help you record on Lynda. It can record 4K videos without lag. You can also choose to record the full screen, a part of the screen, or a specific window.
Here are the steps.
Step 1. Download and install iTop Screen Recorder on your Mac or PC. Then, open it.
Step 2. To choose a specific recording area, click Full Screen and choose Select Region from the drop-down list.
Step 3. To record the system audio and the microphone, click the Speaker and Mic icons to turn them on.
Step 4. Click the REC button to start recording.
Step 5. Click the Stop button to stop recording.
Screen Record on Kayo Sports with Snipping Tool
![How to Record MLB.TV Games with Ease [Computer & Phone]](https://images.minitool.com/videoconvert.minitool.com/images/uploads/2025/03/how-to-record-mlb-tv-games-thumbnail.jpg)
How to Record on Lynda with Snipping Tool
Snipping Tool is not a stranger to many Windows users. It is a popular screen-capturing tool. But now in Windows 11, it can record on-screen activities.
Step 1. Enter snipping tool in the search box and select Snipping Tool from the results.
Step 2. In the top toolbar of the Snipping Tool, click the video camera icon to switch to screen recording mode.
Step 3. Click New on the top menu and use your mouse to select the recording area. If you want to record the entire screen, simply drag the rectangle across the full screen area.
Step 4. Open the course and click Start to begin the process.
Step 5. To end the process, click Stop recording in the toolbar. Click Save to save the recording.

Conclusion
Recording on Lynda is a good way for offline learning. This post offers you 4 easy methods for this task. I hope you find it useful.
User Comments :