Microsoft Lync is the predecessor of Skype for Business. In 2015, it was officially renamed Skype for Business and co-branded with the Microsoft-owned consumer messaging platform Skype. But there are still some people who choose to use Lync. Through recording Lync, you can save meeting recordings, substance, videos, and others. How to record a Lync meeting. The following content will give you step-by-step guidance. Now, let’s get started!
How to Record a Lync Meeting in Lync
If you are the organizer or host of the Lync meeting, you have the right to record the Lync meeting. On the contrary, you haven’t the right to record the meeting or share it without permission if you are only a meeting attendance. You can read the second and third parts to learn how to record Lync as an attendance. This part only shows you how to record Lync meeting in Lync as a meeting organizer.
Step 1. After joining a Lync meeting, you need to click the More Options icon at the lower-right corner and click the Start Recording option.
Step 2. During the recording process, you can click the Pause or Start icon to control the recording process.
Step 3. If you want to finish the recording process, you can click the Stop Recording icon. Then the recorded video will be saved on your computer automatically.
How to Record Lync on Windows
In some situations, you may want to use other third-party screen recorders to record Lync. For example, you want to record the cursor movement or save your recordings in other formats. If you are a Windows user, you can try MiniTool Video Converter. It is a free video conference recorder that can record the full screen or selected region according to your needs. Moreover, it offers you adjustable output parameters including choosing the format, codec, and others.
Generally, MiniTool Video Converter can help you record a Lync meeting effectively and you can refer to the below detailed steps.
Step 1. Click the below download button to download and install MiniTool Video Converter on your desktop and open it.
MiniTool Video ConverterClick to Download100%Clean & Safe
Step 2. Enter the Lync meeting you want to record, click the Screen Record tab, and click the Click to record screen area to access the recording panel.
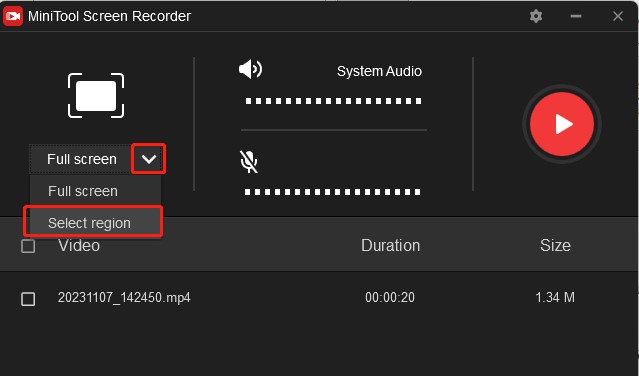
Step 3. Click the inverted arrow next to Full screen and choose the Select region option. Then click and drag the cursor to choose the Lync meeting as the recording area.

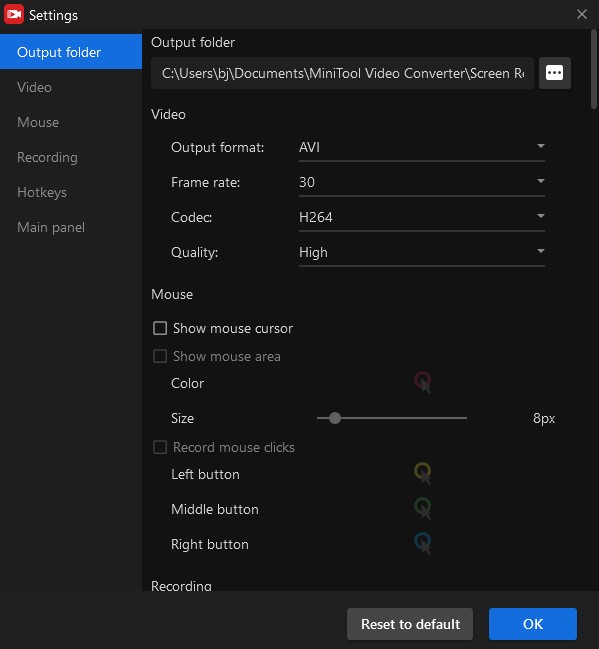
Step 4. Click the Settings icon, customize the output parameters, and then click OK to save the changes.

Step 5. Click the Record button or press the F6 key on the keyboard to start the recording process and press the F6 key again to end the recording. If you want to pause and resume the recording process, you can press the F9 key. Moreover, you can set the hotkeys in the Settings window.
How to Record Lync on Mac
If you are a Mac user, QuickTime Player is a good choice to record your Lync meeting. Here’s how:
Step 1. Since QuickTime Player is pre-installed on your Mac, you can directly launch it.
Step 2. Click on File and select the New Screen Recording option. Click the arrow next to the Record icon to personalize the recording settings.
Step 3. Click the Record icon. If you want to record the full screen, you can click anywhere on the screen. Or you can drag the cursor to choose the selected region if you only want to record a specific area. Then click Start Recording.
Step 4. Click the Stop button to stop recording. Next, click on File and choose Save to save your recorded meeting file.
FAQs of Recording Lync Meeting
MiniTool MovieMakerClick to Download100%Clean & Safe
Conclusion
Hopefully, this post is helpful to you. You can choose one method from above and follow the guidance to record a Lync meeting.


![7 Ways to Capture Video from Website [Windows/Mac/Phone/Online]](https://images.minitool.com/videoconvert.minitool.com/images/uploads/2023/11/capture-video-from-website-thumbnail.jpg)

![7 Best Screen Recorders for Mac You Can Try [Free & Paid]](https://images.minitool.com/videoconvert.minitool.com/images/uploads/2023/07/best-screen-recorder-for-mac-thumbnail.jpg)
User Comments :