In this post from MiniTool Video Converter, you’ll learn how to upscale video in Premiere Pro to improve the sharpness and clarity of your video.
Now, with the help of AI upscaling software, videos can be easily upgraded to improve image quality. Additionally, Adobe Premiere Pro can also do the same. It’s a professional video editing software application that provides almost all editing tools. Also, this application can upscale videos to get a better viewing experience. Here’s a clear guide on how to upscale video in Premiere Video.
How to Upscale Video in Premiere Pro
Step 1. Open Adobe Premiere Pro on your computer.
Step 2. Click File > New Project to create a new project and click File > Import to import your video.
Step 3. Now, you need to create a new sequence. You can go to File on the top menu bar, and select New > Sequence. Alternatively, click the New Item in the project panel and select Sequence from the drop-down menu.
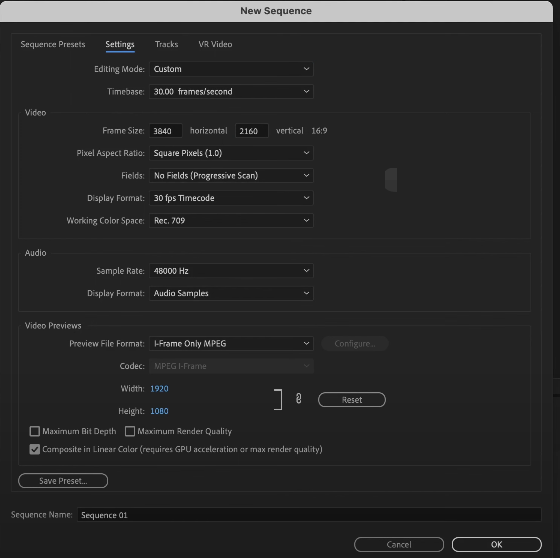
Step 4. In the New Sequence window, you can choose a sequence preset under the Sequence Presets tab. For example, if you want to upscale 1080p to 4K, go to RED R3D > HD 4K > 4K HD 16x9 23.976 or 4K HD 16x9 24.
Alternatively, switch to the Settings tab to customize the frame size. Make sure the Editing Mose is set to Custom and then change the frame size. For 4K videos, type 3,840 or 4,096 in the horizontal box and 2,160 in the vertical box. Finally, click OK.
Step 5. Drag your video to the timeline, then immediately a Clip Mismatch Warning pop-up window appears, and click Keep existing settings.
Then, you’ll find your video does not match the player window and see black areas around the video. Just click the clip on the timeline and choose Set to Frame Size (or go to Edit > Preferences > Media > Default Media Scaling to find this option) to fix the issue and your video will fill the 4K frame.
Step 6. To further improve the video quality and make it look clearer, you can sharpen the video by clicking Color at the top menu bar and dragging the Sharpen slider to the right in the Lumetri Color section.
Step 7. Finally, click File > Export > Media or press Cmd/Ctrl + M to open the Export Mode to export the video from Premiere Pro.

How to Use the Detail-preserving Upscale Effect to Upscale Video
In fact, the Detail-preserving Upscale effect is in After Effects instead of Premiere Pro. But you can send the video clip from Premiere Pro to After Effects to upscale the video. This effect can enlarge images while preserving details in the image.
Step 1. Launch Adobe Premiere Pro, import your video, and drag it to the timeline.
Step 2. Right-click on the clip and select Replace With After Effects Composition to send the video to After Effects.
Step 3. Then, your video will open in After Effects and a prompt will appear. Give the project a name, choose the destination folder, and click Save.
Step 4. In the Effects & Presets panel, search for Detail-preserving Upscale, and double-click on it to add this effect to your video.
Step 5. Click Fit to Comp Width to make the video match the width of the canvas.
Step 6. Save the After Effects project, then go back to Premiere Pro, continue to edit the video, and then export it.
![[Solved] How to Fix After Effects Not Sending to Media Encoder?](https://images.minitool.com/videoconvert.minitool.com/images/uploads/2023/04/after-effects-not-sending-to-media-encoder-thumbnail.png)
Another Way to Upscale Video in Premiere Pro
You can use plug-ins to add more functionality to your Adobe Premiere Pro software. To upscale video in Premiere Pro, you can use Infognition SuperResolution plugin that can convert SD footage at lower quality into higher definition projects like HD to 4K.
Step 1. Download Infognition SuperResolution plugin and follow the onscreen instructions to install it.
Step 2. Open Premiere Pro, create a new project, then upload your video, and add it to the timeline.
Step 3. Expand the Effects tab, click Video Effects > Infognition > Super Resolution resize, and drag this effect to your clip on the timeline. Then, you can change the scale factor in the Effect Controls tab with Super Resolution resize.
Step 4. Export your upscaled video from Premiere Pro.
MiniTool Video ConverterClick to Download100%Clean & Safe
Conclusion
This guide explains 3 methods to upscale videos in Adobe Premiere Pro. Choose one way to make your footage sharper and clearer.
If you like this post, you don’t want to miss:
About The Author

Position: Columnist
Cora is a tech writer specializing in digital media workflows, with over six years of hands-on experience in video post-production, media transcoding, and screen capture. Her writing is always clear and practical. Cora also produces in-depth software reviews for users across skill levels to help them find the right tool and enjoy video editing.
User Comments :