Windows 11 provides a built-in audio recording tool called Sound Recorder to help you capture audio from a microphone or headset. In the following paragraphs, I will walk you through how to record audio on Windows 11 using Sound Recorder. But Sound Recorder doesn’t support recording internal audio. How to record internal audio on Windows 11? I will also present you with several useful third-party audio recorders for internal and external sound recording. Now, let’s get started.
If you want to record activities happening on your Windows 11 PC, you can use MiniTool Video Converter to capture the screen with the option to record the microphone sounds and system audio simultaneously or separately. It enables you to record video conferences, online videos, streaming videos, video games, video and voice calls, and more. More importantly, it is a completely free screen recorder with no time limit or watermark.
MiniTool Video ConverterClick to Download100%Clean & Safe
How to Record Audio on Windows 11 via Built-in Tool
Sound Recorder, also known as Voice Recorder on Windows 10, is a useful tool to capture audio from microphones and headsets. It enables you to record and save audio in MP3, AAC, WMA, FLAC, or WAV format. Among various output audio formats, Sound Recorder set AAC as the default output format. Moreover, it also allows you to record the audio at medium, high, or best quality. How to record audio on Windows using Sound Recorder? Keep reading.
Before starting to learn how to record voice on Windows 11 by Sound Recorder, you may want to personalize the recording settings, like the recording format and quality. Below is how:
Step 1. Type “sound recorder” into the Start Search bar, find the matched one, and click Open.
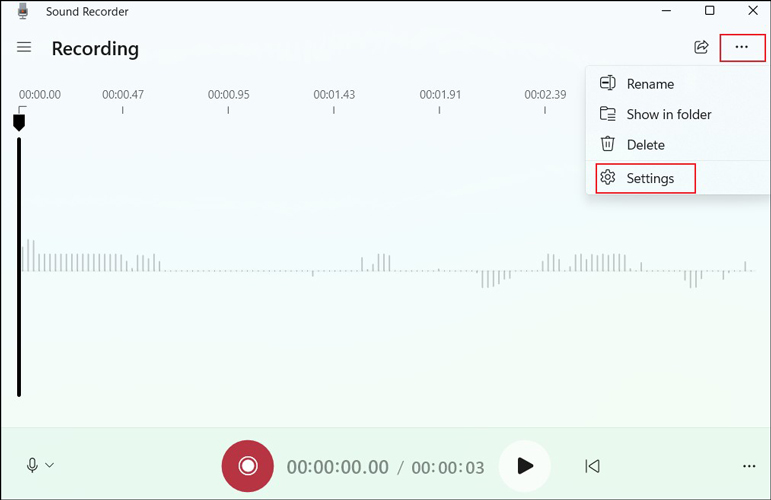
Step 2. Click the three-point icon in the top right corner and choose Settings.

Step 3. Then you can expand the Recording format and Audio quality menus to choose the options you need.
Then refer to the following steps to record audio with Sound Recorder:
Step 1. You need to connect your microphone or headset to your Windows 11 computer first.
Step 2. If you connect multiple microphones or headsets, you can click the microphone icon at the lower left to choose the recording device.
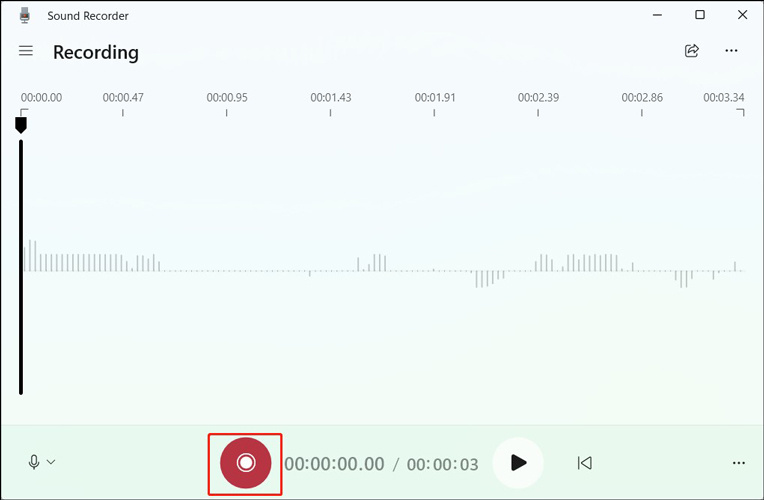
Step 3. Click the Start recording icon to activate the audio recording. In the process of recording, you can click the Mark option to mark a point. You can also hit the Pause icon or the Space key on the keyboard. Once done, click on Stop recording.

How to Record Internal Audio on Windows 11
The Sound Recorder is designed to record audio from microphones and headsets. How to record audio from the system? You can enable the Stereo Mix option to use Sound Recorder to record the internal audio. In case, it is better to use third-party audio recorders, like Audacity and OBS Studio. Here, I will introduce you to how to record internal audio on Windows 11 using Audacity.
Step 1. Download, install, and run Audacity.
Step 2. Click the Edit option from the top menu bar and select Preferences.
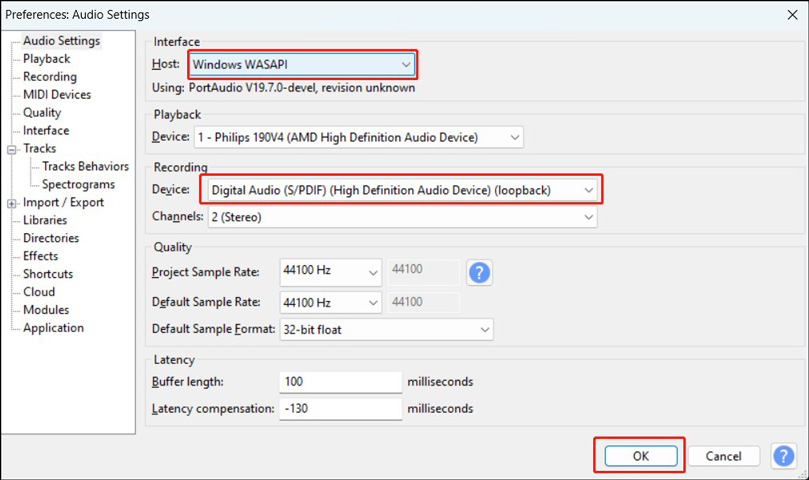
Step 3. Under the default Audio Settings tab, set the Host as Windows WASAPI and choose the default playback device of your Windows 11 PC. Then click OK to save the changes.

Step 4. Click the Record icon to start recording and hit the Stop icon to finish the recording. Later, you can click on File, choose Export Audio, and select the Export to computer option to open the export window. In this window, you can choose the output format, channel, and others. Finally, click on Export.
Fix the Sound Recorder Not Working on Windows 11
What can you do if you encounter the Sound Recorder not working on Windows 11 error? Don’t worry, here are some feasible solutions you can try.
Solution 1. Repair Sound Recorder
- Open Settings of your Windows 11 PC.
- Go to Apps and choose Installed apps to find Sound Recorder.
- Click on the three-dot icon and choose Advanced options.
- Scroll down to the Reset section and click on the Repair button
After the repair process is over, you can reopen the Sound Recorder. If it still doesn’t work, go back to the Reset section and click on the Reset button.
Solution 2. Check Microphone Permissions
If you are the first time to use Sound Recorder, you’d better check whether you permit Sound Recorder to access microphones.
- Go to Settings on your PC.
- Click the Privacy & security option from the left sidebar and then choose Microphone.
- Check whether you enable the Microphone access and Let apps access your microphone options. If not, simply toggle on them.
Solution 3. Restart the Windows Audio Service
- Type “services” in the Start Search box to find Services and click Open.
- Scroll down to find the Windows Audio option.
- Right-click on the Windows Audio option and select the Restart option.
Solution 4. Run Audio Troubleshooter
- Click the System option in Settings.
- Scroll down to choose Troubleshoot and click the Other troubleshooters option.
- Hit the Run button behind Audio.
Later, you can click the Yes button and follow the on-screen instructions to finish the process.
If you are a Windows 10 user, you can also find solutions to fix the Voice Recorder not working on Windows 10 error by reading this post: Top 10 Methods to Fix Windows Voice Recorder Not Working
To Wrap Things Up
How to record audio on Windows 11? You can use Sound Recorder to capture audio from microphones or headsets. If you want to record internal audio, you need to use a third-party audio recorder. I hope this post will be helpful to you.


User Comments :