Some Teams users want to save Teams recordings in MP4 format and store them in other places instead of Teams SharePoint/OneDrive for Business but don’t know how. Therefore, this article edited by the free video converter from MiniTool is written for their reference.
The recorded videos of Teams meetings will be deleted after 120 days (approximately 4 months). Thus, if you want to keep some recordings forever, you have to download them and save them somewhere offline for later usage.
How to Download Teams Recording as MP4 in Teams App?
In general, it is easy to download and save a Teams recorded video in MP4 file format.
Step 1. Choose the Files or Shared tab in the meeting chat, channel, or meeting in calendar.
Step 2. Find and select the target recording video.
Step 3. Click More options (three dots) and choose Download.
Finally, wait for the process to be completed.

How to Save a Copy of the Teams Recording on SharePoint?
The default file-saving location of Teams recordings (video or audio files) is Teams SharePoint online storage. If you are the owner of the recording files or have editing permissions, you can download them offline.
Step 1. Click the waffle menu (9 dots ordered in a square shape) on the top left and choose Stream in the pop-up list.
Step 2. Find the target Teams Recording in the Stream web version.
Step 3. Click the more options (three dots) from Recommended (which lists the most recent recordings) and choose Download.
If you can’t find the target file, you can rely on the filter tabs: created by me, meetings, playlists, shared, or favorites. Once locating your recording, click on the three dots next to the recording name and select Download.
Finally, the target Teams recording will be downloaded and saved to a local location on your computer in MP4 format by default.
How to Download Teams Recording as MP4 from OneDrive?
If your Teams recordings are on the OneDrive cloud, you can get them in two ways.
Way 1. Download Teams Recording as MP4 Directly from OneDrive
In the first place, you can directly get the target Teams recording from OneDrive.
1. Click on the dotted square icon and launch the OneDrive webpage from the popup.
2. In the next window, select My Files from the left menu and find and open the Recordings folder from the right section.
3. In the Recordings folder, locate the target Teams recording.
4. Click on the recording file and choose Download from the top menu. Or click the three-dot icon next to the file name and click Download in the context menu that pops up.
5. Next, in the Save As popup, pick up a location to store the downloaded Teams recording and click Save.
The downloaded file will be saved as MP4 automatically.
![Where Are Teams Recordings Stored? [An Ultimate Guide]](https://images.minitool.com/videoconvert.minitool.com/images/uploads/2023/04/where-are-teams-recordings-stored-thumbnail.jpg)
Way 2. Download Teams Recording as MP4 Through Microsoft Stream
Or you can indirectly download Teams Recording in MP4.
1. On the Home tab, you can view all files in OneDrive including your recordings under For You or Recent sections.
2. Click on the three dots aside and select Open.
3. Then, the target file will be opened in Microsoft Stream. There in the top menu, click the three dots and click Download.
It won’t take long before you can play the Teams Recording offline.
How to Convert Teams Recording to MP4?
In fact, the default saving video file format for Teams recording is MP4/H.264, so there is no need for conversion. However, if you want to convert an MP4 Teams recording from H.264 to other codecs like MPEG-4 and AVC, video conversion is necessary. Therefore, you need a video conversion tool such as MiniTool Video Converter. Below is a brief guide for converting MP4 video from one encoder to another with this application.
MiniTool Video ConverterClick to Download100%Clean & Safe
Step 1. Download, install, and launch MiniTool Video Converter on your Windows PC.
Step 2. Drag and drop the target MP4 Teams recording into its main interface.
Step 3. It will create a conversion task. Click the settings icon under the Target section.
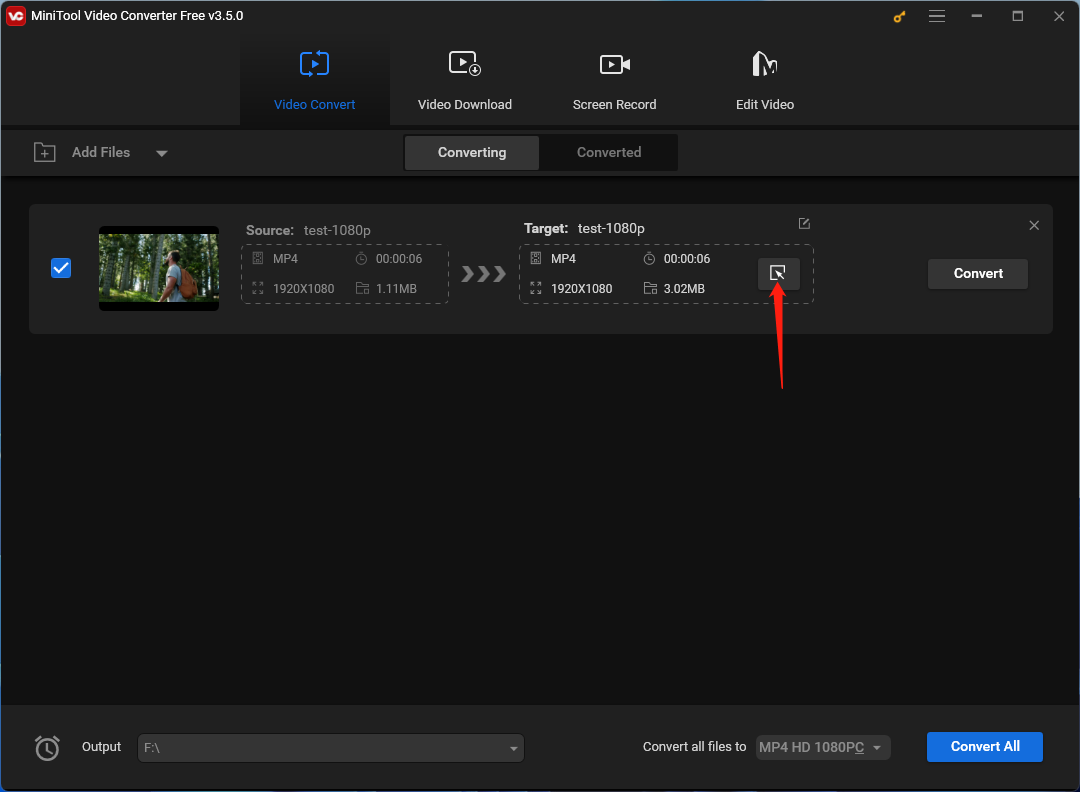
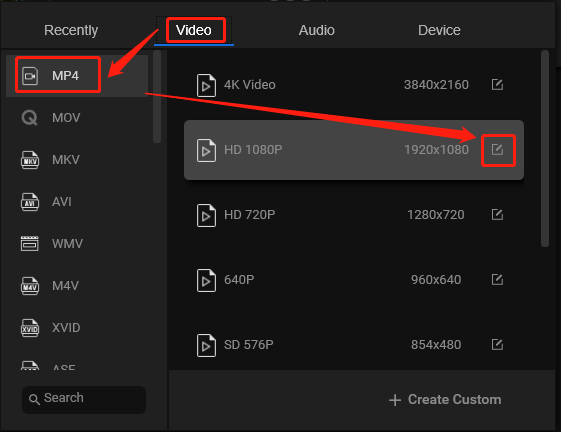
Step 4. In the new popup, move to the Video tab from the top menu, select MP4 in the left panel, and click the settings icon for the target option.
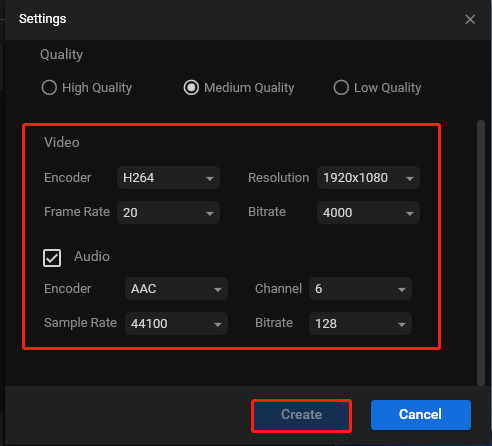
Step 5. In the next Settings window, you can specify the encoder, resolution, frame rate, and bitrate of the video as well as the encoder, channel, sample rate, and bitrate of the embedded audio. Click Create when completes setup.
Step 6. Go back to the previous window. There, scroll down the options list, find and select the customized option, and click the Convert button in the main interface.
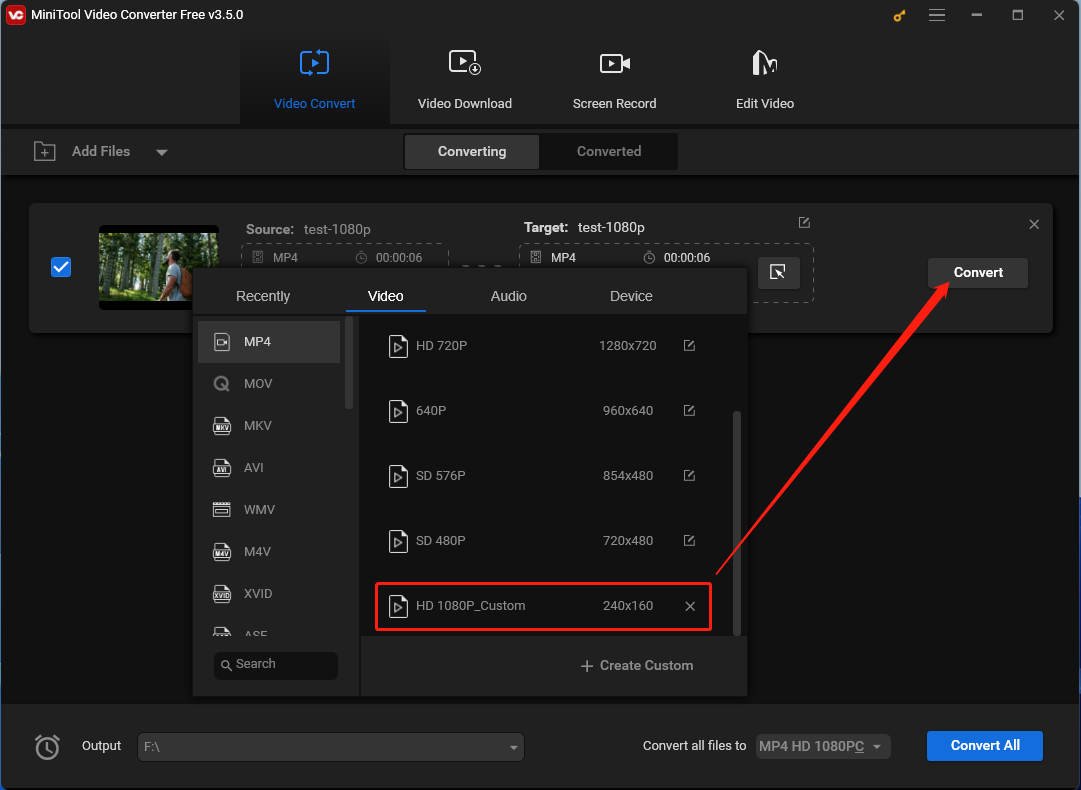
Eventually, you will get your customized MP4 Teams recording in a few seconds.
Recap and Key Takeaways
Until now, you must know how to download Teams recording as MP4. It’s not complex work! Just pick a method from the above content that suits you most! In case you want to do further settings to the MP4 format like video encoder, resolution, frame rate, bitrate, etc., you can rely on MiniTool Video Converter.
About The Author

Position: Columnist
Helen is a tech writer with over 10 years of experience. She specializes in creating easy-to-follow guides for video editing, media file conversion, and computer performance. Helen doesn't just write—she tests every software herself and listens to feedback from users and experts. Her goal is to make complex programs simple so that everyone can solve their tech problems with confidence.
User Comments :