Where are Teams recordings stored? This post will give you a full guide on Microsoft Teams recording location and teaches you how to record a meeting in Teams for free using MiniTool Video Converter.
Microsoft Teams is a video conferencing platform, as part of the Microsoft 365 family of products. Like other video meeting apps, Teams has a Record feature that allows the meeting organizer or person from the same organization to record meetings and calls for future viewing.
Please note that the screen recording feature of Microsoft Teams is only available for paid account users with the correct license, Office 365 Enterprise E1, E3, E5, F3, A1, A3, A5, M365 Business, Business Premium, or Business Essentials.
Many meeting admins don’t know where do Teams recordings go after ending a meeting. This post offers a complete guide on Teams recording location for meeting organizers to find their recordings for sharing, editing, or more.
Where Are Teams Recordings Stored
Where are Teams recording stored? Generally speaking, Teams recordings will be saved to OneDrive or SharePoint. The specific location depends on the type of meeting, channel meeting or non-channel meeting.
In Microsoft Teams, recordings of channel meetings will be stored in SharePoint. If it’s a non-channel meeting, the recording will be stored in OneDrive.
Here’re some other questions. Where do Teams recordings go, where does Teams save recordings, and where to find Teams recording for viewing or downloading?
Follow the steps below to find the recordings of channel meetings:
- Open the Microsoft Teams desktop app.
- Open your channel and click Files at the top.
- Click the Recordings folder and you’ll see all of the recordings.
For non-channel meetings, the recordings will go to the Recordings folder in the OneDrive directory of the person who started the meeting. Follow the steps below to access the recordings:
- Open File Explorer on your PC and go to your OneDrive location.
- Open the Recordings folder to show all recordings.
However, some companies are still using Microsoft Streams to save recordings. Follow the steps below to find Teams recording in Microsoft Stream:
- Go to the Microsoft Streams site.
- Click on My Account and select Meetings.
- Click the Meetings tab at the top, and you’ll see all of Teams meeting recordings.
- Click the three dots icon and select Open in Microsoft Stream, click the three dots in the Microsoft Stream portal, and click Download original video to download the Teams recording.
How to Record a Meeting in Teams for Free
As we mentioned above, only meeting organizers with the right license can record a Teams meeting. If you’re a participant, how to record a meeting in Teams.
Fortunately, you can use other screen recorders like MiniTool Video Converter to record a Teams meeting for free. MiniTool Video Converter is a free screen recorder without time limits and watermarks, and it can save the recording in MP4, WMV, MKV, AVI, MOV, FLV, and TS formats.
MiniTool Video ConverterClick to Download100%Clean & Safe
Step 1. Launch MiniTool Video Converter after the installation.
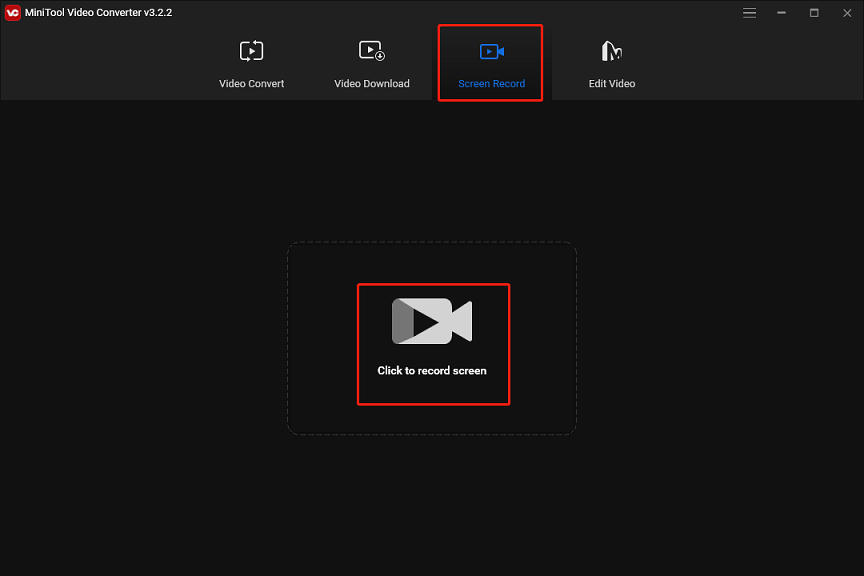
Step 2. Go to the Screen Record tab, and tap on the Click to record screen area to activate MiniTool Screen Recorder.

Step 3. If you want to record the entire screen, click the arrow next to Full screen, choose Select region, and drag your mouse to select the recording area.
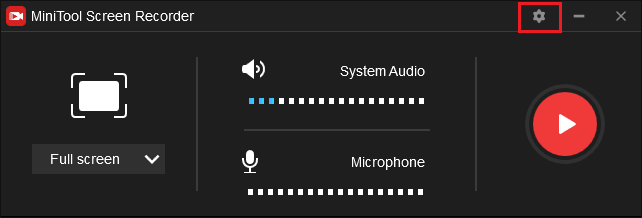
Step 4. Click the Settings icon at the top right to change the output folder, video format, video frame rate, mouse settings, and more. Click OK to save your changes.

Step 5. Click the red Record button to start recording. Press F9 to pause/resume recording. Press F6 to stop recording. Immediately, you can see the video recording displayed on the MiniTool Screen Recorder Video list. Right-click on it to preview, delete, rename the recording, or check its folder.
Conclusion
As an organizer of a company, you might have organized many meetings and have many recordings. Where are Teams recordings stored? Follow the above instructions to find your recordings.


User Comments :