VLC Media Player is a free and universal video player that can open almost all video files. However, sometimes it may have issues with opening MP4 files. How to fix it if VLC won’t play MP4 videos? This guide from MiniTool Video Converter gives you 6 solutions.
VLC Media Player can open a wide variety of video files, and there is no doubt that MP4 is one of the native formats it supports. However, when opening MP4 files using VLC, an error sometimes occurs, prompting “Unable to open the file” and showing a black screen. Why can’t VLC play MP4 video? How to fix it if VLC won’t play MP4 videos? This post will explain possible causes and give you some solutions.
Possible Reasons for VLC Not Playing MP4
Here are common reasons for VLC not playing MP4 videos.
#1. Outdated version of VLC
If you’re using an older version of VLC Media Player, sometimes it might not play your MP4 or other video files.
#2. Missing codecs
If the required MP4 codec is missing from the VLC media player, it won’t play the video because it can’t identify the video or audio codec.
#3. Improper playback settings
VLC’s playback settings also determine whether it can play videos. Improper playback settings can cause some problems with video playback.
#4. A corrupted MP4 file
If your MP4 video file is corrupted, it can’t be played with VLC Media Player or other media players.
How to Fix VLC Won’t Play MP4
Here are 6 methods to fix VLC not playing MP4.
Method 1: Update VLC
The first simple solution is to update VLC to the latest version, which can fix some temporary glitches and bugs.
Method 2: Convert MP4 to VLC-Supported Format
MP4 supports various codec types. To enjoy a smooth playback with VLC, you’d better convert your video to MP4 encoded with H.264 and AAC. If your video has a high resolution like 4K, you can also downscale it to 1080p for better playback.
To perform this conversion task, you need a video converter, and MiniTool Video Converter is recommended here, a free video converter that supports a rich variety of video file formats. Also, it lets you change the video codec, resolution, frame rate, and bitrate.
MiniTool Video Converter is free to convert video and audio files, and it won’t add a watermark to the converted video.
Step 1. Click the button below to download and install MiniTool Video Converter on your computer.
MiniTool Video ConverterClick to Download100%Clean & Safe
Step 2. Run MiniTool Video Converter and click on the Add or Drag files here to start conversion area to upload your MP4 video file. Then, click the diagonal arrow circled in the below screenshot.
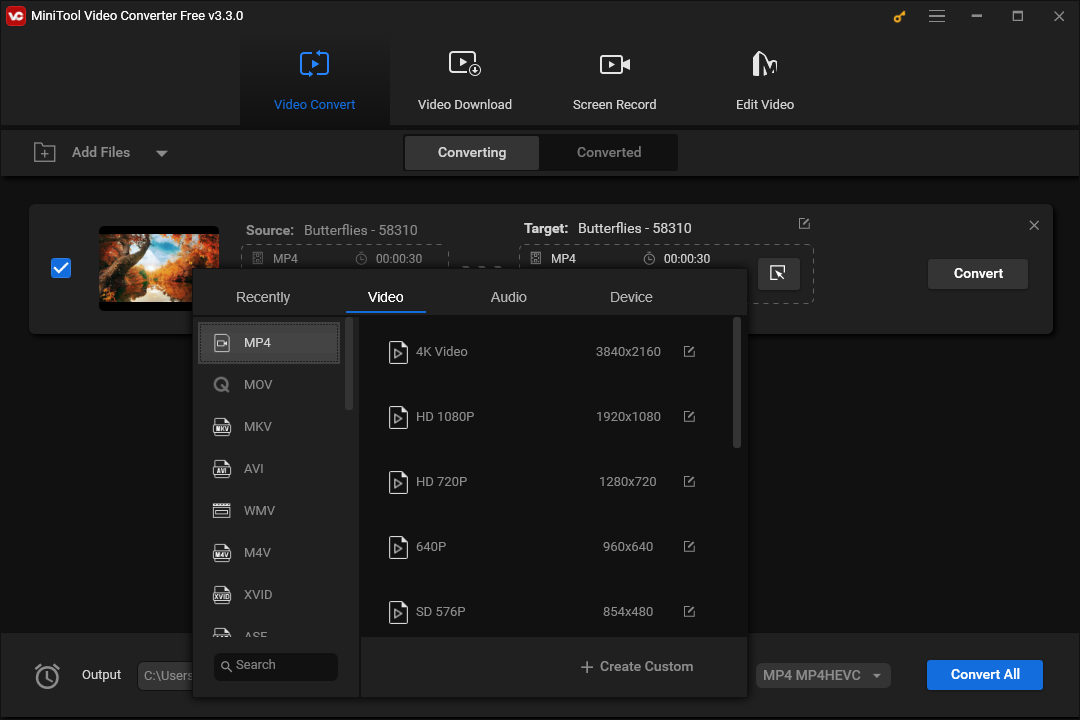
Step 3. Go to the Video tab, select MP4 on the left, and choose the preset with the desired video resolution. Alternatively, you can click the + Create Custom button to create a custom MP4 format by editing some parameters.
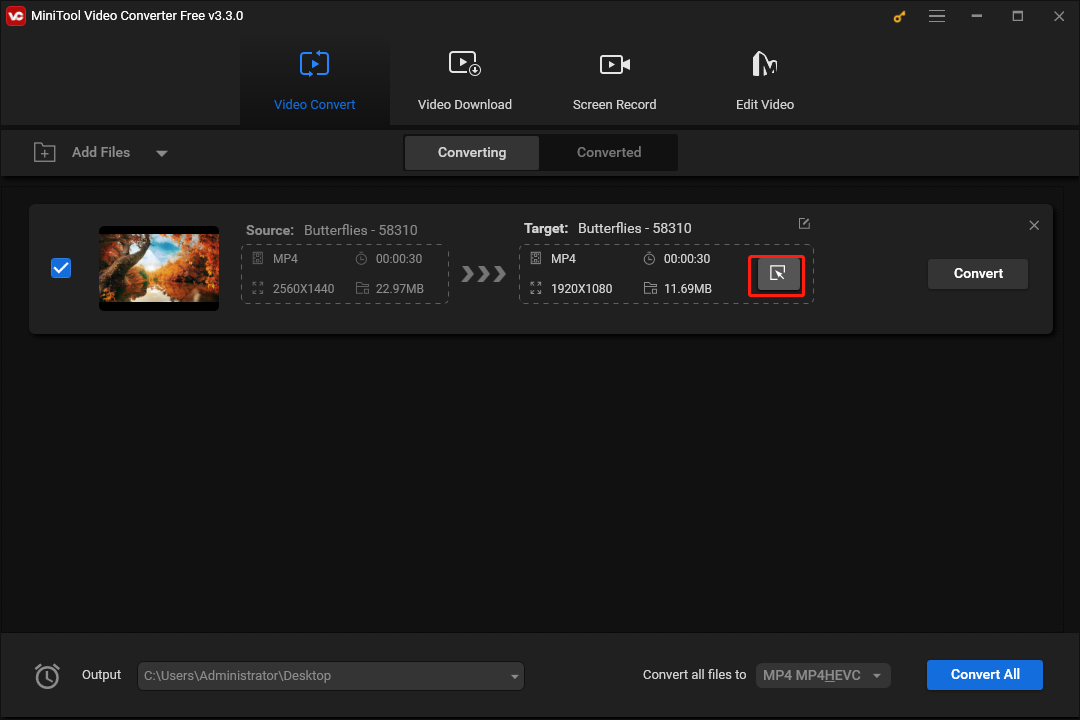
Step 4. Click the Output menu at the bottom and choose Browse to select the folder to save your converted video. Click Convert to start the conversion task.
Method 3: Use Another Video Player
You can try another video player when VLC won’t play MP4 files. There are many other VLC alternatives for smooth playback. If the MP4 video can be played with other media players, then the video file is not corrupted. On the contrary, if the playback fails, it means that the video file is damaged. If so, you need a video repair tool to repair it.
MiniTool Video Repair allows you to repair broken MP4, MOV, M4V, and F4V videos for free as well as videos from GoPro, Sony, Canon, DJI drones, and more. You can use this application to fix your MP4 video and then try opening it with VLC again.
MiniTool Video RepairClick to Download100%Clean & Safe
Method 4: Disable Hardware Decoding in VLC
Another way to fix VLC Media Player not playing MP4 is to disable hardware decoding.
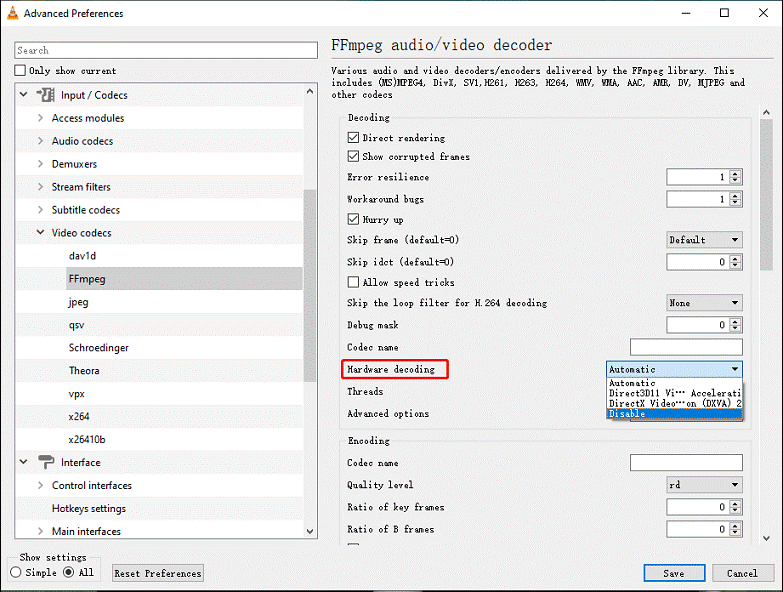
Step 1. Open the VLC Media Player and click Tools > Preferences.
Step 2. Click All at the bottom left corner.
Step 3. On the right side, change the Hardware decoding setting from Automatic to Disable.
Step 4. Click Save to save your changes. Relaunch VLC and play your MP4 file again.
Method 5: Change the Video Output Setting
You can also change the video output module to fix the VLC MP4 playback issue.
Step 1. In the VLC Media Player, select Tools > Preferences.
Step 2. Click the Audio tab at the top, ensure the Enable audio option is selected, and click Save.
Step 3. Go to the Video tab, make sure that the Enable video option is selected, change the Output setting from Automatic to OpenGL video output, and click Save.
Step 4. Restart your VLC and then see if the MP4 playback issue is solved.
Method 6: Reinstall VLC
To fix VLC not playing MP4, you can also reinstall this application. First, uninstall it from your computer. Then, go to the VLC official website to download VLC again. Once the installation is finished, open it and try playing the MP4 file.
Tip: Best MP4 Video Editor
If you want to edit your MP4 video, MiniTool MovieMaker, an easy-to-use and feature-rich video editor, is a good choice. This application allows you to trim, split, crop, rotate, reverse, speed up, and slow down videos, change the video aspect ratio, apply filters, transitions, and motion effects, add stickers and text, etc.
After editing, you can export the MP4 video up to 1080p for free and without watermarks.
MiniTool MovieMakerClick to Download100%Clean & Safe
Conclusion
If VLC won’t play MP4, you can try the above 6 methods to fix the problem. Hope these ways can work for you. And if you have any questions about MiniTool Video Converter or MovieMaker, please contact us via [email protected] for help.


![[4 Ways] Fix “VLC Could Not Open the MP4A Audio Encoder” Windows](https://images.minitool.com/videoconvert.minitool.com/images/uploads/2022/05/vlc-could-not-open-mp4a-audio-encoder-thumbnail.png)
User Comments :