Have you ever encountered the "to play this video you need a codec" or "the codec used to compress the video is not supported" issue? I know how frustrating it can be. You’re not alone in this struggle. But fret not! In this guide offered by the free video converter, I will begin with the introduction of video codecs, explain the causes for it, and end with the highlights: 5 solutions for this issue.
Picture this: You’ve had a long, tiring day and all you’re looking forward to is unwinding with some great videos. You click on that video file, all excited, expecting wonderful entertainment. But instead, what you see is that infuriating message: “To play this video you need a codec” or “The codec used to compress the video is not supported”. Such a bummer! Why does this happen? How to solve it?
Here’s good news, this post is going to dig deep into video codecs, understand why this problem keeps popping up, and most importantly, arm ourselves with 5 easy and quick solutions. So, grab a snack, get comfortable, and let’s embark on this journey to get your videos playing perfectly again!
Part 1. What Exactly Is a Video Codec
A video codec plays an important role in the video world. It is software or hardware and its main job is to compress and decompress digital video. Without codecs, videos could be massive, making them difficult to download, stream, or even store on your device.
There are many video codecs, each with unique features. Here I list the most common ones.
- H.264 (AVC): This is one of the most widely used codecs. It offers a great balance between video quality and file size, making it popular for online streaming platforms like YouTube and Netflix as well as for storing videos on mobile devices.
- H.265 (HEVC): An upgrade from H.264, H.265 can achieve even better compression ratios, meaning you can get the same quality video with a smaller file size. However, it requires more processing power to encode and decode, so older devices may not support it well.
- VP9: Developed by Google, VP9 is an open-source codec. It’s designed to provide high-quality video at low bitrates, making it a great choice for web-based video content.
- AV1: Another open-source codec, AV1 aims to deliver better video quality than H.264 and H.265 at the same bitrate. It’s becoming more prevalent as technology advances, but also has some compatibility issues with older systems.

Part 2. Why Are You Greeted with the “To Play This Video You Need a Codec” Message
Now that we know what a video codec is, let’s figure out why you encounter the "to play this video you need a new codec" or "the codec used to compress the video is not supported" issue. There are several reasons behind it:
Cause 1. Incompatible Software
There are many video codecs and each of them is compatible with different players. When the video codec is incompatible with your player, the playback issue will occur.
Cause 2. Outdated Software
With the increasing need for more efficient file compression and higher quality, many new codecs are created. And those codecs may fail to be played on the old version of the your media player.
Cause 3. Missing Codec Installations
Sometimes, the codec required to play a particular video simply isn’t installed on your system. This can happen if you’ve downloaded a video from an unusual source or it was encoded with a less common codec.
Cause 4. Corrupted Video Files
The video file itself could be corrupted during the download or transfer process. And your device could wrongly assume that a new codec is needed.
Part 3. How to Fix the “To Play This Video You Need a Codec” Problem
There are different reasons for the “to play this video you need a codec” or "the codec used to compress the video is not supported" problem. There are also multiple ways to solve it.
Method 1. Convert Video Format
How to fix video codec not supported issue? you can use a video converter to convert it to a more commonly used format. Here I recommend MiniTool Video Converter for the conversion task, which is the best free conversion tool I have ever used.
About MiniTool Video Converter
MiniTool Video Converter is a free and easy video converter for Windows. This tool has no size limes, watermarks, ads, or bundles. It supports a wide range of video codecs, such as H.263, H.264, H.265, MPEG-4, VP8, VP9, AV1, libdav1d, DivX, Xvid, etc. Besides video codec, this tool also allows you to adjust the frame rate, resolution, and bitrate for video, as well as the codec, sample rate, channel, and bitrate for audio.
That’s not stop! MiniTool Video Converter can convert multiple audio and video container formats. For example, you can convert MP4 to MP3, AVI to MOV, WMV to M4B, M4V to OGV, etc. With its batch conversion feature, you can convert up to 5 files simultaneously, saving you time and energy.
What also surprises me is that this free tool can also function as a screen recorder that can record any activities on your screen with the system sound, microphone, or both. It also gives you the flexibility to adjust the recording area. Additionally, MiniTool Video Converter can reduce your file size and download YouTube videos, music, subtitles, and playlists.
Now, hit the button below to download and install MiniTool Video Converter on your device and begin the conversion journey with me.
MiniTool Video ConverterClick to Download100%Clean & Safe
To Solve the “To Play This Video You Need a Codec” Issue with MiniTool Video Converter
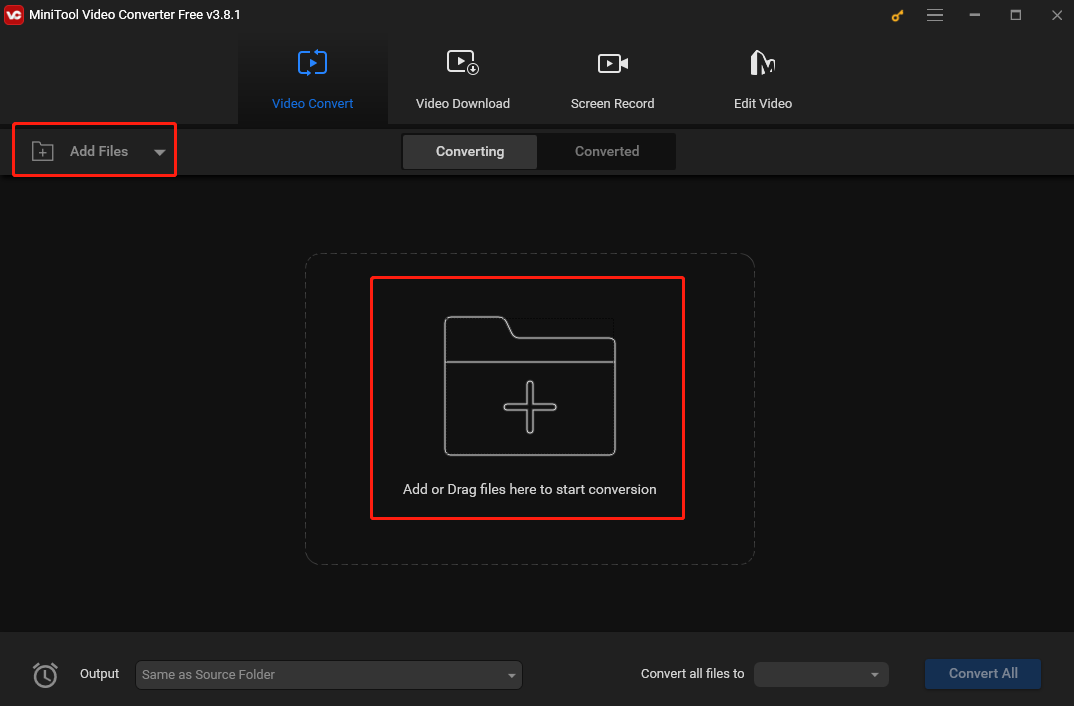
Step 1. After installation, open MiniTool Video Converter and click the Add Files button or the Add or Drag Files here to start conversion area to add the target file.
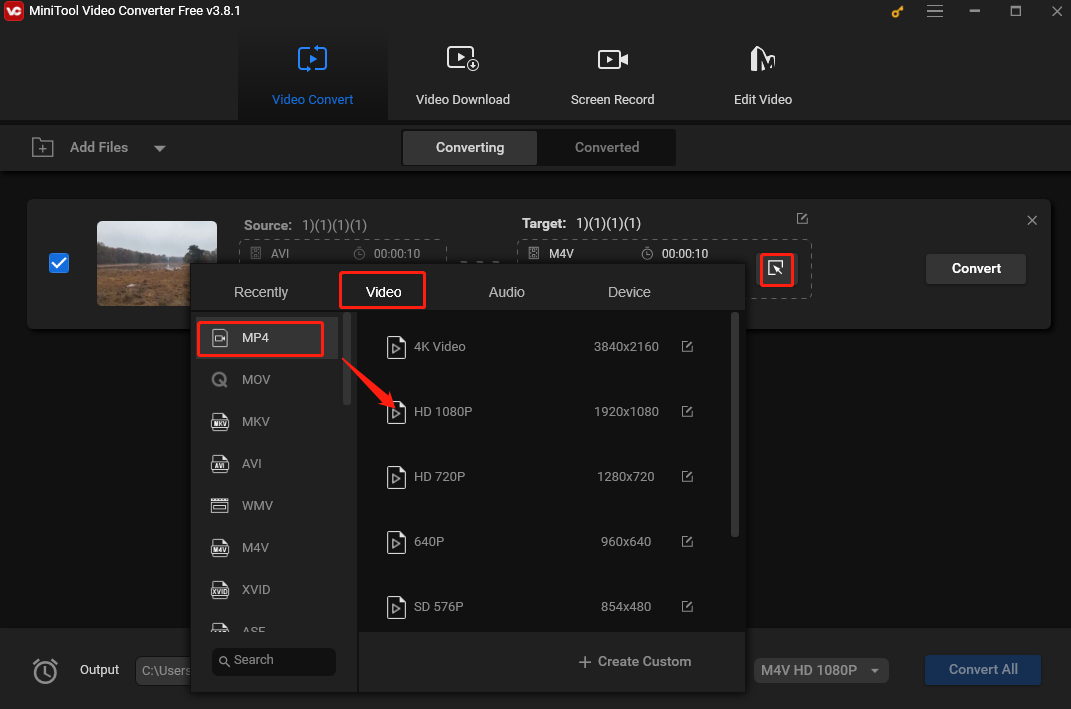
Step 2. Since MP4 coded with H.264 is compatible with a wide range of devices, so here I will show to how to convert your file to this format. Also, you can check your device and look for the container formats and codecs it supports.
Click the Edit icon to open the output format window. In the popup, go to Video and choose MP4. (MiniTool Video Converter sets H.264 as the default codec for MP4.)
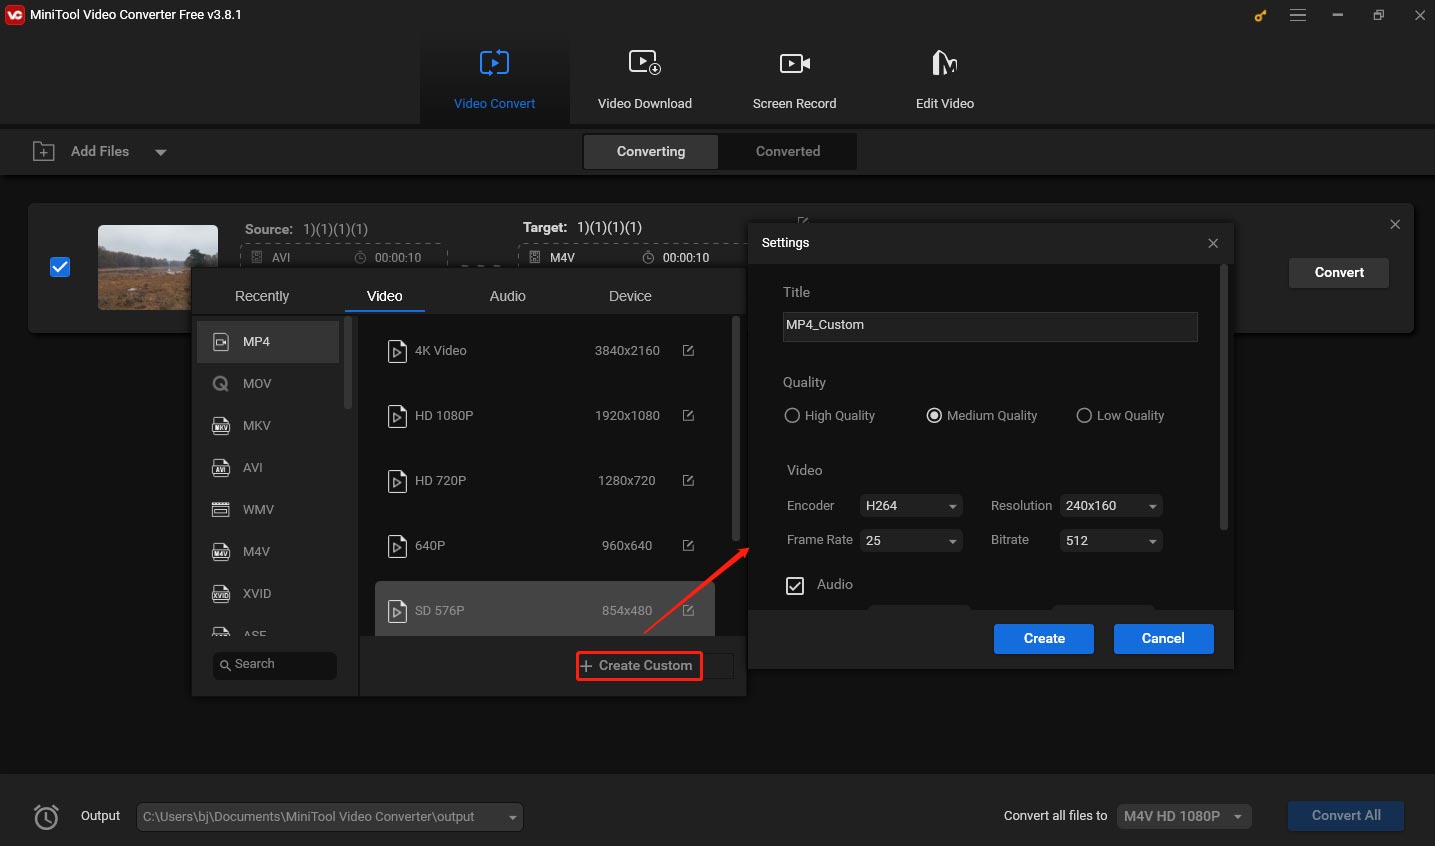
Step 3. If you are not satisfied with the premade profile, click Create Custom to open the Settings window. Here, you can adjust the video codec, resolution, bitrate, and frame rate, as well as the audio codec, sample rate, bitrate, and channel. Then, click Create to save the changes and choose the newly created profile.
Step 4. When all set, click the Convert button to begin the conversion process.
Step 5. When “Success” shows up under “Convert”, it means the process is over. Then, click Converted and click Show in folder to locate the converted file.
Method 2. Update Your Software
As mentioned above, outdated software may cause the playback issue. The world of video technology is constantly evolving and new codecs are being developed all the time, which may not be played on your old version of the media player. By staying informed and keeping your software up to date, you’ll be able to enjoy a wide variety of video content.
Most popular video players like Windows Media Player and VLC Media Player regularly release updates that include support for new codecs.
- Windows Media Player: In Windows, go to the Microsoft Store, search for Windows Media Player, and check if there’s an update available. Click Get or Update to install it.
- VLC Media Player: Open VLC and go to Help > Check for Updates. If an update is available, follow the on-screen instructions to install it.

Method 3. Install Codec Packs
If updating your video player doesn’t do the trick, you can try installing codec packs. These are collections of various codecs that can add support for a wide range of video formats.
- K-Lite Codec Pack: This is a very popular codec pack. You can download it from the official website. There are different versions available, such as Standard, Full, and Mega. Choose the one that suits your needs. And then follow the on-screen instructions to install it on your device. When the installation is complete, try playing the video file on your player to check if the error has been fixed.
- LAV Filters: You can also choose the LAV Filters codec pack. It’s open-source and provides high-quality decoding for many video formats. Download and install it on your device and it should start working with your existing video player to enable playback of previously unsupported videos.
Method 4. Try Another Video Player
You can try another video player to fix the issue. VLC Player and Windows Media Player are popular, but today I’m going to introduce you to another handy and free player for Windows – MiniTool MovieMaker.
MovieMaker is a free video editor without watermark that helps you to create a wonderful video with a few simple clicks. It includes multiple editing features, such as trimming, cropping, adjusting video speed, changing video color, adding effects, etc.
MiniTool Video allows for importing multiple video formats: MP4, 3GP, MPG, WMV, MOV, MKV, FLV, AVI, VOB, RMVB, and WEBM. If your video format is on the list, you can use it to play your video.
Step 1. Click the button below to download and install MiniTool MovieMaker on your computer.
MiniTool MovieMakerClick to Download100%Clean & Safe
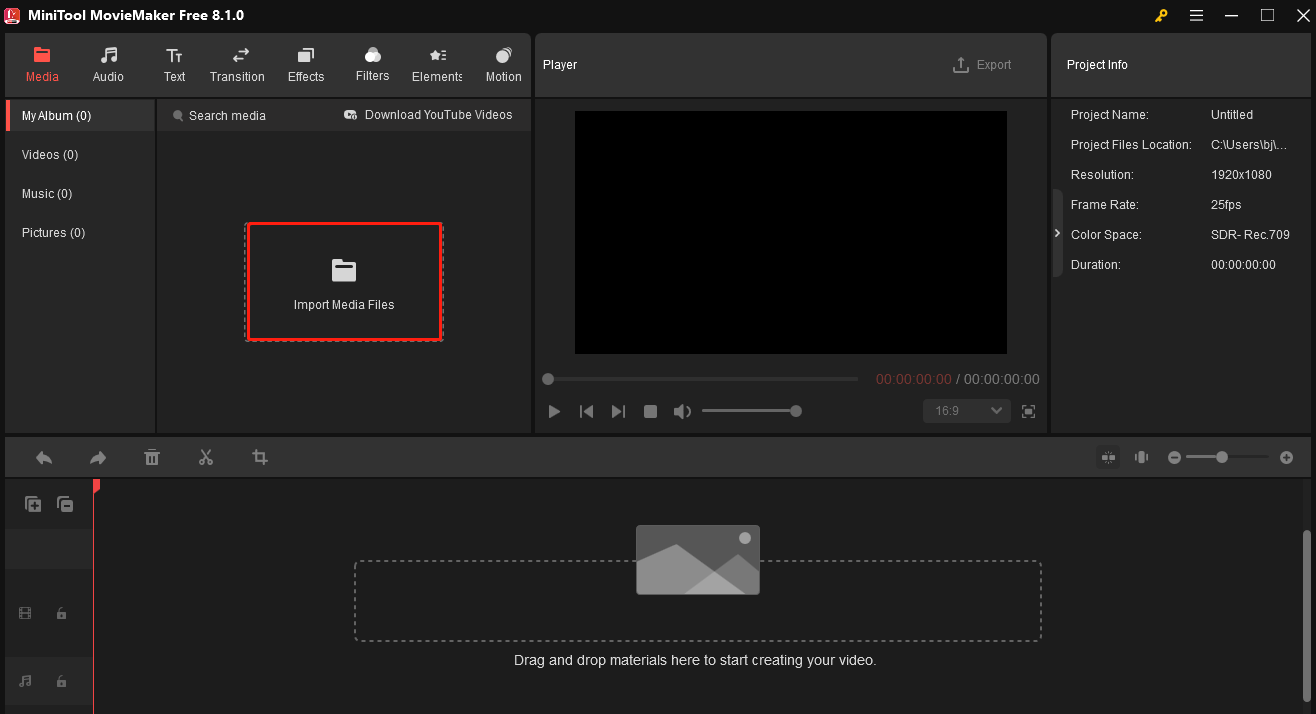
Step 2. Close the project window and click Import Media Files to add the target video to this program.
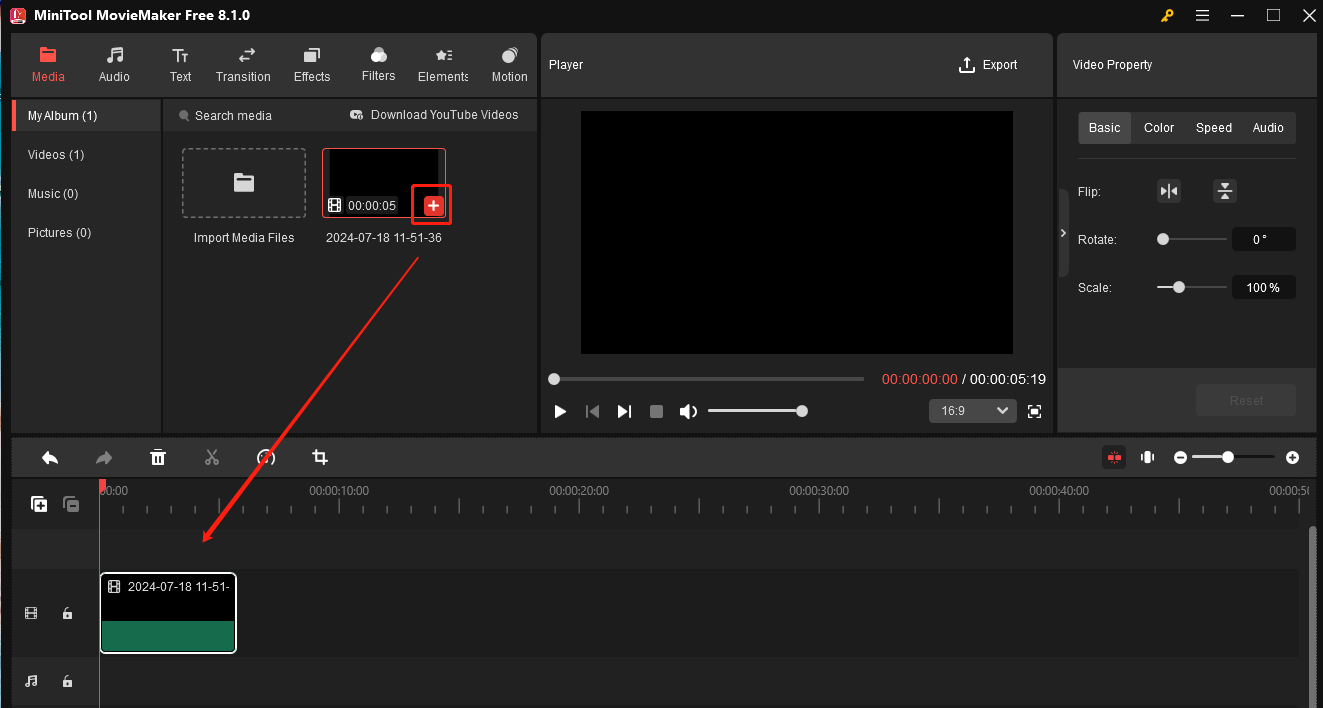
Step 3. Click the + icon on the bottom-right corner of the video thumbnail to add it to the timeline.
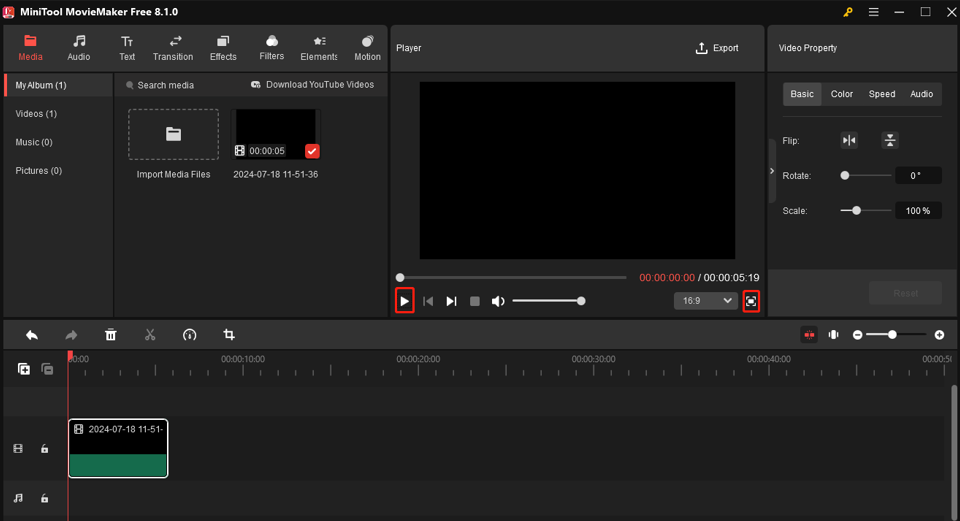
Step 4. Go to the Player section and click the play icon in the bottom-left corner to watch it in a small window. You can also click the Full Screen icon in the bottom-right corner to enjoy it in the whole screen.
Method 5. Repair Corrupted Video Files
If the solutions mentioned above don’t work out, then the video file may be corrupted. To repair it, you can use the following 2 tools.
1. MiniTool Video Repair
MiniTool Video Repair is easy to use and can repair corrupt MP4, MOV, M4V, F4V videos, etc. for free.
Step 1. Download and install MiniTool Video Repair on your device.
MiniTool Video RepairClick to Download100%Clean & Safe
Step 2. Launch it and click Add video(s) and start repairing to load the corrupted video.
Step 3. After that, click Repair to start repairing.
2. VLC Media Player
VLC Media Player can sometimes repair minor video file corruption.
Step 1. Download, install, and open VLC.
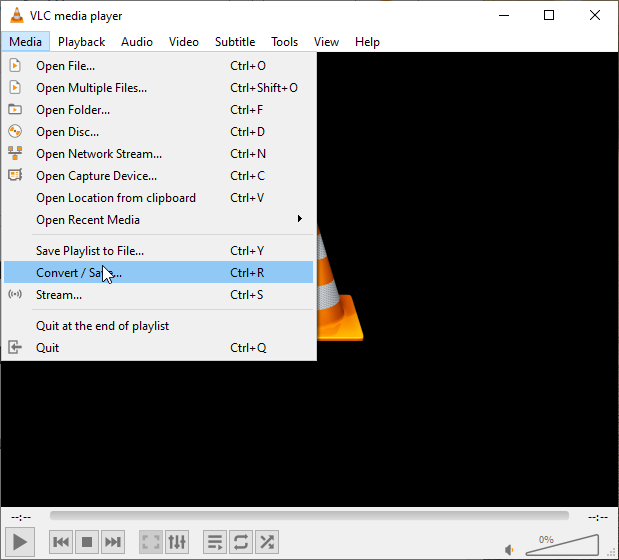
Step 2. Then, go to Media in the top menu bar and select Convert/Save from the drop-down list.
Step 3. In the next window, click Add to add the corrupted file, then click Convert/Save in the bottom-right corner.
Step 4. Click the Profile box. From the drop-down menu, choose a profile similar to the original video format.
Step 5. Click Browse to choose a destination to save the repaired video and click Start to begin the process. Then the small issues within the video file can be fixed.
Conclusion
Well, there you have it! In this guide post, we’ve explored video codecs, learned why you might encounter the “To play this video you need a codec” or "The codec used to compress the video is not supported"message, and discovered 5 effective ways to fix it. Whether it’s converting your video format, updating your video player, installing codec packs, trying another media player, or repairing corrupted files, there’s always a solution to get your videos playing smoothly. So, the next time you see that dreaded codec message, there’s no need to panic.
Finally, if you run into any issues while using MiniTool Video Converter or MiniTool MovieMaker, just reach out to me on Twitter for help.
User Comments :