Kodi is a free and open-source media player that supports many media formats. What formats does Kodi can play? Can Kodi play MKV files? How to fix it if Kodi fails to play your MKV file? In this post from the free file converter, I will explore the various file formats that Kodi supports, uncover the reasons why playing MKV files might sometimes fail, and most importantly, provide you with 3 solutions to get those videos playing smoothly!
What Is MKV File Format
MKV, also known as Matroska, is a popular open-source multimedia container format. Inside just one MKV file, you can fit multiple video tracks, audio tracks, subtitles, pictures, or even more subtitle tracks. This makes it convenient for storing and managing multimedia content.
What’s more, MKV is compatible with a wide range of high-quality video and audio codecs, including popular ones like H.264, H.265, VP9, and AV1 for video, and MP3, AAC, AC3, DTS, and FLAC for audio. This allows for high-quality playback of multimedia content.
However, because MKV files support lossless compression (which is great for quality), they usually end up being large in size.
Can Kodi Play MKV Files?
You might be thinking: “Can Kodi play MKV files?” Well, before I jump right into answering that question, let’s take a good look together at what formats Kodi supports.
Kodi Supported Formats
- Video Formats: MKV, AVI, MPEG, WMV, ASF, FLV, MOV, MP4, OGG H .263, H.264, H.265, etc.
- Audio formats: MP3, AAC, AC3, M4A, DTS, etc.
- Digital picture/image formats: BMP, JPEG, GIF, PNG, TIFF, MNG, ICO, PCX, etc.
- Subtitle formats: AQTitle, ASS/SSA, CC, JACOsub, MicroDVD, MPsub, OGM, PJS, RT, SMI, SRT, SUB, etc.
Reasons Why Kodi Might Fail to Play MKV Files
Now we can easily answer the question raised above. Yes, Kodi does support the MKV format. Now, you might be scratching your head and wondering, “If Kodi supports MKV, then why on earth can’t it play my MKV files?" Well, there are quite a few reasons for this and I’m going to share the 2 main ones with you.
- Incompatible Codecs. Incompatibility is usually the root cause of most video playback issues. MKV is a container format that can use a variety of codecs to compress and encode video and audio data. If the codec your MKV uses is not supported by Kodi, that will cause the playback issue.
- Corrupted Files.If the MKV file itself is corrupted, Kodi will have trouble playing it. File corruption can occur due to various reasons, such as interrupted downloads, bad sectors on the storage device, or issues during the file conversion process. A corrupted MKV file might cause Kodi to freeze, crash, or display error messages while trying to play.
3 Easy Methods to Fix the Kodi Can’t Play MKV File Issue
- Convert MKV to MP4
- Repair corrupted MKV File
- Try Another Media Player
Method 1. Convert MKV to MP4
How to play MKV files on Kodi when their codecs just don’t get along with Kodi?
Well, one way to address this is by changing the codec to a Kodi-supported one while keeping MKV as the container format. However, I’d highly recommend converting MKV to MP4 encoded with H.264.
MP4 with H.264 video codec has wide compatibility. Plus, the file size is relatively small compared to MKV while maintaining a really good quality.
In this part, I’m going to share 3 handy and free tools that can help you out with this task. Let’s dive in!
Tool 1. MiniTool Video Converter [Most Recommended]
MiniTool is a free file converter that has always been my go-to solution to video incompatibility.
Reasons Why You Should Try MiniTool Video Converter
- Easy to Use. It has an intuitive interface, making it easy to navigate. I still remember the very first time I used it. When I opened this program, I easily spotted the buttons to load and convert the file. The whole process was quick and hassle-free.
- No Watermarks or Size Limits. Unlike some converters, you need to subscribe to it to remove the watermark or convert files without size limits. As a completely free tool, MiniTool Video Converter can convert files as large as you want and doesn’t add any watermarks to the converted files.
- Give You Control Over the Converted File. This tool is flexible and gives you a lot of control over the converted file. It allows you to change to the video encoder, resolution, frame rate, and bitrate. As for audio, you can customize its encoder, sample rate, bitrate, and channel. You can also personalize the name and destination folder.
- Support a Wide Range of File Formats. It supports many video and audio formats, including MKV, MP4, AVI, MOV, WebM, MP3, AAC, AC3, etc.
- Offer Tailored Formats for Multiple Devices and Platforms. This tool provides you with preset profiles for devices like Android, Samsung, and Android, as well as for social media such as Facebook, YouTube, and Instagram.
- Include a Batch Conversion Feature. To save you time, you can convert up to 5 files simultaneously with it.
Step-by-Step Guide to Convert MKV to Kodi with MiniTool Video Converter
Step 1. Hit the button below to download and install MiniTool Video Converter. Then open it.
MiniTool Video ConverterClick to Download100%Clean & Safe
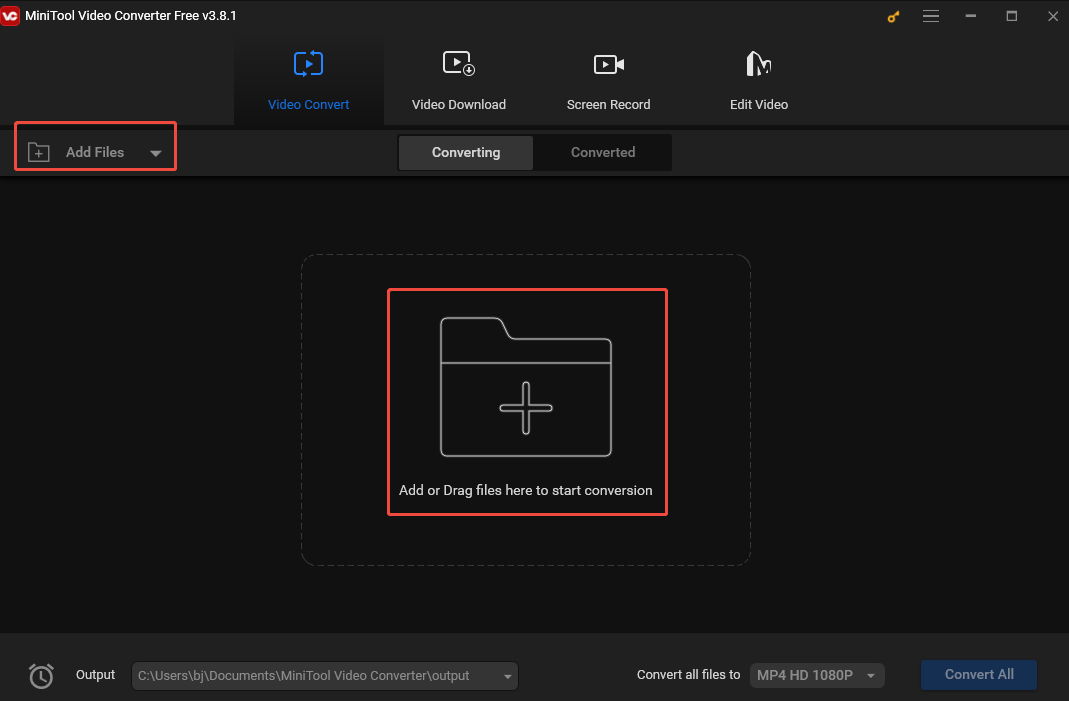
Step 2. Click the Add Files button or the Add or Drag Files here to start conversion area to load the MKV file.
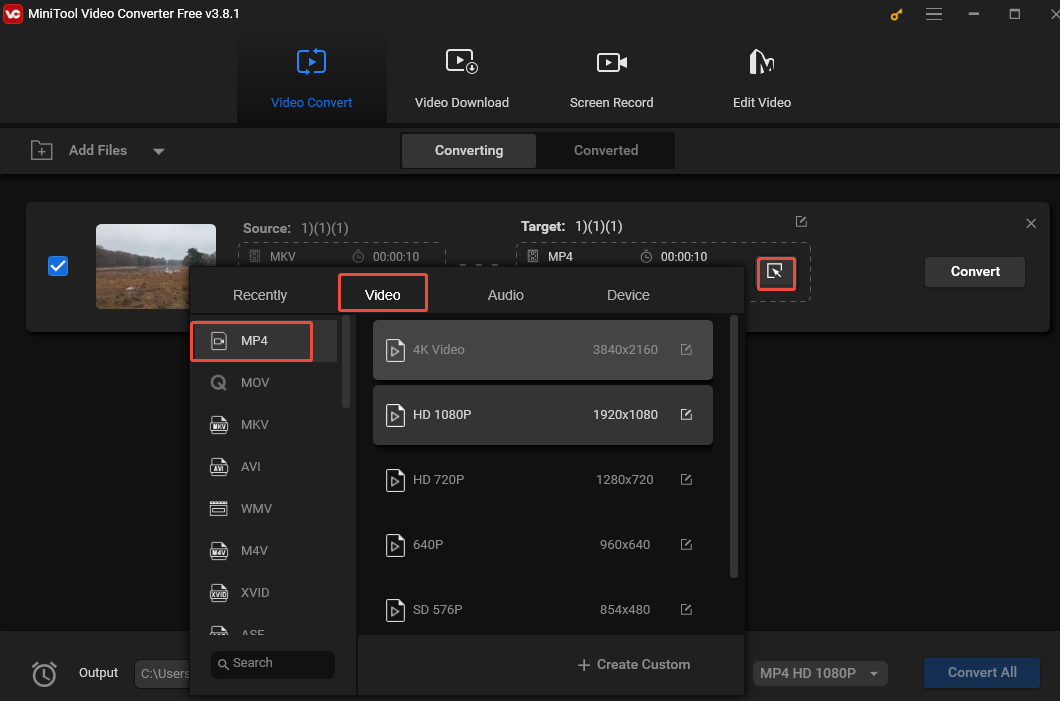
Step 3. Click the Edit icon under Target to open the output format window. If you have loaded multiple MKV files to this program, click Convert all files. In the following pop-up, go to the Video tab, select MP4 from the left sidebar, and pick your desired profile on the right.
The tool sets H.264 as the default video codec for MP4 by default. So, you don’t need to choose them manually.
Step 4. If you want to give a name to the converted file and choose a destination folder to save it, just click the pen icon next to Target.
Step 5. Click the Convert button to convert MKV to MP4. Or click Convert All to batch convert the files.
Step 6. Once finished, go to the Converted tab and click Show in folder to locate the converted file(s).
Other Useful Features of MiniTool Video Converter
- Record any on-screen activities without time limits or watermarks.
- Capture your screen with system audio, microphone, or both.
- Record your entire screen or a specific area.
- Allow you to customize the recording frame rate, duration, etc.
- Capture your 4K screen with different qualities.
- Enable you to pause and resume the recording process whenever you want.
- Reduce video and audio file size.
- Download YouTube content, such as music, videos, playlists, and subtitles.
Tool 2. MiniTool MovieMaker
As the name suggests, MiniTool MovieMaker is an editor that helps you create wonderful movies easily. But, it can also function as a video converter.
MiniTool MovieMaker supports a wide range of file formats, including MKV, MP4, MOV, AVI, etc. With its simple interface, you won’t have any trouble finding where to import your files or export your finished projects. Everything is so straightforward.
Before you export your video, if you want, you can use this free tool to refine your video by cutting the unnecessary parts, adjusting the speed and color, adding some visual effects, etc.
Follow the steps below to convert MKV to MP4 with MiniTool MovieMaker.
Step 1. Click the button below to download and install MiniTool MovieMaker.
MiniTool MovieMakerClick to Download100%Clean & Safe
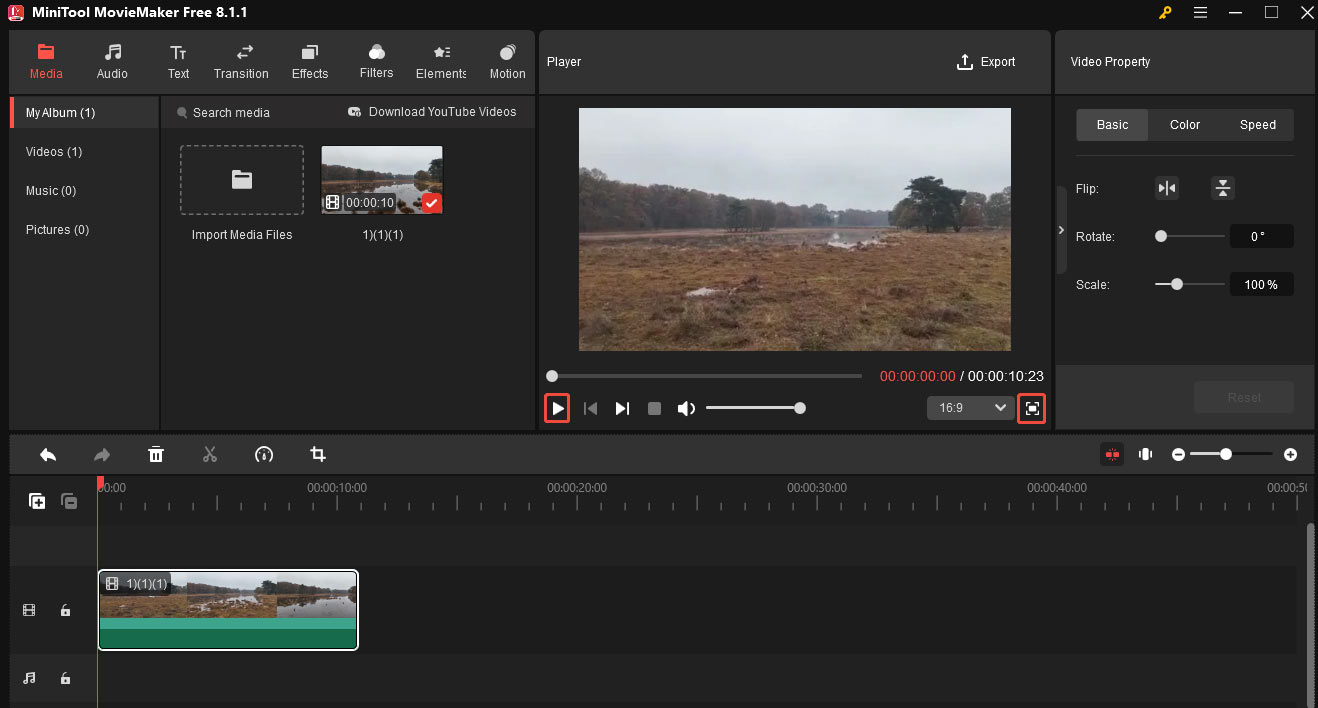
Step 2. Open this program. Click Import Media Files to import the MKV file to this program.

Step 3. Click the plus icon at the bottom-right corner of the MKV video thumbnail to add it to the timeline. You can also directly drag and drop it to the timeline.
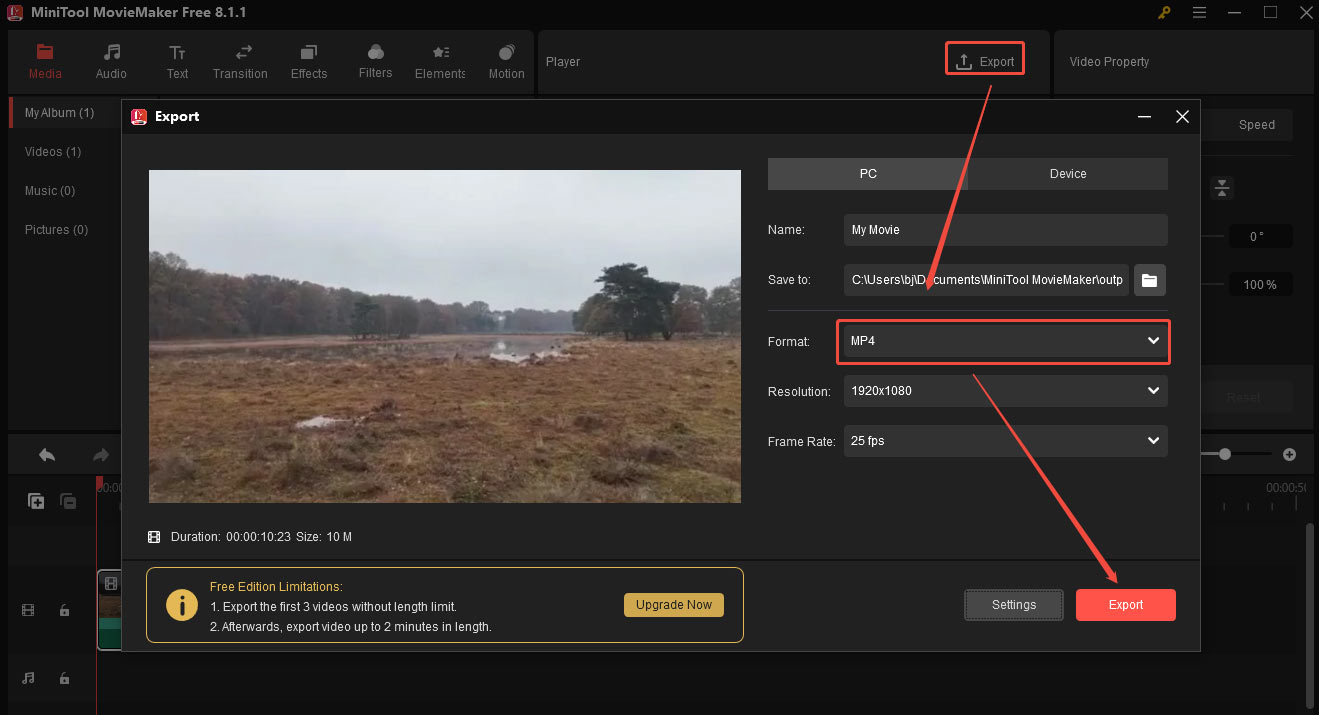
Step 4. Choose Export in the toolbar. When the Export window pops up, you’ll notice that the MP4 format is already selected for you by default. This tool also automatically sets H.264 as the default video codec specifically for the MP4 format. So, all you need to do next is click the Export button in the Export window and wait for the process to finish.
Step 5. Once finished, a small window will pop up. You can choose Close to shut it down or choose Find Target to locate your converted file.
Tool 3. WonderFox HD Video Converter Factory Pro
WonderFox HD Video Converter Factory Pro is also a great option to convert MKV to Kodi. This tool is super easy to use yet quite professional! It comes with a wide range of features that make the conversion process a breeze.
One of the best things about it is its extensive support for various file formats. Whether you need to convert your MKV file to MP4, MOV, M4V, WMV, AVI, or WebM, WonderFox HD Video Converter Factory Pro has got you covered.
Let’s see how to convert MKV to Kodi with WonderFox HD Video Converter Factory Pro.
Step 1. Download, install, and launch WonderFox HD Video Converter Factory Pro.
Step 2. Click Converter and click Add Files to the target MKV video.
Step 3. Click Output folder to customize the output folder.
Step 4. Click the Click to change output format area on the right, go to Video, and choose MP4 as the output format.
Step 5. Click Run to start the conversion.
Method 2. Repair the Corrupted MKV File
If your MKV file is corrupted, you can use EaseUS Fixo Video Repair to fix it.
Step 1. Download and install EaseUS Fixo Video Repair. Then, open it.
Step 2. Click Video Repair and click Add Videos to add the corrupted MKV file.
Step 3. Click the Repair button behind the file to start the repair process. If you have added multiple MKV files, click Repair All.
Step 4. Once finished, click Save or Save All.
Method 3. Try Another Media Player
If neither of these 2 methods works, don’t worry! You can give another media player a shot. There are 2 really convenient and completely free tools perfect for this task.
1. MiniTool MovieMaker
Yes, besides editing and converting, MiniTool MovieMaker can also serve as a media player. If you haven’t had this tool on your PC yet, click the button below to download and install it.
MiniTool MovieMakerClick to Download100%Clean & Safe
Step 1. Adding the MKV file by clicking the Import Media Files button. Then, drag it to the timeline.
Step 2. Go to the Player section. If you’d like to watch the MKV video in a small window, just click the play icon at the bottom-left corner. But if you want to enjoy the content across your whole screen, then click the Full Screen button at the bottom-right corner.
2. VLC media player
VLC media player is a popular and powerful player that can run on Windows, Mac, and Linux. With its wide format compatibility, it can play almost any video or audio file. The interface is clean and intuitive. Even if you’re new to using media players, you can quickly figure out how to play, pause, skip, or adjust the volume.
Step 1. Download and install VLC media player. Then, run it.
Step 2. Click Media on the top menu bar and select Open File.
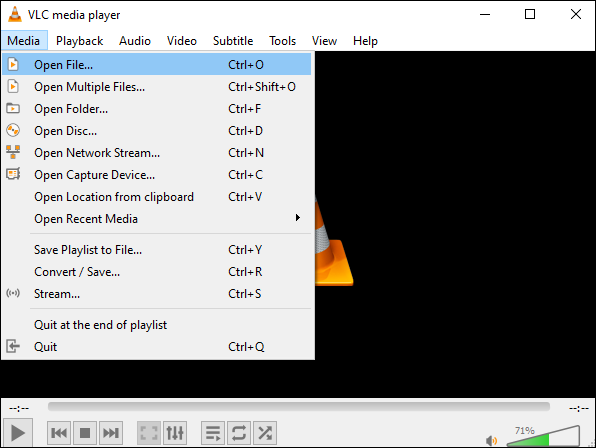
Step 3. In the following file window, choose the MKV file you want to play and click Open. After that, the tool will automatically start playing it.
Conclusion
Can Kodi play MKV files? Kodi can indeed play MKV files. However, this player can sometimes encounter issues when dealing with these files. By understanding the reasons behind potential playback failures, such as incompatible codecs and file corruption, you can take the appropriate steps to resolve them.
This post offers 3 methods, each with detailed instructions, to help you solve the playback issue, including converting MKV to MP4, repairing the corrupted file, and trying another media tool. So, just pick one method that you like and don’t let playback problems stop you from enjoying your videos.
Finally, if you have any issues while using MiniTool Video Converter and MiniTool MovieMaker, just contact me on Twitter.
User Comments :