How to reduce the file size of F4V videos? This post shows you how to compress F4V file with free video compressors, including MiniTool Video Converter, FreeConvert, and Zamzar.
Is your F4V file too large to upload to some platforms, such as TikTok and Flickr? If so, it is an ideal choice for you to compress F4V file to bypass the file size limit. Don’t know how to do that? Just read the following content to find out.
How to Compress F4V Files
You can reduce the file size of F4V videos with MinITool Video Converter, FreeConvert, or Zamzar.
Method 1. Use MiniTool Video Converter (Offline)
MiniTool Video Converter is one of the best F4V compressors.
Overview of MiniTool Video Converter
MiniTool Video Converter is a watermark-free video compressor that enables you to compress various video files, such as F4V, MP4, MKV, MOV, WMV, AVI, and more. In addition, this file compressor supports batch compression. With it, you can compress up to five F4V files simultaneously.
Better than some online file compressors with a file size limit, MiniTool Video Converter allows you to compress large video files as much as possible. What’s more, it doesn’t require any payment. Even if you are a novice, you can use MiniTool Video Converter to compress F4V videos effortlessly.
How to Compress F4V File with MiniTool Video Converter
Below is a detailed guide on how to compress F4V files using MiniTool Video Converter.
Step 1. Download and install MiniTool Video Converter.
MiniTool Video ConverterClick to Download100%Clean & Safe
Click on the download button above to download and install MiniTool Video Converter on your PC. Then, launch this F4V compressor.
Step 2. Upload F4V videos.
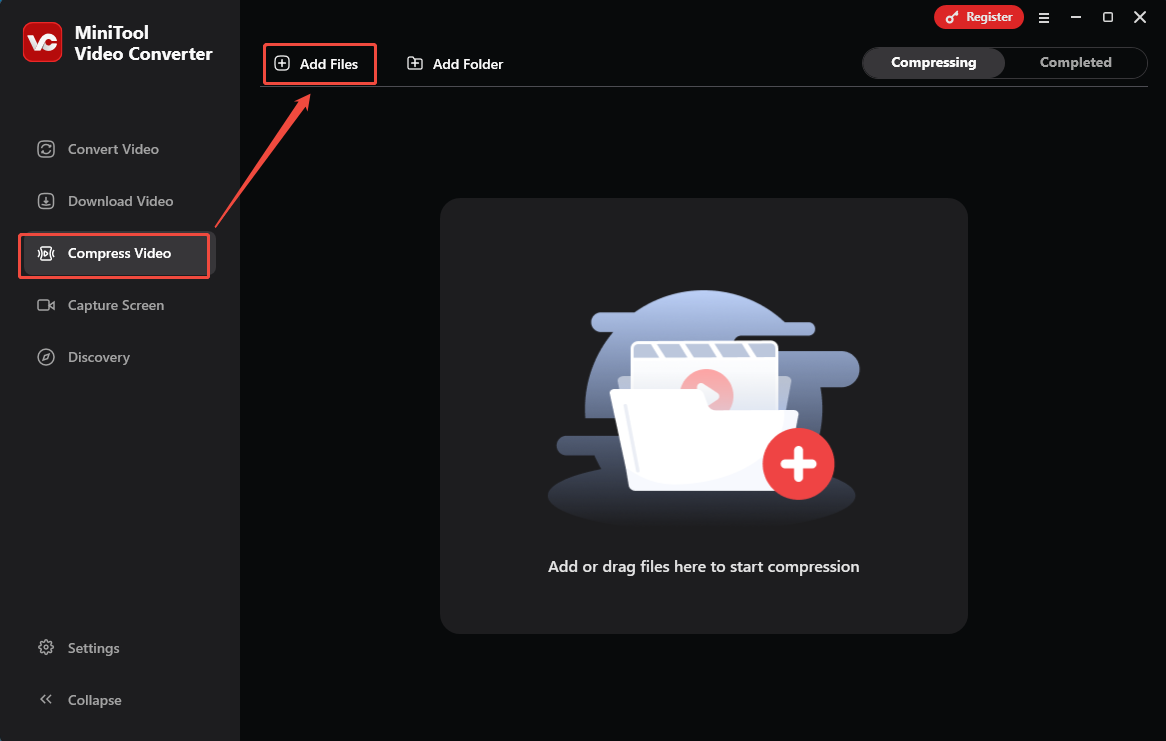
Switch to the Compress Video tab. There, click on the upper-left Add Files option to import the F4V files that you want to compress.
Step 3. Specify the compression settings.
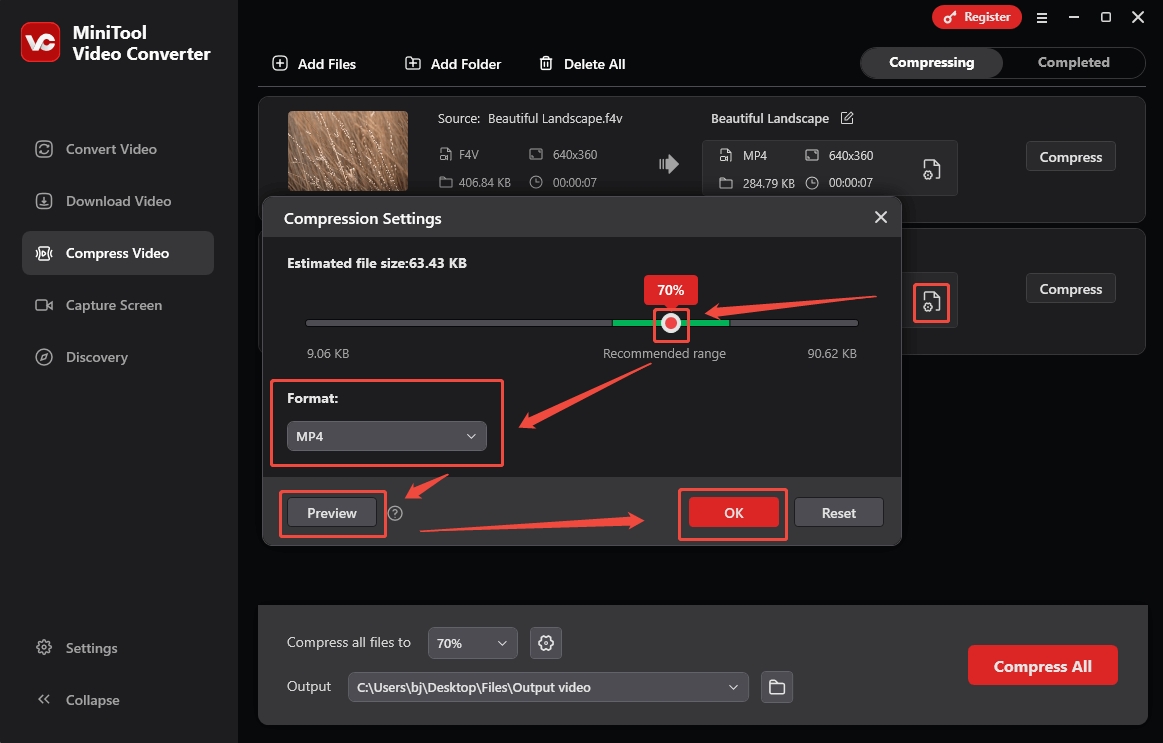
Click on the Settings icon to enter the Compression Settings window. There, move to the red dot icon to adjust the output file size. Then, expand the Format option to set an output format. To check whether the compression level is OK, click on the Preview button. Finally, click on OK to apply the compression settings.
Step 4. Choose an output location.
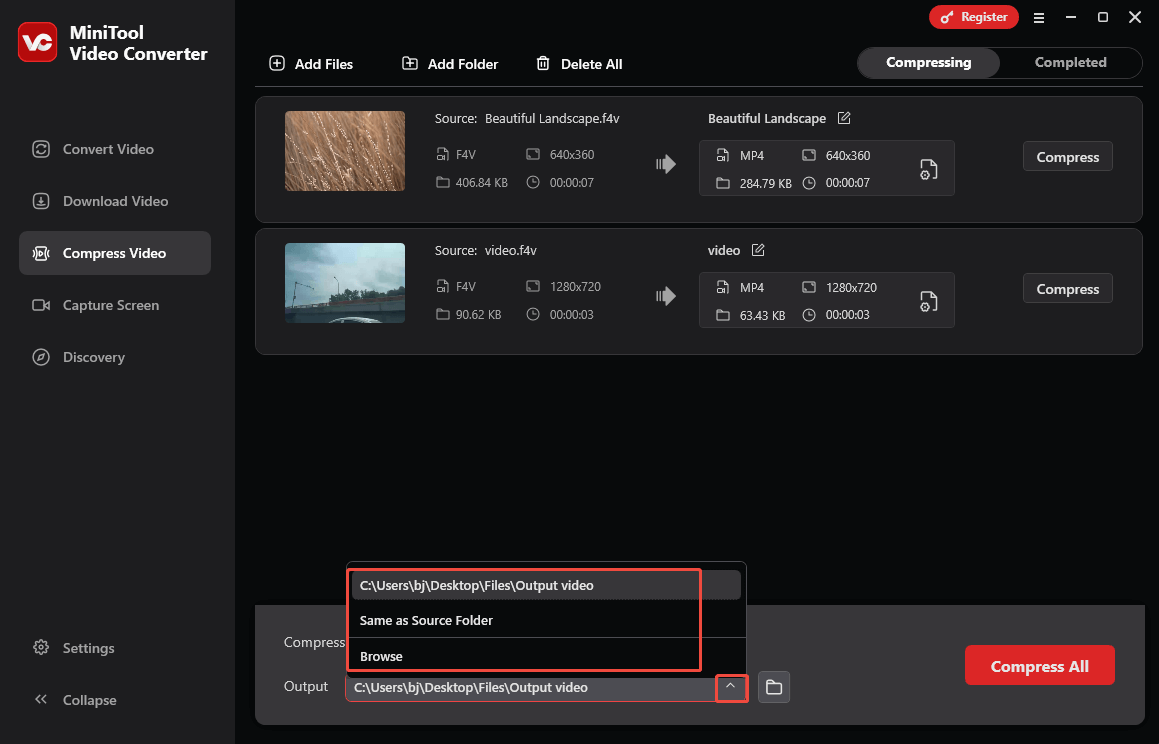
Expand the bottom Output option. There, choose a saving path for the compressed videos.
Step 5. Start Compression.
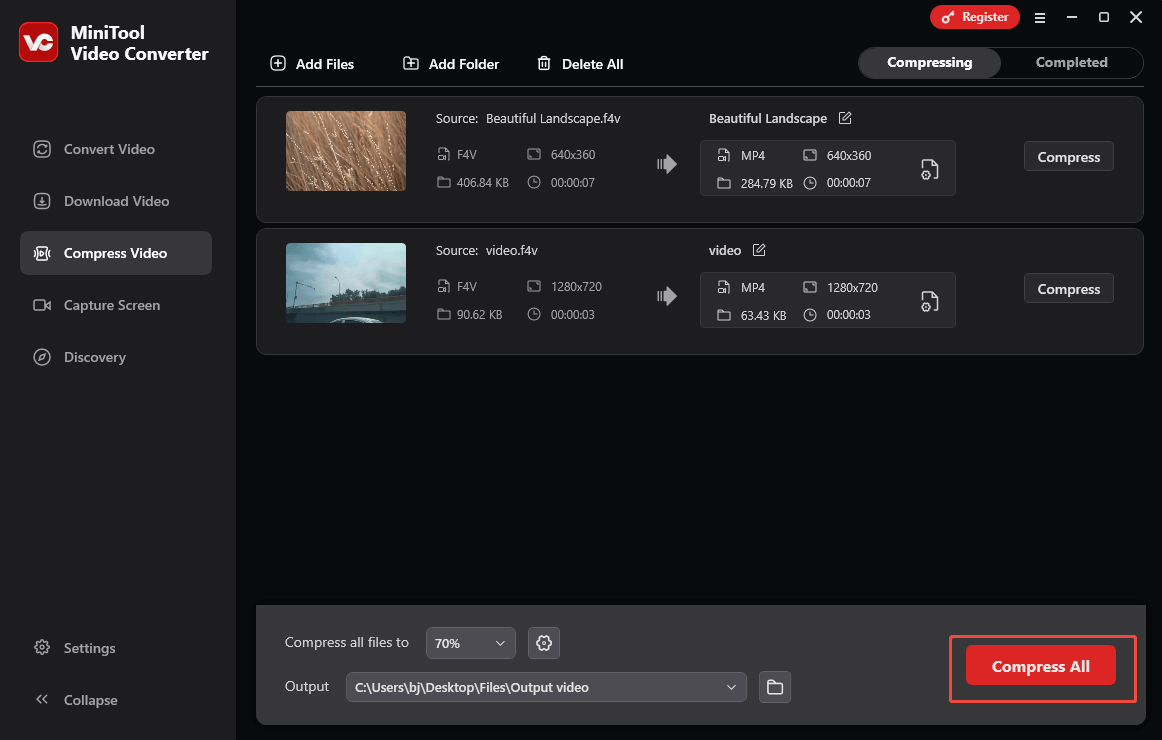
Click on the bottom-right Compress All button to begin the compression process.
Step 6. Check the compressed videos.
When the file compression process completes, this F4V compressor will automatically switch to the Completed section. There, click on the Folder icon to locate the output videos. If you want to directly view the compressed files, click on the Play icon.
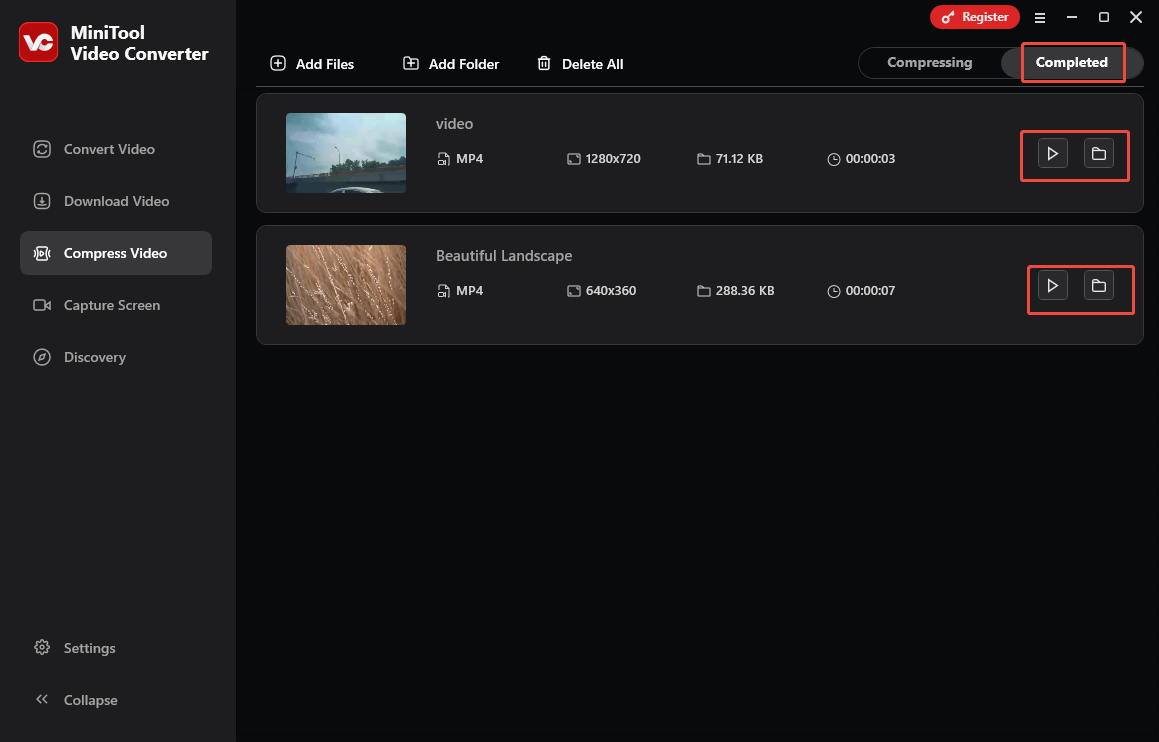
As you can see, MiniTool Video Converter is a can’t-miss F4V video compressor.
How to Convert Compressed Videos to F4V
Some of you may want to save the compressed files in F4V format. The following conversion tutorial can help.
Step 1. Import your compressed videos.
Navigate to the Convert Video tab of MiniTool Video Converter. There, upload the compressed videos by clicking on the upper-left Add Files option.
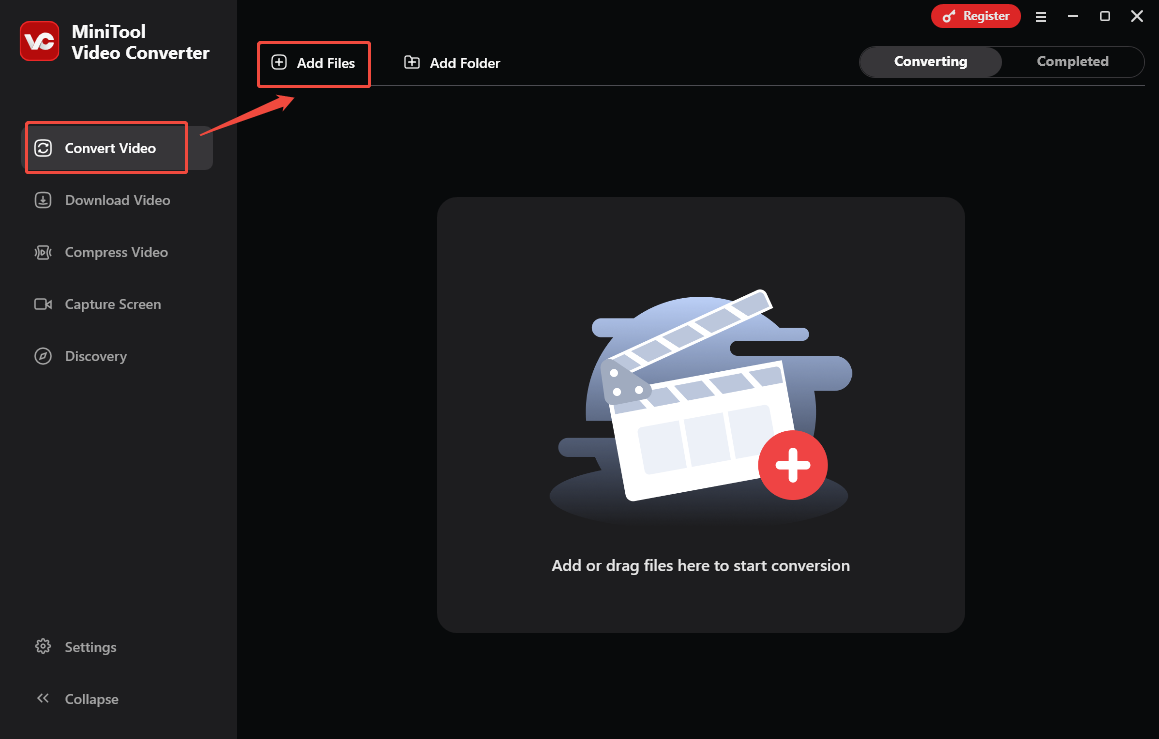
Step 2. Choose an output format.
Expand the bottom Convert all files to option to access the output format window. There, switch to the Video tab and click on F4V. Then, choose the resolution you want.
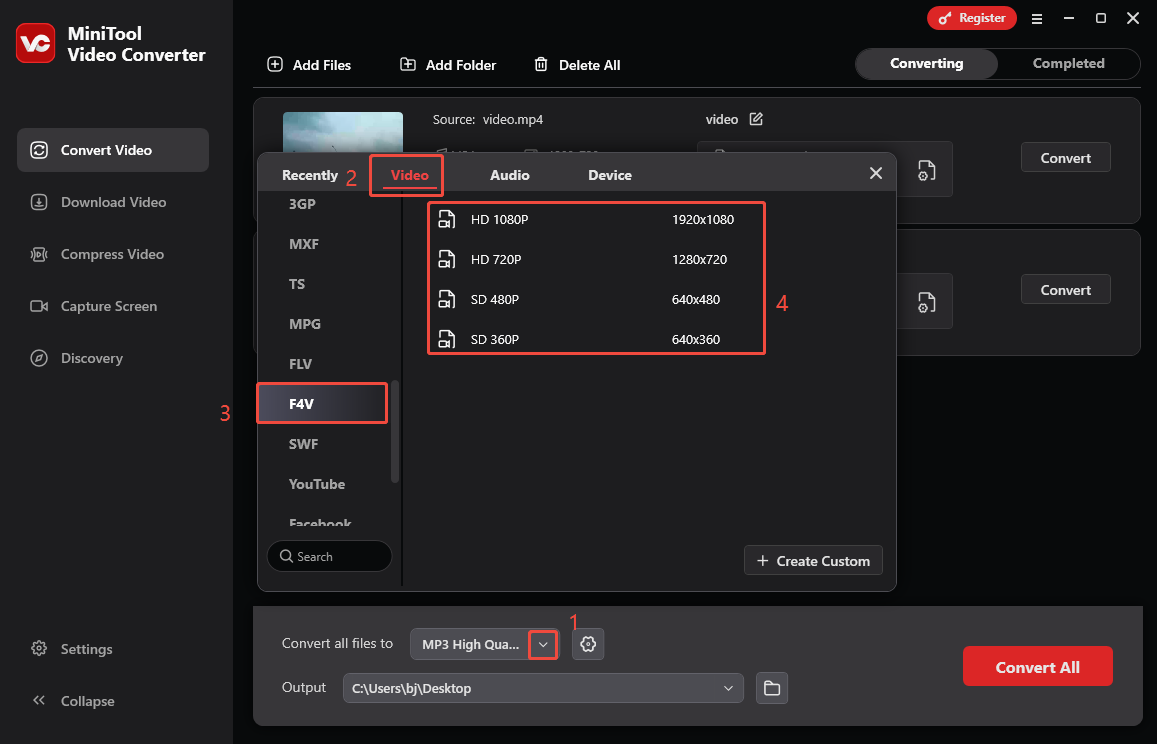
Step 3. Select an output folder.
Expand the bottom Output option to choose an output location for the converted files.
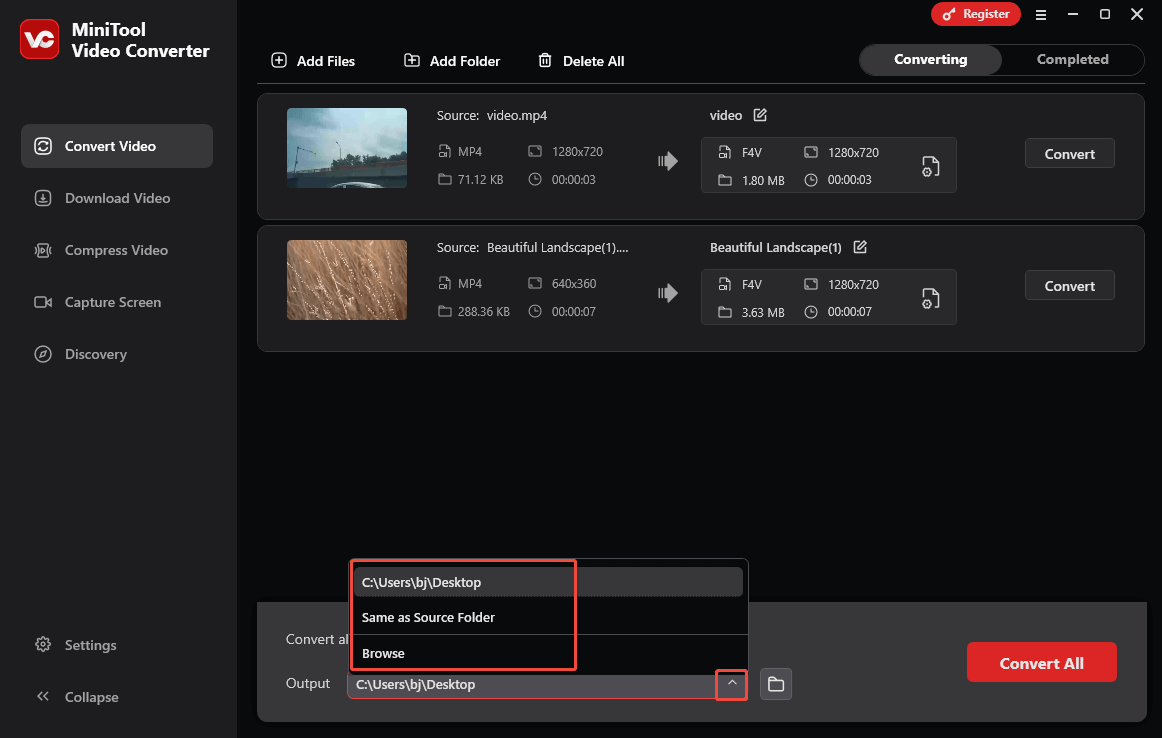
Step 4. Start conversion.
Begin the conversion process by clicking on the bottom-right Convert All button.
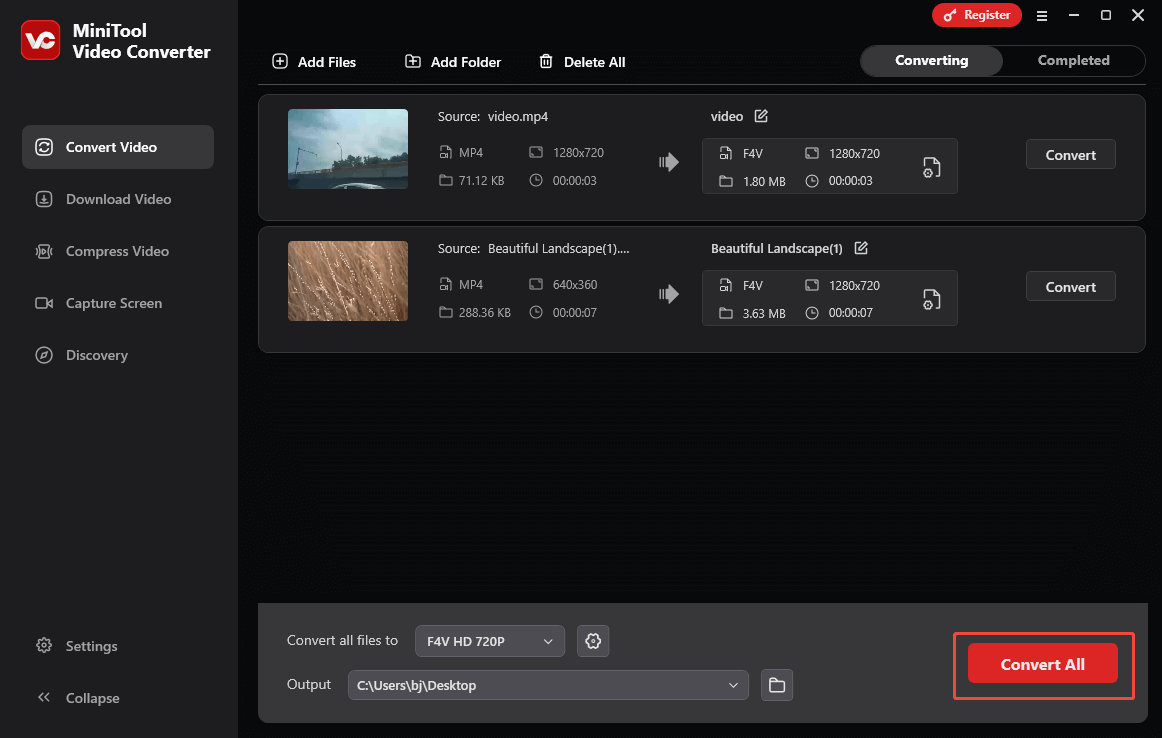
Step 5. Check the converted files.
When the conversion process ends, this file converter will switch to the Completed section. There, click on the Play icon to view the converted files. If you want to locate them, click on the Folder icon.
More surprisingly, MiniTool Video Converter is more than a free video converter. It also enables you to capture the screen without time limits or watermarks.
Method 2. Use FreeConvert (Online)
Some of you may want an online method to make your F4V files smaller. FreeConvert can help. With a well-organized interface, it allows users with different skill levels to compress F4V videos easily and quickly.
In addition, since FreeConvert applies vigilant monitoring and advanced encryption, you won’t be frustrated by privacy leakage. Below is a step-by-step tutorial on how to reduce the MB of F4V files with FreeConvert.
Step 1. Go to the interface of FreeConvert Video Compressor.
Visit https://www.freeconvert.com/video-compressor.
Step 2. Upload F4V videos.
Click on the Choose Files button to import your F4V video files.
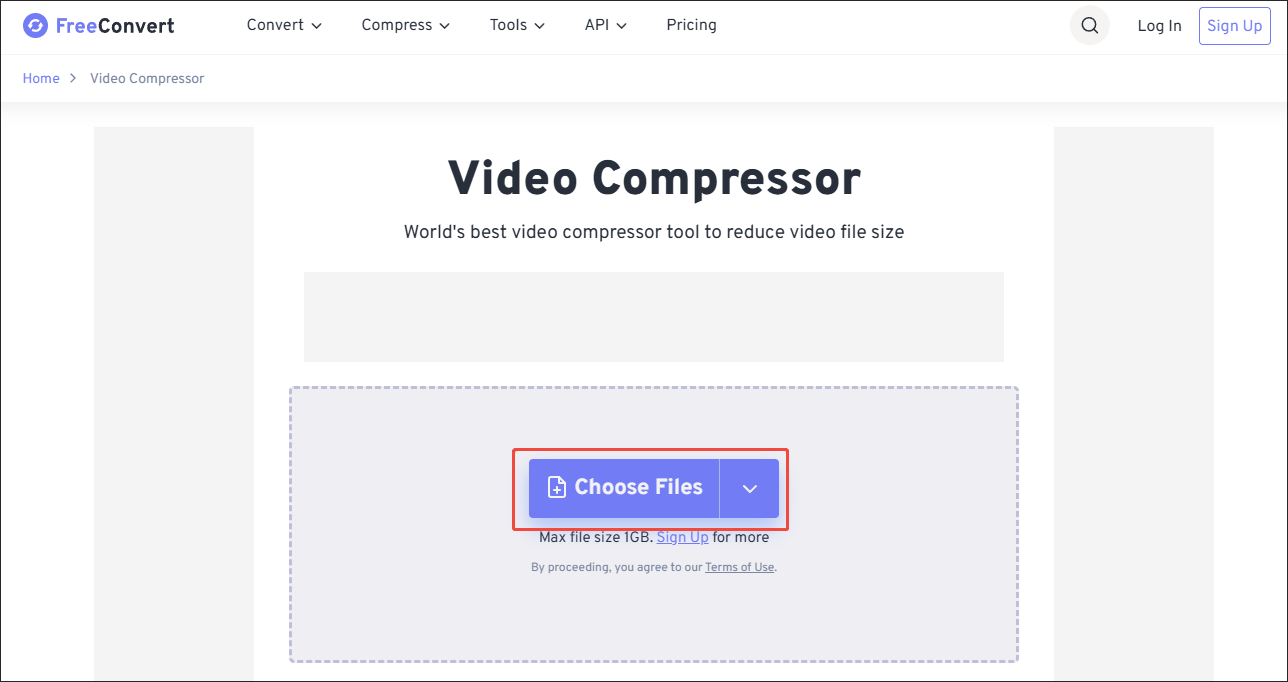
Step 3. Specify the compression settings.
Click on the gear icon to enter the Advanced Options window. There, you are free to customize the video codec and compression method. When you have configured the compression settings, click on the Apply Settings button to save the changes.
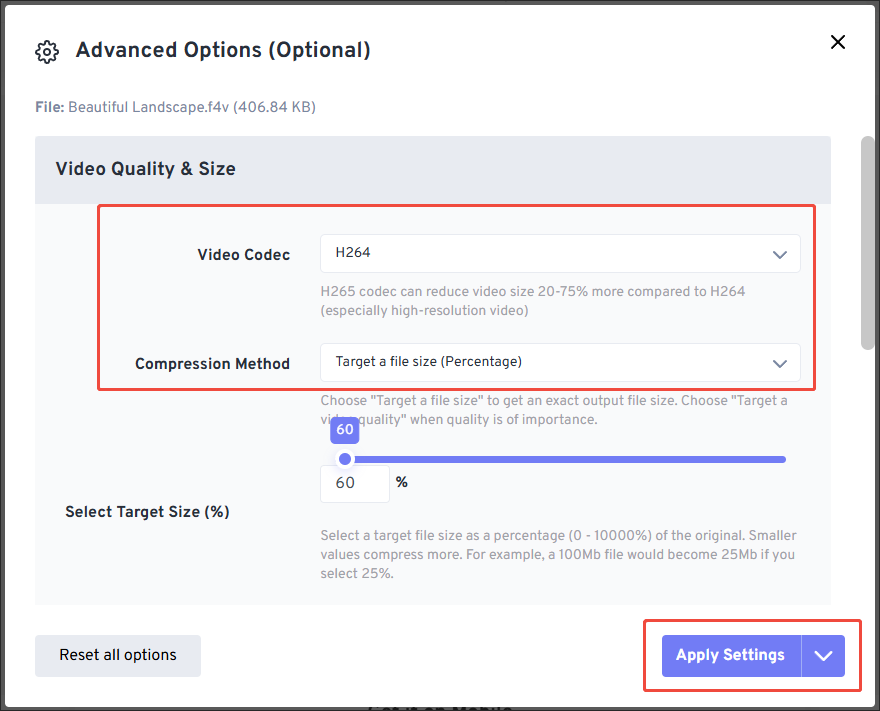
Step 4. Start compression.
Begin the compression process by clicking on the Compress Now button.
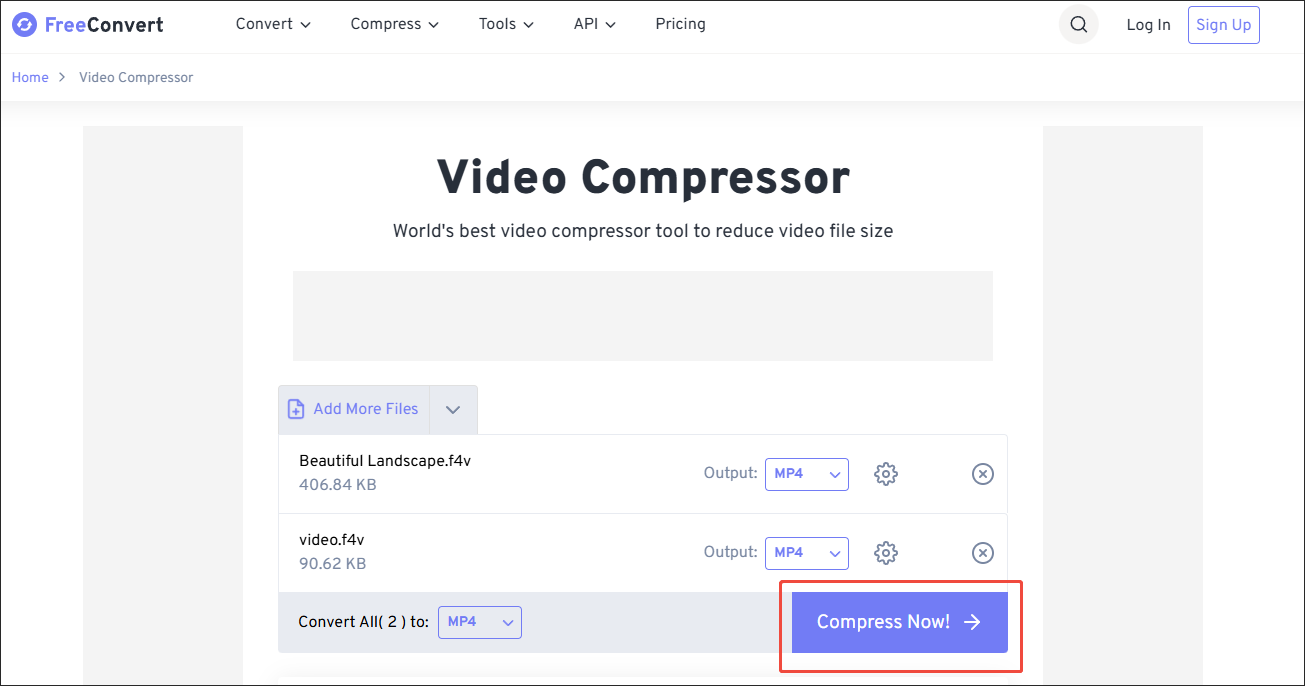
Step 5. Check the compressed videos.
When the file compression process ends, download and check the compressed files.
With FreeConvert, you can compress F4V file with ease. However, if you are a free user of FreeConvert, it only allows you to compress videos not larger than 1GB.
Method 3. Use Zamzar (Online)
Using advanced codecs, such as H.264 and AAC, MP4 is more compressed than F4V. Therefore, you can compress F4V file by converting your F4V files to MP4. To accomplish the conversion tasks, Zamzar, as a reliable online converter, can do you a favor. Just follow the tutorial below to make your F4V videos smaller.
Step 1. Go to https://www.zamzar.com/convert/f4v-to-mp4/.
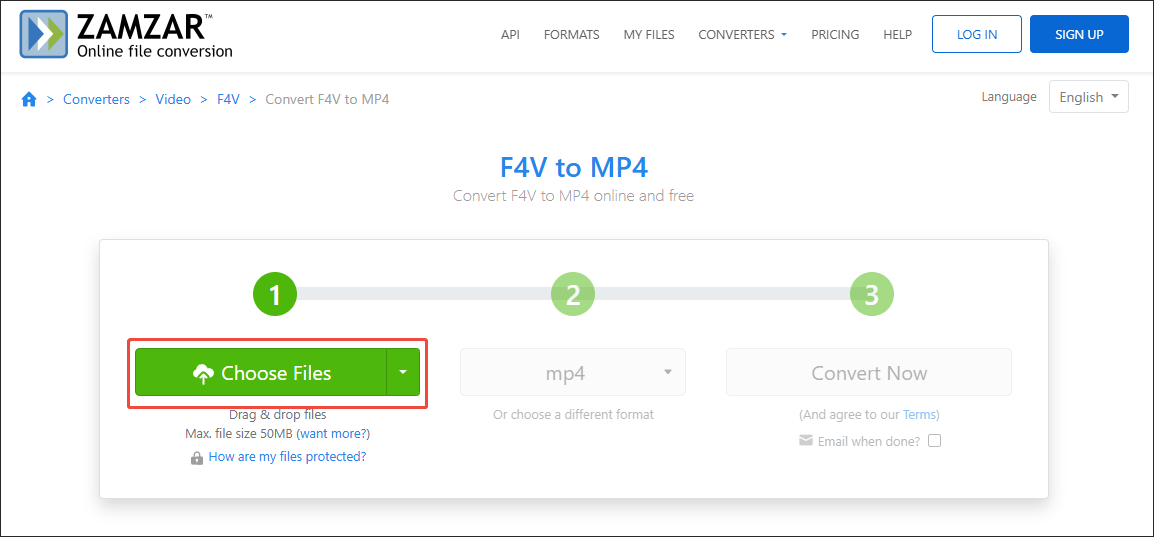
Step 2. Click on Choose Files to import F4V files.
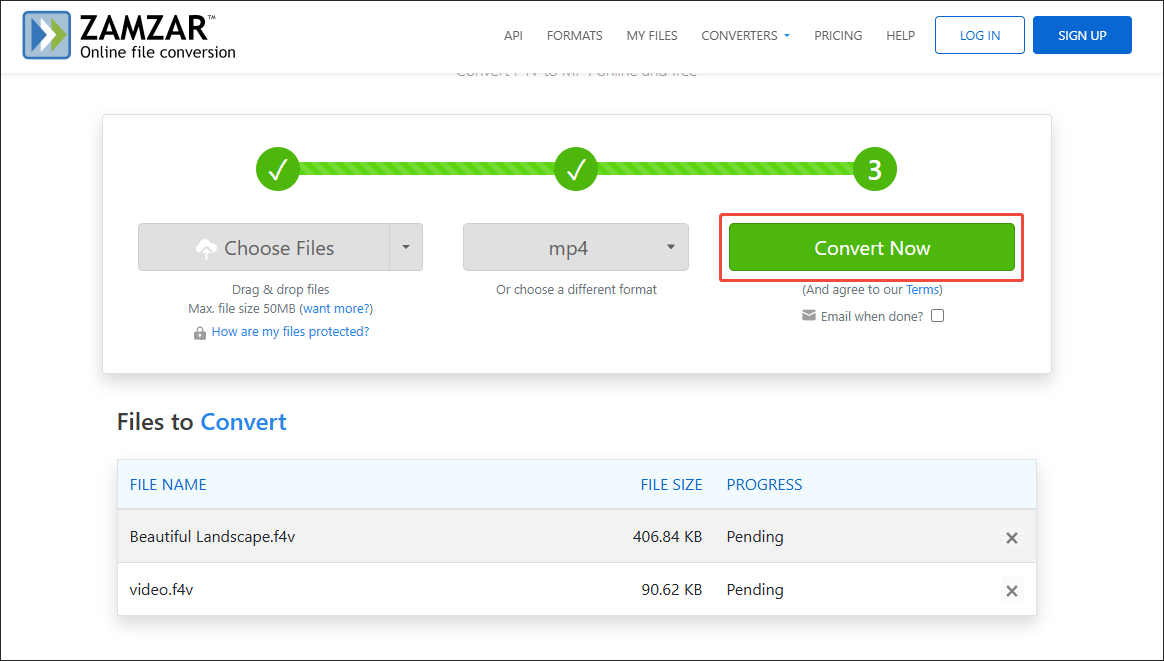
Step 3. Click on Convert Now to begin the conversion.
Step 4. When the conversion ends, download and check the converted files.
Undoubtedly, Zamzar is a robust F4V compressor. However, it has a 50MB file size limit for free users.
Wrapping Up
MiniTool Video Converter, FreeConvert, and Zamzar can all help you compress F4V file. MiniTool Video Converter is for an offline method, while the other two tools are for those who want an online F4V video compressor.
If you are bothered by any problems when using MiniTool Video Converter, please ask for help by sending an email to [email protected]. Also, you can send me a message on X. I will help you as quickly as possible.


User Comments :