This post from the free file converter - MiniTool Video Converter will explore various reasons why you can’t record on Microsoft Teams and explain possible solutions.
Like other online conference platforms, Microsoft Teams also allows meetings or calls to be recorded for future viewing, and the recording includes video, audio, and screen sharing activity. However, sometimes you may have problems recording a meeting in Teams. For example, Teams won’t let you record or the record button grayed out.
“Why can’t I record on Teams?” What to do if Teams can’t record meeting? This post offers a complete guide to help you resolve these problems.
Who Can Start a Meeting in Teams
With the cloud recording enabled by your organization’s IT admin, meeting organizers and persons from the same organization can start or stop a recording with one of the following licenses, Office 365 Enterprise E1, E3, E5, F3, A1, A3, A5, M365 Business, Business Premium, or Business Essentials. Additionally, a guest won’t be allowed to record meetings.
Besides, meeting organizers using Teams Premium can manage who can record when scheduling meetings. Also, you can control whether users’ meetings can be recorded in the Teams admin center or PowerShell. In this case, both the conference organizer and the recording initiator need to have permission to record the conference.
If you do not meet the above criteria, that’s why you can’t record on Teams.
Why Can’t I Record on Teams
In addition to the above Teams recording requirements, you may fail to start a meeting recording due to other reasons, such as malfunction of the recording button, the app version, cache file, storage location, etc.
If you’re sure you have the relevant Microsoft 365 license and your administrator has turned on cloud recording, but you (the meeting organizer, co-organizer, or someone from the same company) still can’t use the recording feature, try the following troubleshooting tips to resolve the issue.
What to Do If Teams Won’t Let Me Record
The Meeting Recording Button Is Missing or Grayed Out
If you find the meeting recording button is missing or grayed out, first, leave and then rejoin the meeting. This will refresh the recording feature. If that does not work, go to the Teams web client to join the meeting and try recording again. Apart from that, make sure you’re trying to record a meeting instead of a 1:1 call.
Other Tips to Fix Microsoft Teams Not Recording Meetings
#1. Check Your Storage Location
You should have a supported storage location, Stream, OneDrive for Business, or SharePoint, and make sure you have sufficient storage space.
#2. Delete Microsoft Teams Cache
Also, you can try clearing the cache in Teams to fix the recording problem because this may be caused by the corrupted app cache. To delete the cache file, you have two options.
Option 1:
- Quit the Teams app. Then, press the Win logo + R.
- Type %appdata%\Microsoft\Team and press Enter.
- Delete all files and folders in this directory and restart Teams.
Option 2:
- Press Win + I to open Settings and select Apps.
- Find and click Microsoft Teams, and then choose Advanced options.
- Click Reset. After that, restart Teams.
#3. Update Microsoft Teams
Always keep your apps up to date for the best experience. Similarly, you can update Teams to the latest version to avoid some issues. Even though the app can automatically update. You can still check for updates if you want. Go to your profile, click the Settings and more menu, and choose Check for Updates.
An Alternative Way to Record a Teams Meeting
In addition to the native recording capabilities in Teams, you can also use a third-party meeting recorder, such as MiniTool Video Converter, to capture Teams meetings.
As the name suggests, MiniTool Video Converter is a free video converter that can perform conversion tasks between all popular video and audio formats, such as AVI to MKV, WAV to MP3, and MP3 to MP4. Furthermore, it also functions as a free screen recorder that allows you to record all activities on your desktop for free, without time limits and watermarks.
Therefore, you can use MiniTool Video Converter to record your Teams meeting. Follow the steps below:
Step 1. Download and install MiniTool Video Converter on your PC.
MiniTool Video ConverterClick to Download100%Clean & Safe
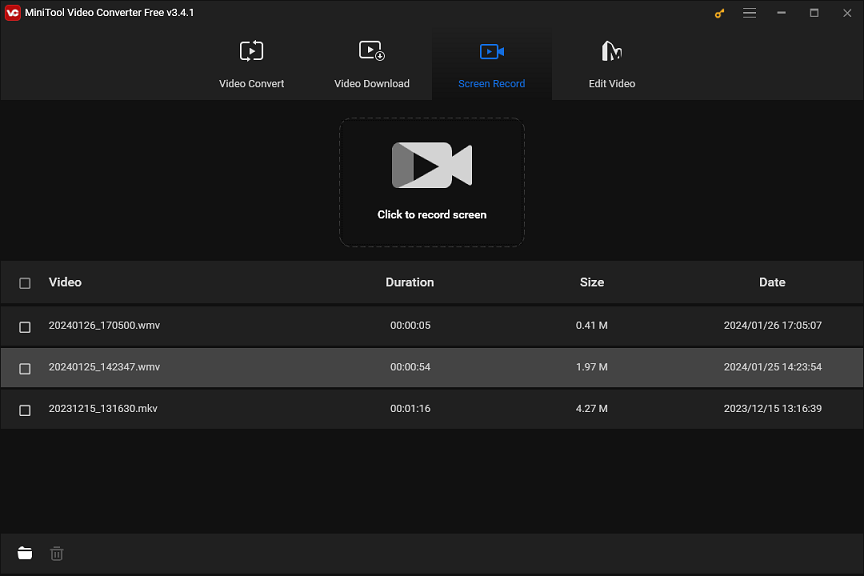
Step 2. After installation, open MiniTool Video Converter, then switch from the default Video Convert tab to the Screen Record tab, and click the Click to record screen area to launch MiniTool Screen Recorder.

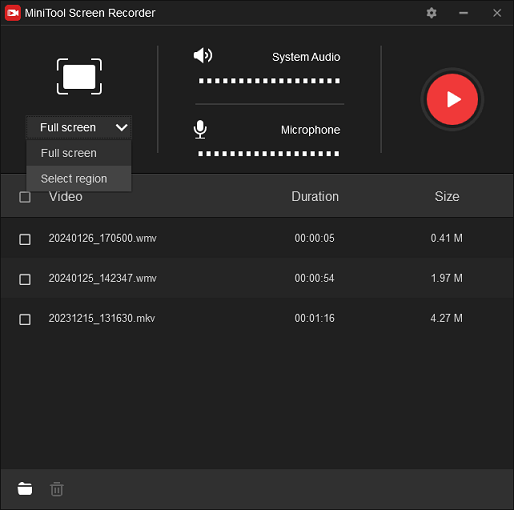
Step 3. Select the recording area. By default, MiniTool Screen Recorder captures the entire screen as well as system sound and microphone audio. If you need to record parts of the screen, click the arrow next to Full screen, click Select region, and drag your mouse to choose the recording area.

Step 4. Click the Settings icon in the upper right corner of MiniTool Screen Recorder to open Settings. Then, you can choose the destination location, recording format (MP4, MKV, WMV, AVI, MOV, FLV, and TS), frame rate (30, 25, 20, or 15FPS), and more. Click OK to apply your changes.
Step 5. Click the Record button to start the recording. To stop the recording, press F6 or your personalized shortcut.
MiniTool MovieMakerClick to Download100%Clean & Safe
Conclusion
After reading this post, you must understand who can record meetings in Microsoft Teams and possible reasons why you can’t record on Teams. When you encounter problems capturing Teams conferences, try these tips to fix the issue or use another meeting recorder like MiniTool Video Converter.
Finally, if you encounter any problems using MiniTool Video Converter, you can contact us for help at [email protected].


![[Solved] How to Fix OBS Not Recording Full Screen – 7 Solutions](https://images.minitool.com/videoconvert.minitool.com/images/uploads/2023/04/obs-not-recording-full-screen-thumbnail.jpg)
User Comments :