Thanks to the apps like Microsoft Teams, nowadays we find easier ways to conduct meetings and invite colleagues who are living in different places to join these meetings. In Microsoft Teams, users can record their Teams meetings and group calls to capture audio, video, and screen sharing activities. Then, let’s see how to record Teams meetings on Windows/Android/iPhone.
How to Record a Meeting in Teams
For Windows Users
The following is how to record the Teams meeting on Windows 10/11.
Step 1: Open the Teams app and join the meeting.
Step 2: After enting the meeting, click the three ellipses button icon to choose Start Recording.
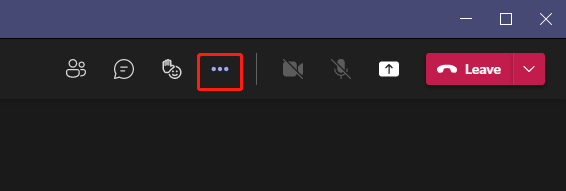
Step 3: To stop recording, click the three ellipses button and select Stop Recording from the menu. Then, it will notify everyone in the meeting that the recording has stoped.
Step 4: After stopping, the recording will be processed and the recorded file will be stored in OneDrive or SharePoint, depending on the type of meeting.
(1) Channel meeting:
For channel meetings, the recording content will be stored in the Recordings folder in the Files tab of the channel. The Files tab stores all files in the document library of the SharePoint site and channel. Everyone in the channel has the right to edit and view the recording.
(2) All other meetings
For non-channel meetings, the recording will be stored in the Recordings folder in the OneDrive directory of the person who started the recording.
Step 5: If you want to share the link to the meeting recording with others, here is how to do that.
(1) If you record or organize a meeting, you can share the recording with people who have not been invited to the meeting – just share it like any other file. Just find the file in OneDrive or SharePoint and share it directly with others, or copy the link and share it as you like.
(2) If you are not the person who recorded or organized the meeting, you can still share the recording with people who have not been invited to the meeting. However, the meeting organizer or meeting recorder needs to approve your sharing operation before others can gain access.
1. Once the meeting recording starts, only one person can be recorded. Even if the person who started the recording leaves, the recording will continue, and once everyone leaves the meeting, the recording will stop. Besides, if someone forgets to leave the meeting, the recording will automatically end after four hours.
2. Only the meeting organizer and the person who started the recording can edit or download the recording. But everyone invited to the meeting can view the recording.
Who can start and stop recordings?
| Type of user | Can start recording? | Can stop recording? |
| Meeting organizer | Yes | Yes |
| Person from same organization or company | Yes | Yes |
| Person from another organization or company | No | No |
| Guest | No | No |
| Anonymous | No | No |
For Android Users
How to record Microsoft Teams meeting on Android? Here is how to do that:
Step 1: Download and install Teams. Open the Microsoft Teams app to join a meeting.
Step 2: Tap the More options button.
Step 3: Select the Start recording option.
Step 4: Tap the Stop recording option to stop the recording.
For iPhone Users
How to record in Teams on iPhone? Here are the steps:
Step 1: Download and install Teams. Open the Microsoft Teams app to join a meeting.
Step 2: Tap the More options button.
Step 3: Select the Start recording option.
Step 4: Tap the Stop recording option to stop the recording.
Other Ways to Record a Meeting in Teams
From the content above, you can find that there are many limitations to using the Teams’ built-in screen recording function to record meetings. Thus, you may want to find other ways to record Teams meeting secretly.
For Windows Users
1. Use MiniTool Video Converter
MiniTool Video Converter is a great alternative to record meeting in Teams. It supports Windows and has three main features – converting videos, downloading videos, recording videos.
MiniTool Video Converter supports automatically stopping and saving the recording process when the scheduled duration is reached. You can also choose to record full screen or selected region.
Whether you are the meeting organizer or a participant, you can use MiniTool Video Converter to record the meeting. Besides, you can choose the output location of the recorded files by yourself.
Now. let’s see how to record a meeting in Teams with MiniTool Video Converter.
Step 1: Download and install MiniTool Video Converter. After installing, launch it to enter its main interface.
MiniTool Video ConverterClick to Download100%Clean & Safe
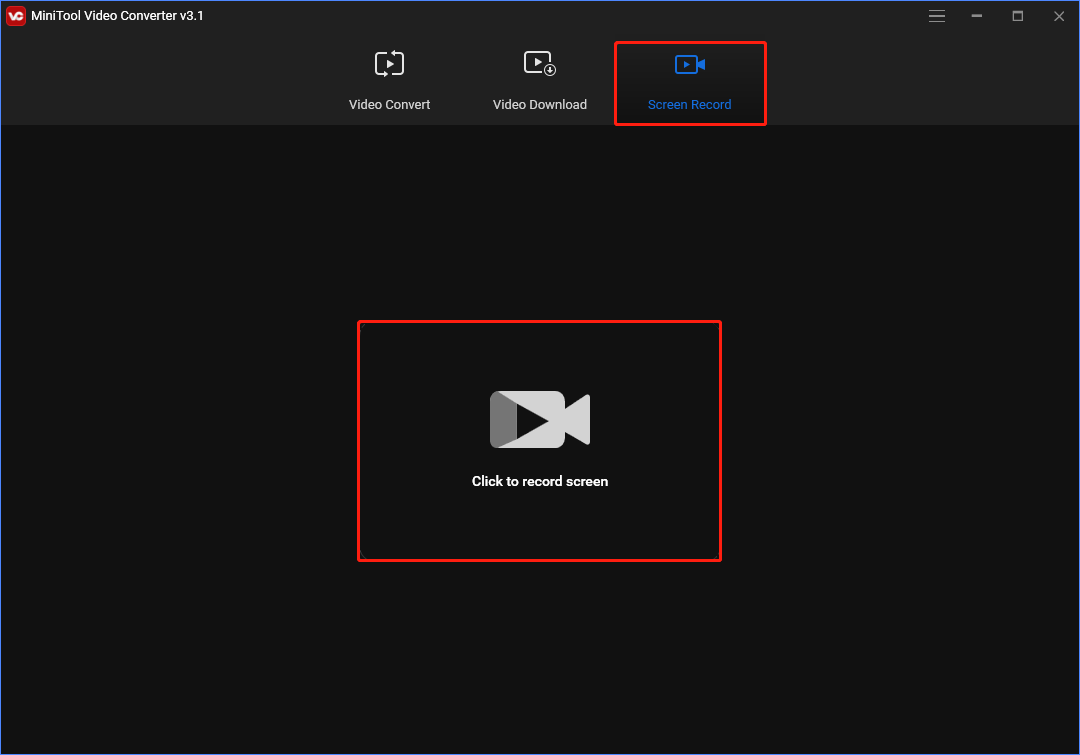
Step 2: Click the Screen Record tab and click the Click to record screen area.
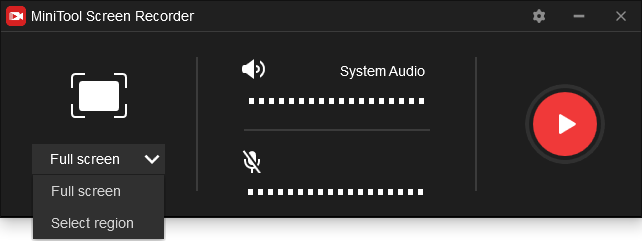
Step 3: On the MiniTool Screen Recorder window, enable either or both of the system audio and microphone. Then choose the desired recording option – Full screen or Select region.
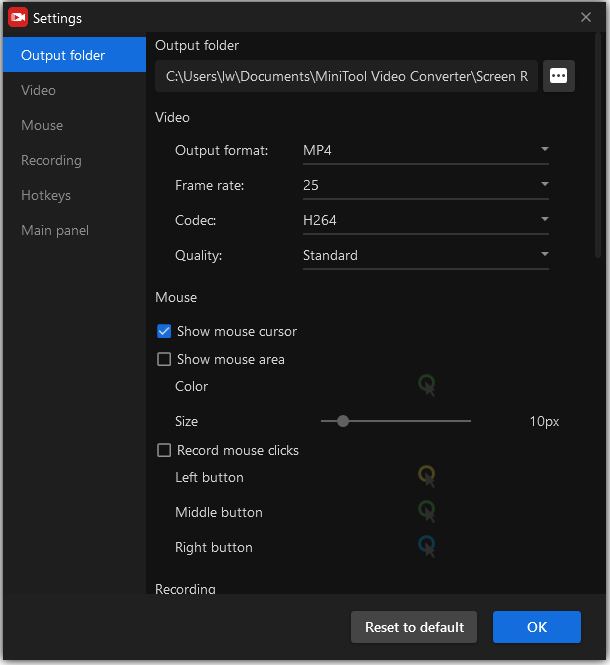
Step 4: Then, you can click the Settings icon to do some changes. Here, you can set the output location, video output format/frame rate/codec/quality, hotkeys, mouse, etc.
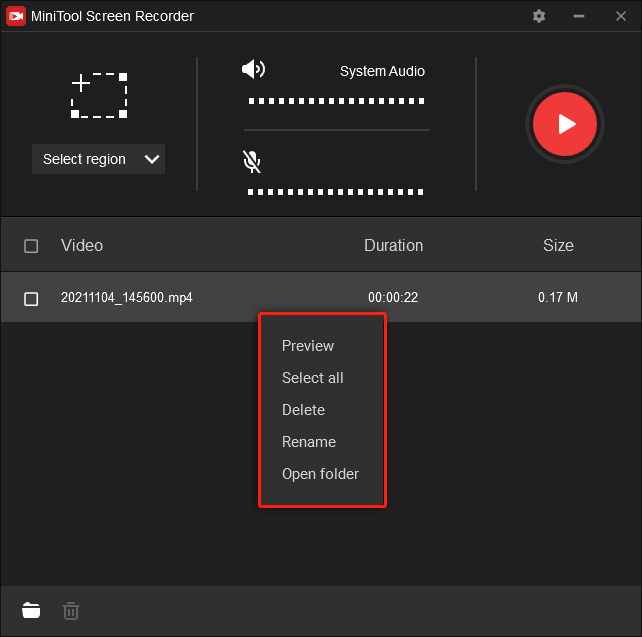
Step 5: Now, you can click the red icon or press the F6 key to start the recording process. Press the F6 key to end the recording and right-click the recorded file. From the drop-down menu, you can preview, delete, rename the recorded file.
2. Use Windows 10 Game Bar
The next method for you to record a meeting in Teams is to use Xbox Game Bar. It is a pre-installed screen recorder on Windows 10/11, which is free and can be used to record meetings, game clips, screenshots, and broadcasts.
It should be noted that the game bar is a non-desktop screen recorder, so you can only use the default shortcut to launch it. And it only allows you to capture the entire computer screen and you cannot change any record configuration, except for shortcuts. Here is how to use it.
Step 1: Press the Windows + I keys together to open Settings. Select the Gaming option and then toggle on Record game clips, screenshots, and broadcast using the Game bar.
Step 2: Press the Windows + G keys simultaneously to run the Xbox Game bar.
Step 3: Click the gear icon to set up the shortcuts if needed. Select Capture > Start recording, and then start recording.
Step 4: When it is finished, click the Stop Recording button.
Step 5: Then a notification will pop up, informing you that the recorded video is saved on your computer. Click Game Clip Recorded to view the recorded video.
Related article: Is Windows 11 Xbox Game Bar Not Working? Try to Fix It!
3. Use Screencastify
You can also use Screencastify to record Teams meetings. It is a Chrome extension that enables you to capture your tab, whole screen, or webcam only. In addition, its free plan only allows you to record videos up to 10 minutes in length and all recorded videos will come with a watermark. Follow the guide to use it.
Step 1: Enter Screencastify in the search box of Chrome Web Store. Click it to select Add to Chrome > Add extension.
Step 2: Once installed, you’ll see the Screencastify icon in the top right of your Chrome browser. Click the icon and sign in with your Google account to continue.
Step 3: Choose Enable mic and webcam to grant access to your microphone and webcam. Now, you can choose Browser Tab, Desktop, or Webcam Only.
Step 4: Turn on Microphone and Embed Webcam if needed. Click Show more options to set additional parameters for your recording.
Step 5: Click the blue Record button to start your recording. To end a recording, click the extension icon again and hit the Stop button.
Step 6: Then you will be taken to a new page, where you can edit, save and share your recording.
For Android Users
Use AZ Screen Recorder
How to record Teams meeting on Android secretly? It’s recommended to use AZ Screen Recorder. AZ Screen Recorder is a powerful screen capture app that offers a simple way to record meetings, game videos, live streaming, video calls.
Step 1: Download and install the AZ Screen Recorder app on your Android phone. Launch it after finishing the installation.
Step 2: You can see 4 options on your screen: Record, Video & Settings, Recording Tools, and Livestream. Choose the Videos & Settings option to adjust the recording settings. You can change the video resolution, frame rate, audio source as you like.
Step 3: After configuring the recording settings, go back to the main window. Tap the Record button to begin recording.
Step 4: Open the Meeting interface. Once done, stop the recording and the recorded meeting video will be saved on your phone.
For iPhone Users
Use iOS built-in app
If you want to record Teams meeting on your iPhone, there is no need to download a third-party application from the App Store. Apple offers a free tool for iOS 11 or later that you can add to your iPhone’s Control Center to record screen with sound.
Next, we will show you how to record a meeting in Teams.
Step 1: Go to Settings > Control Center and tap on More Controls (or Customize Controls if you’re using iOS 13 or earlier).
Step 2: Then click the green + button next to Screen Recording, which will move it from the MORE CONTROLS section to the INCLUDE section.
Step 3: Open Control Center on your iPhone. Press and hold the gray Record icon. If you want to record your voiceover, just click Microphone.
Step 4: Hit Start Recording. After a three-second countdown, it will record the meeting.
Step 5: To stop the recording, open Control Center again and tap on the red Record icon. Or tap on the red status bar at the top left of your screen and select Stop.
Step 6: Go to the Photos app and check your screen recording.
Bottom Line
After reading this post, you must know how to record Microsoft Teams meetings. If you don’t want to use Teams’ built-in screen recording function, you can choose one of the screen recorders above to record the meeting.
If you have questions about this post or encounter problems when using MiniTool Video Converter, please feel free to contact us via [email protected] or leave comments below.


User Comments :