Hisense TV is popular. Many Hisense TV users like to record their favorite shows so they can watch them in their free time. If you are one of them, you are in luck today, because in this article from the free file converter, I will offer detailed instructions on how to record on Hisense TV using its PVR feature and a computer.
Recording on Hisense TV allows you to watch your beloved shows at your convenience. However, this task isn’t always straightforward if you don’t have the proper means. In this guide, I will take you step by step through 2 ways to record on your Hisense TV with ease. These include using a PVR and a computer. By following these steps, you will never again miss out on any of your favorite programs.
All about Hisense TV
Hisense is a well-known electronics brand, particularly famous for its televisions. It has a large variety of models. There are sleek and fashionable smart TVs, as well as high-end 4K and even 8K Ultra HD TVs. No matter how much you want to spend or what your viewing taste is, Hisense has a TV for you.
The picture quality of Hisense TVs is usually great. The colors are bright, the blacks are deep, and the contrast ratios are good. This makes your favorite movies, TV shows, and games seem real.
The smart TV platforms on Hisense TVs are easy to use. You can access popular streaming services such as Netflix, Hulu, Amazon Prime Video, and lots of others just by simply pressing the remote.
Besides having great visuals, Hisense TVs also offer excellent audio quality. Some models are equipped with advanced sound systems. These systems can give you an immersive audio experience, making you feel like you’re right in the center of the action. Whether you’re watching a movie or listening to a live concert on TV, the sound quality of Hisense TVs makes the experience even more enjoyable.

Why Record on Hisense TV
There are numerous advantages of recording on your Hisense TV. The following are the 2 main ones.
Firstly, recording on your Hisense TV gives you the freedom to watch your favorite content at your convenience. Our schedules can be pretty hectic. Sometimes, we might miss the premiere of a show or a crucial moment in a sports event due to work, study, or family. Recording these programs lets you catch up whenever you have some free time.
Secondly, recording allows you to build your own personal media library. You can save educational documentaries, classic movies, or inspiring speeches that you want to refer back to in the future. This way, you don’t have to rely on streaming services or worry about content being removed from their platforms.
How to Record on Hisense TV Using PVR
How to record to USB on Hisense TV? Some, but not all, Hisense TVs have a built-in PVR feature. PVR is short for Personal Video Recorder. This feature allows you to record live TV programs and save them to an external storage device, like a USB flash drive or external hard drive. So, first of first, you need to check if your TV has it. You can check the user manual or Hisense’s website for it.
How to record a program on Hisense TV? Here are the steps.
Step 1. Plug a USB flash drive into the TV’s USB port. Make sure it has enough storage space. I recommend 16GB at least.
Step 2. Open your TV settings and navigate to Channel Setup or Signal Source.
Step 3. Go to PVR Recording and turn it on.
Step 4. If you want to record the TV show you are watching now, press the Record button (usually red or labeled REC) on the remote. Press the Stop button when finished.
If you want to schedule a recording, go to the program guide in the PVR menu. Select the show you want to record and then choose the Schedule Recording option. Set the start/end time.
Step 5. Go to Media Center and select PVR or Recordings to play your recording.
2. If the recording fails, check if the USB is recognized (It may need formatting via TV settings).
How to Record on Hisense TV Using a Computer
If your Hisense TV doesn’t have a built-in PVR function, you can use a computer and a screen recording application for this task.
Stage 1. Choose a Handy Screen Recorder
Many screen recorders are available for this task. Choosing a good one from the enormous number is time-consuming. To save time, I have selected 2 handy recorders for you.
- MiniTool Video Converter
- iTop Screen Recorder
1. MiniTool Video Converter [Most Recommended]
Price: Free
Compatibility: Windows
MiniTool Video Converter is simple and feature-rich. I still remember the very first time I used it a couple of years ago. The whole process was totally hassle-free. As soon as I opened this program, I immediately spotted the button to activate the recording tool. Even though I was completely new to screen recording back then, it was so easy for me to start, pause, resume, and stop the recording.
But don’t get fooled by its simplicity. MiniTool Video Converter can capture every activity on your screen, namely online courses, video calls, streaming content, gameplay, etc. As a high-quality screen recorder, it can capture your 4K screen smoothly.
Additionally, this tool gives you many controls over the recorded video. You can customize the recording area. Whether you want a full-screen recording or a specific-area recording, it has you covered. This tool also allows you to adjust the recording audio source. You can choose from the system sound to the microphone sound. Or turn them off simultaneously. In addition, you can change the recording quality, frame rate, output folder, etc.
Other Useful Features of MiniTool Video Converter
- Supports many formats and you can convert MP4 to MP3, MKV to MOV, AVI to WebM, 3GP to MPEG, etc.
- Offers preset formats for YouTube, Facebook, Instagram, and Vimeo.
- Provides presets for different devices such as iPad, iPhone, Samsung, and Huawei.
- Allows you to convert up to 5 files simultaneously.
- Can compress video and audio files by adjusting the encoder, resolution, frame rate, and bitrate.
- Includes a downloading feature to help you get music, videos, subtitles, and playlists from YouTube.
MiniTool Video ConverterClick to Download100%Clean & Safe
2. iTop Screen Recorder
Price: Free & Paid
Compatibility: Windows
iTop Screen Recorder is also an excellent tool for recording on Hisense TV with a computer. This easy yet feature-rich tool can record any part of your screen. You can also record your screen with audio and a webcam, making it a good choice for creating reaction videos and tutorials. As a high-quality recorder, it can capture 4K videos without lag or dropped frames. Additionally, iTop Screen Recorder enables you to output the recording in MP4, AVI, and other formats.

Stage 2. Set Up Screen Recording Tool on Your Computer
I will take MiniTool Video Converter to show you how to set it up on your device.
Step 1. Click the button below to download and install MiniTool Video Converter.
MiniTool Video ConverterClick to Download100%Clean & Safe
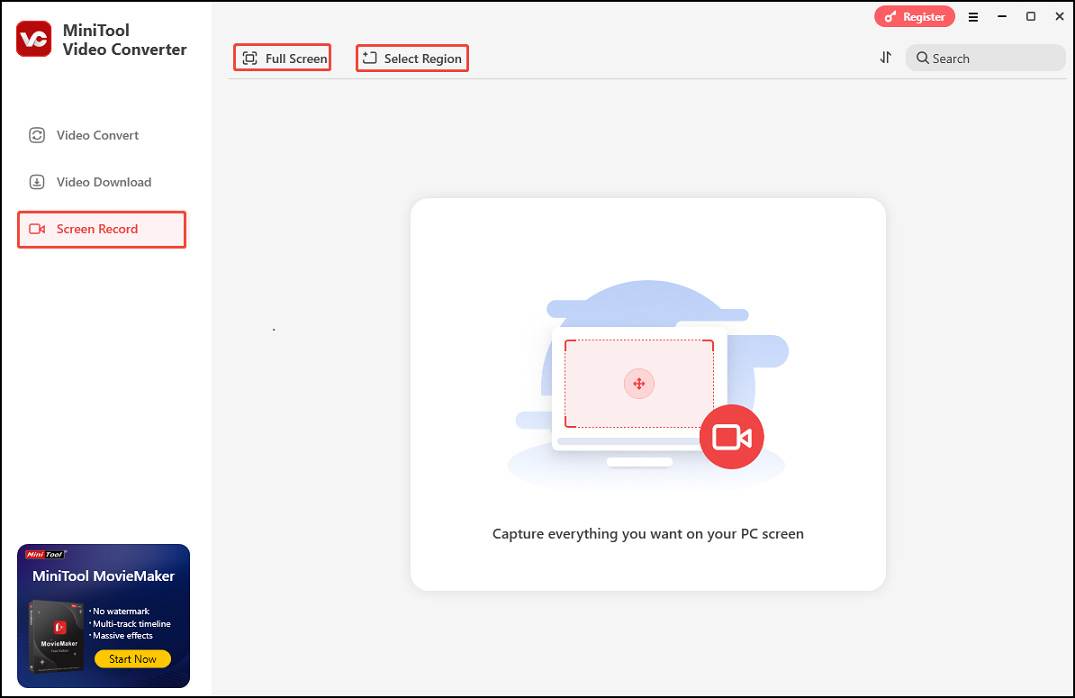
Step 2. Open this free recorder. Click Screen Record in the left sidebar to switch from the default Video Convert tab to the Screen Record tab. Click Full Screen to capture the entire screen. Or, click Select Region, left-click your mouse, and then move it to select the recording area.
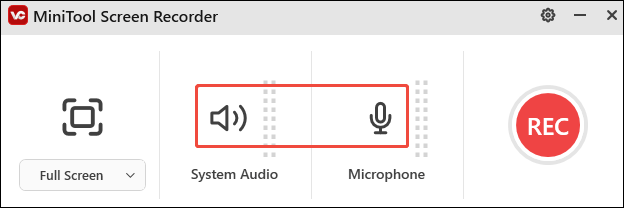
Step 3. Click the System Audio icon or the Microphone icon to capture the corresponding sound in the MiniTool Screen Recorder panel. You can also turn them on or off simultaneously.
Step 4. For more settings, click the Settings icon in the upper right to enter the advanced Settings page. Here, you can adjust the output folder, video frame rate, video quality, preset recording duration, and much more. Do not forget to click OK to save your changes.
Stage 3. Connect Your Hisense TV to Your Computer
Here are the steps to connect your Hisense TV to your computer:
1. HDMI Cable Connection
Nowadays, most computers and TVs have HDMI ports. If your devices have such ports, use an HDMI cable to connect them.
Step 1. Make sure your Hisense TV and computer have HDMI ports.
Step 2. Plug one end of the HDMI cable into the HDMI input port on your computer and the other end into the HDMI output port on your Hisense TV.
Step 3. On your Hisense TV, use the remote to select the HDMI output source corresponding to the port you connected the cable to.
2. VGA Cable Connection
If your TV and computer don’t have HDMI ports but VGA ports, you can use a VGA cable to connect them. However, VGA only carries video, so you need an audio cable to send audio to your computer.
Step 1. Connect one end of the VGA cable to the VGA input port on your computer and the other end to the VGA output port on your Hisense TV.
Step 2. Connect an audio cable from your computer’s audio input to the TV’s audio output.
Step 3. On your Hisense TV, select the VGA output source.
Stage 4. Start Recording
Now, it’s time to start recording.
Step 1. Play the show you want to record on the Hisense TV and press the F6 key on your computer keyboard to start recording.
Step 2. During recording, you can press F9 to pause/resume recording.
Step 3. Once done, press F6 to stop recording.
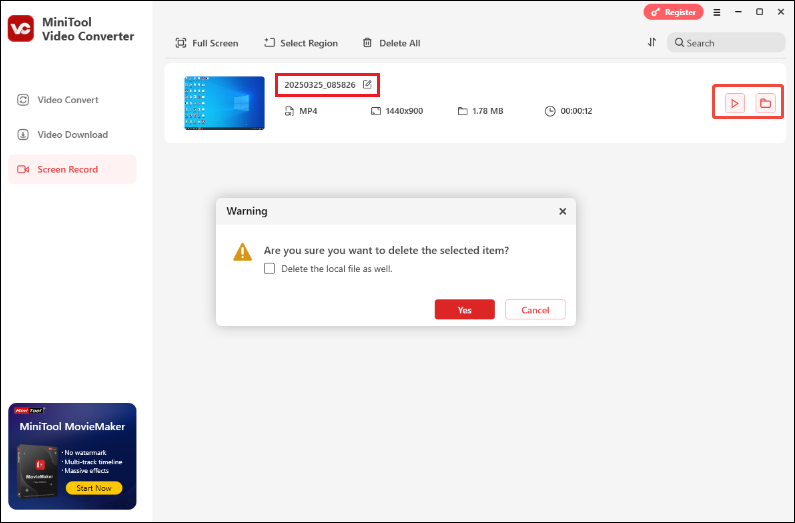
Step 4. After that, you will be redirected to the main interface of the MiniTool Video Converter, where the recording will be listed. Click the play icon beside it to watch or the file icon to locate it. To rename the recorded file, click the current file name or the editing icon next to the current file name.
Stage 5. Edit Your Recording (Optional)
If you want to refine your recording, you can use MiniTool MovieMaker.
Price: Free
Compatibility: Windows
About MiniTool MovieMaker
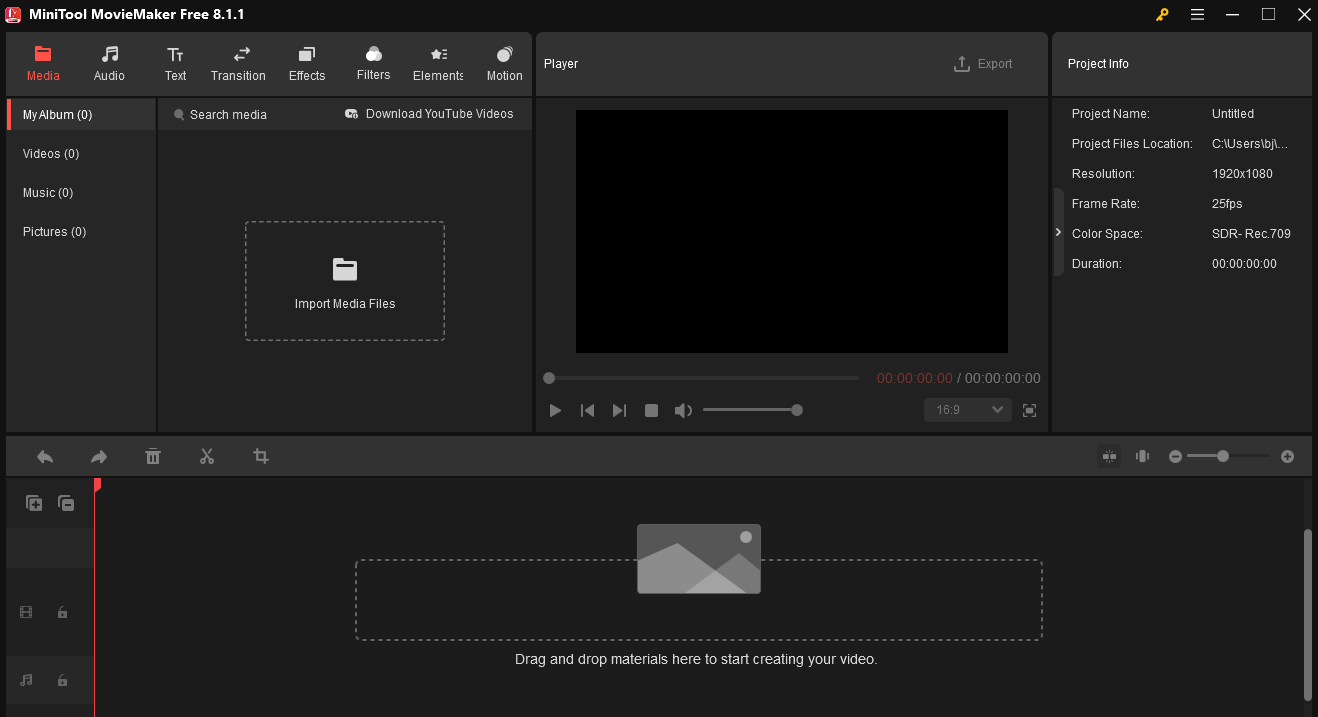
MiniTool MovieMaker is a free video editor without watermark. It has an intuitive interface, which makes it easy to navigate. Even those with little to no video editing experience can quickly get started with creating their own videos.
MiniTool MovieMaker offers a variety of editing functions. For example, you can cut, trim, and split video clips easily. They can also merge multiple video segments to create a seamless video. It allows for adding transitions between video clips. There are different types of transitions, like fade-in, fade-out, and cross-fade, available, which can enhance the visual flow of the video. Text and captions can be added to the video. You can customize the font, size, color, and position of the text.
In addition, MiniTool MovieMaker enables you to add background music to your recording. The volume of the video’s original audio and the added music can be adjusted separately, allowing for a perfect balance between your recording and background music. Furthermore, it supports exporting videos in different formats, such as MP4, AVI, and WMV. This flexibility allows you to choose the format that is most suitable for your needs.
How to Edit Your Recording
To learn how to trim or split your recording, crop it to the perfect size, add effects, filters, or text, adjust the recording speed or properties, and much more, you can visit the MiniTool MovieMaker’s help website for detailed instructions.
MiniTool MovieMakerClick to Download100%Clean & Safe
Conclusion
How to record on Hisense smart TV? You can use its built-in PVR feature to record TV programs to a USB. If your TV doesn’t have that feature, you can connect your TV to a computer and use a screen recording tool like MiniTool Video Converter to capture your favorite shows. After recording, you can use MiniTool MovieMaker to refine it.
Finally, if you need any help while using MiniTool Video Converter and MiniTool MovieMaker, just hit me on Twitter.
User Comments :