Have you ever wanted to capture a cool game moment, record a helpful tutorial, or save a funny video on your Vivo phone? Well, you’re in luck because today in this post offered by the free file converter, I’m going to show you how to screen record on Vivo phones. It’s easier than you might think, and once you learn how, you’ll be able to save and share all those amazing moments with your friends and family in no time. So, let’s get started!
How to Screen Record on Vivo with Built-in Recorder
Vivo offers a built-in recorder to help you capture on-screen activities. It’s convenient. With it, you don’t need to download and install extra software. Here are the steps.
Step 1. Go to Control Center>Shortcuts>S-capture to activate Record Screen. If you need audio recording, go to Settings>S-capture to turn on Record Voice.
Step 2. Swipe down from the top edge of the screen to open the Quick Settings panel and swipe right to find the Screen Record button and tab it.
Step 3. Click Record Audio to choose recording device audio, microphone, or both. Then, the recording will start after 3 seconds.
How to Screen Record on Vivo with AZ Screen Recorder
AZ Screen Recorder is a popular and handy option to record on Vivo. This tool has no time limits, so you can record your screen as long as you want. As a high-quality screen recorder, it supports recording in 4K resolution and 60 FPS. To ensure the recording to be played on a wide range of devices and platforms, this tool allows you to output the recordings in multiple formats such as MP4, MKV, etc. In addition, AZ Screen Recorder can record the screen with audio.
Here are the steps.
Step 1. Download and install AZ Screen Recorder on your Android. Then open it.
Step 2. Tap on the Record button and press Start Now to start recording.
Step 3. To end the process, swipe down your screen and tap on the Stop button. Finally, go to your gallery to check the recording.
![How to Record ITVX on Android and iPhone [A Comprehensive Guide]](https://images.minitool.com/videoconvert.minitool.com/images/uploads/2025/03/how-to-screen-record-itvx-thumbnail.jpg)
How to Screen Record on Vivo with MiniTool Video Converter
Can I use my computer to record my Vivo screen. Sure! Just use AirDroid Cast to mirror the Vivo screen on your PC and use a desktop screen recorder – MiniTool Video Converter to capture it.
MiniTool Video Converter is a free screen recorder for Windows users. It doesn’t have size limits or watermarks. One of the best features of this tool is that you can have a lot of control over your recording. For example, you can adjust the recording area, bitrate, frame rate, etc. Additionally, it can record your 4K screen with different qualities.
Let's see how to screen record on Vivo with MiniTool Video Converter.
Step 1. Download and install AirDroid Cast on your phone.
Step 2. Use a USB cable to connect Vivo to your PC. On the list of available devices, choose your phone device. Then, your phone screen will mirror on the computer.
Step 3. Hit the button to download and install MiniTool Video Converter on your device. Then, open it.
MiniTool Video ConverterClick to Download100%Clean & Safe
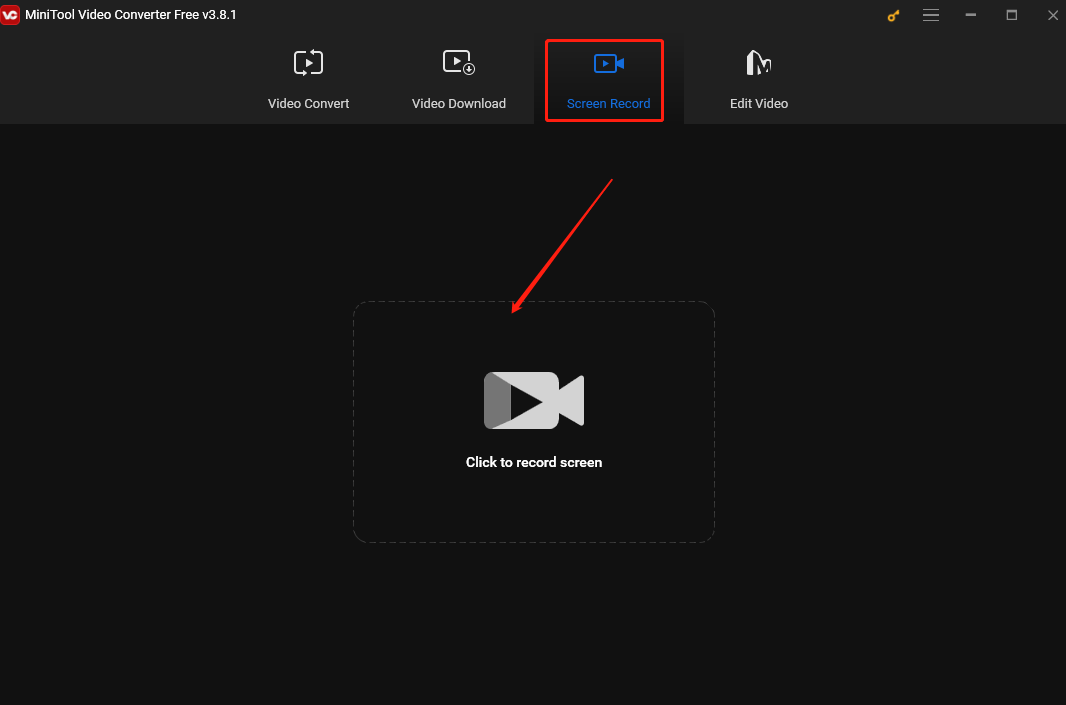
Step 4. Click the Screen Record option and click the Click to record screen region to access MiniTool Screen Recorder.
Step 5. MiniTool Video Converter captures your entire screen by default. Click Full screen in the MiniTool Screen Record panel, choose Select region from the dropdown, and move your cursor to choose your desired area. You can also click the System Audio and Microphone icons to record the external and internal sounds.
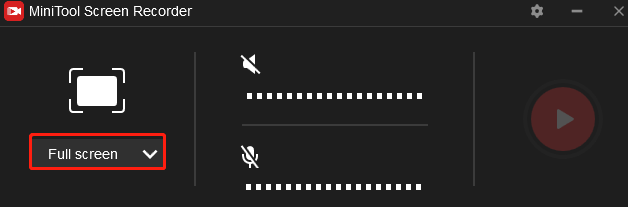
Step 6. Press the default F6 keyboard or click the Record button in the MiniTool Screen Record panel to start recording.
Step 5. Press F6 to stop it. Then the MiniTool Screen Recorder panel will show up again. Right-click the recording on the panel to preview, rename, delete, or locate it.

Conclusion
How to record on Vivo? There you have it! This post offers you 3 methods to help you record on Vivo. Whether you like the convenience of the built-in tool, the advanced features of a third-party app, or simply want to record your Vivo screen on your PC, this post has you all covered. I hope you enjoy it.
User Comments :