FFmpeg is a free and open-source software project with a suite of libraries and programs for handling videos and other multimedia files. You can use it to convert WebM to MP4, transcode MKV to MP4, rotate videos, and more. Also, you can use FFmpeg to change video resolution to 720P, 1080P, 2K, or others. How to make FFmpeg change resolution? If you are the first time to use FFmpeg for resolution changing, it must be difficult.
Fortunately, you can refer to the following detailed instructions. Furthermore, I will introduce you to a free and easy way to change resolution. Even if you are a beginner, you can master how to use it quickly and easily. Let’s get started!
How to Make FFmpeg Change Resolution
After reading the following steps, you can master how to change the video resolution in FFmpeg.
Step 1. Download and Install FFmpeg
If you don’t install FFmpeg, you need to go to its official website to download and install it first. Don’t know how to do that? Just refer to this useful post: How to Download and Install FFmpeg on Windows/Mac/Linux
Step 2. Open the Command Prompt Window
After installing FFmpeg on your PC, you need to press Win + R to open the Run dialog, type in CMD, and press Enter to open the Command Prompt window. Alternatively, you can directly enter CMD in the Search box of Windows and press Enter.
Step 3. Specify the Directory of the Target Video
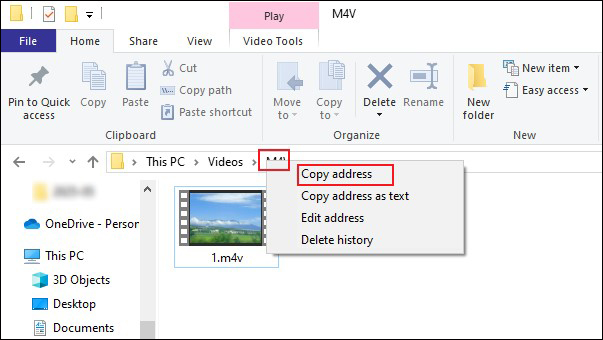
Then you need to specify the directory of the video you want to change resolution. Open the folder that saves the target video, right-click on the folder name, and choose the Copy address option. Just as the screenshot below.
Type “cd”, press the Space key on the keyboard to leave a space, and paste the directory name of the video. Then press Enter.
Step 4. Type in a Specific Command
The basic FFmpeg command for changing resolution is as follows:
ffmpeg -i input.mp4 -vf scale=WIDTH:HEIGHT -c:a copy output.mp4
It may be confusing when you first time to see this command. We can break this command down into four parts. What does each part represent? Here is an explanation for your reference:
- -i input.mp4: stands for your source file. You can change the MP4 extension to other formats according to your file. When you enter the command, you need to replace input with the name of your file.
- -vf scale=WIDTH:HEIGHT: represents the use of scale filter. You need to replace WIDTH and HEIGHT with specific numbers, like 1280:720, 1980:1280, or others.
- -c:a copy: This option enables you to copy the audio stream without re-encoding. If you want to personalize audio settings, you can remove or adjust this parameter.
- output.mp4: stands for the name of the output file. You can also change the file extension based on your needs.
How to make FFmpeg change resolution to 720P? You can enter this command: ffmpeg -i input.mp4 -vf scale=1280:720 -c:a copy output.mp4
This type of command may change the original aspect ratio in the process of changing resolution. if you want to keep the original aspect ratio while setting one dimension explicitly, you can use “-1” to make FFmpeg calculate the corresponding dimension automatically. For instance, you can enter the command: ffmpeg -i input.mp4 -vf scale=1280:-1 output.mp4
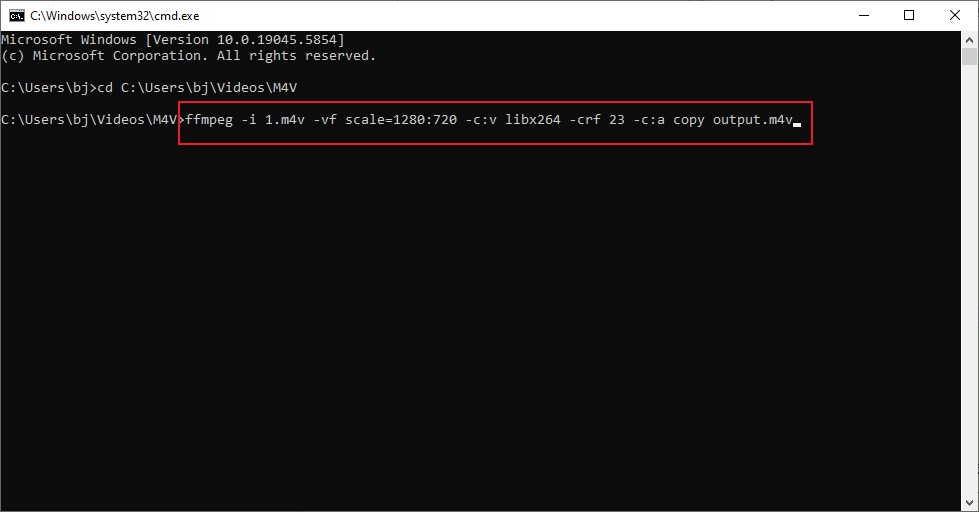
To change the resolution of my M4V video, my command is: ffmpeg -i 1.m4v -vf scale=1280:720 -c:v libx264 -crf 23 -c:a copy output.m4v
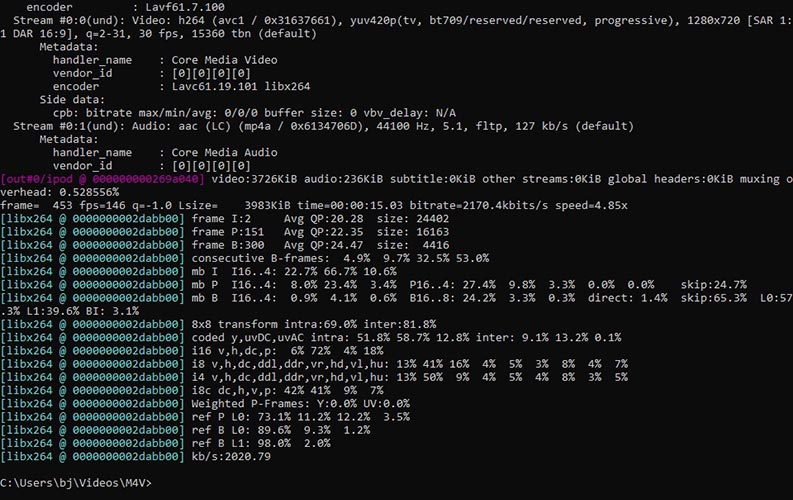
Step 5. Execute the Process
Finally, you can press Enter to start the changing process. Then you can get the image like the screenshot below.
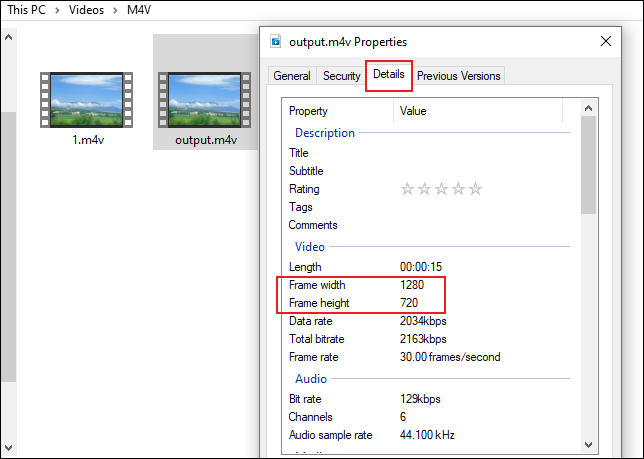
Next, go to the destination folder to find the changed video. To check the video resolution, you can right-click on the video, choose Properties, and go to Details.

Easy Way to Change Video Resolution
With the above detailed instructions, you can change the resolution in FFmpeg. I'm sure you may also feel that mastering how to use FFmpeg to process audio and video is not an easy task. In fact, FFmpeg is really not for beginners either.
No matter you are a beginner or a professional, MiniTool Video Converter can meet your needs. It is a reliable and easy-to-use program that supports converting video and audio files, changing video resolution, extracting audio from video, and adjusting other format parameters. With its user-friendly interface, you can master how to use it quickly. Below is how to change the video resolution with MiniTool Video Converter.
Step 1. Click the button below to download this free video converter and then install it on your computer.
MiniTool Video ConverterClick to Download100%Clean & Safe
Step 2. Launch this program and click Add Files to import the target videos that you want to change the resolution.
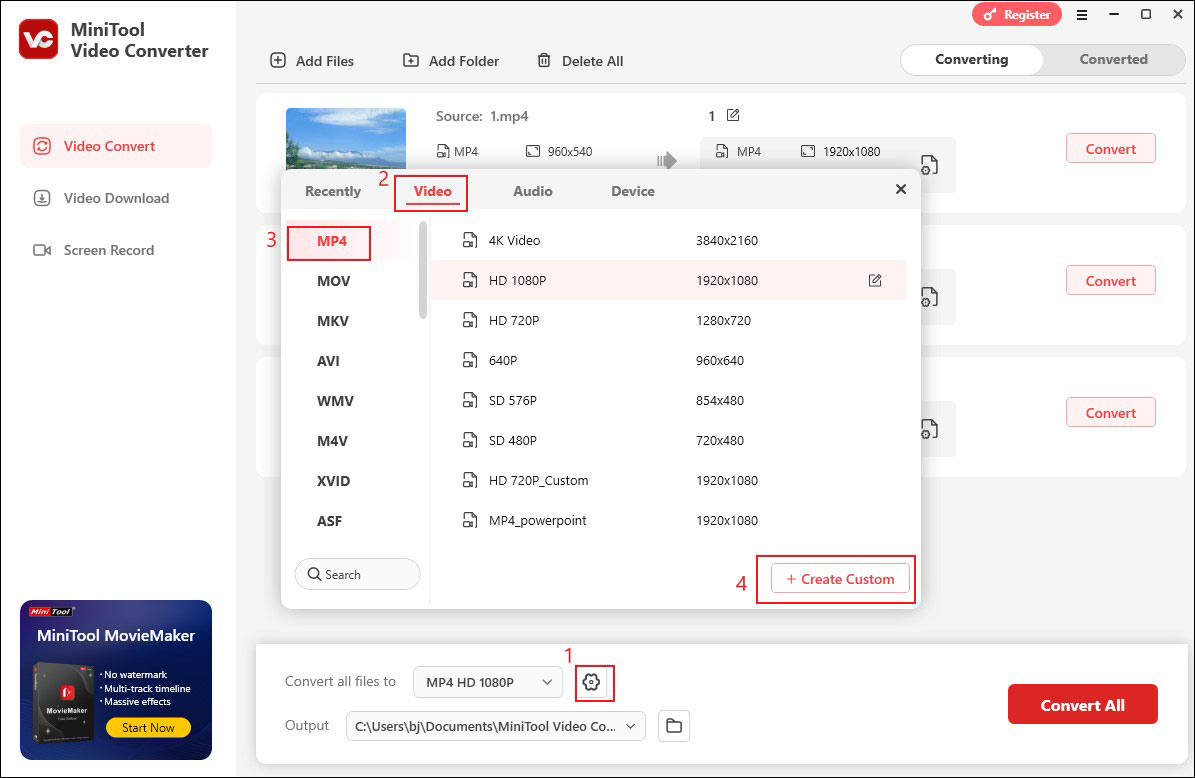
Step 3. Click the Settings icon next to Convert all files to. Go to the Video tab, choose the format you need, and select the preferred resolution preset. Furthermore, you can click on + Create Custom to change the resolution and personalize other format parameters.
Step 4. Click Convert All to perform the conversion process. Once done, you can click the Play icon to view the converted video or click the Folder icon to locate it.
Conclusion
Though FFmpeg is a useful tool for changing video resolution, it is not friendly to beginners since it requires a steep learn curve. If you still want to make FFmpeg change resolution, just follow the guidance above. Alternatively, you can easily change the video resolution using MiniTool Video Converter.
About The Author

Position: Columnist
Olivia is always full of enthusiasm for life and loves to record. She often records beautiful and memorable moments of life with her camera and then uses some editing tools to put the photos, videos and audio together. She also has a passion for writing and offers suggestions to readers on images, audio, videos and news. To provide more professional articles and solve problems for readers, she is continuing to learn multimedia as well.
User Comments :