Vimeo is a video-sharing platform. You can upload videos to this service and share them with others or keep them private. However, this service has specific standards for video posting. What formats does Vimeo support? What is the best video format for Vimeo? The answers are covered in this post from the free file converter.
What Formats Does Vimeo Support
Vimeo only supports video formats. Any other non-video formats such as audio and image are not acceptable. What formats does Vimeo support? See as follows.
- MP4
- MOV
- WMV
- AVI
- FLV
- …
What Is the Best Video Format for Vimeo
The best format for uploading videos to Vimeo is MP4, using the H.264 video codec and the AAC audio codec. The H.264 codec is highly efficient and provides excellent video quality, while the AAC audio codec enables high-quality sound at a low bit rate, helping to keep file sizes small.
When it comes to resolution, Vimeo supports video resolutions ranging from 240p to 8K. Generally speaking, higher resolutions usually mean better quality but also larger file sizes. Among them, most users choose 720p or 1080p for Vimeo.
The frame rate of your video matters a great deal. Vimeo supports a wide range of frame rates namely 23.98, 24, 25, 30, 50, 60, etc. It is suggested that you choose 30fps. This frame rate strikes a good balance between quality and size. Anything above 60 is reduced by default.
Vimeo supports different aspect ratios like 16:9, 4:3, and 1:1.
Please ensure that your files do not include leaders, color bars, or tones. The files will be presented to users exactly as they are submitted. Additionally, Vimeo OTT cannot accept videos with a rectangular pixel aspect ratio, Apple Intermediate Codec, or HDV 720p60 format.
How to Make a Perfect Vimeo Video
To make a perfect Vimeo video, you can use MiniTool Video Converter. It is a free video/audio converter. With it, you can change your file format to MP4, AVI, MOV, WMV, FLV, etc. You can also adjust the encoder, resolution, frame rate, etc. for the video. In addition, this tool has no size limits, allowing you to convert files of any size. Moreover, this tool won’t add watermarks to your converted file.
Step 1. Hit the button below and follow the on-screen instructions to download and install MiniTool Video Converter on your Windows PC.
MiniTool Video ConverterClick to Download100%Clean & Safe
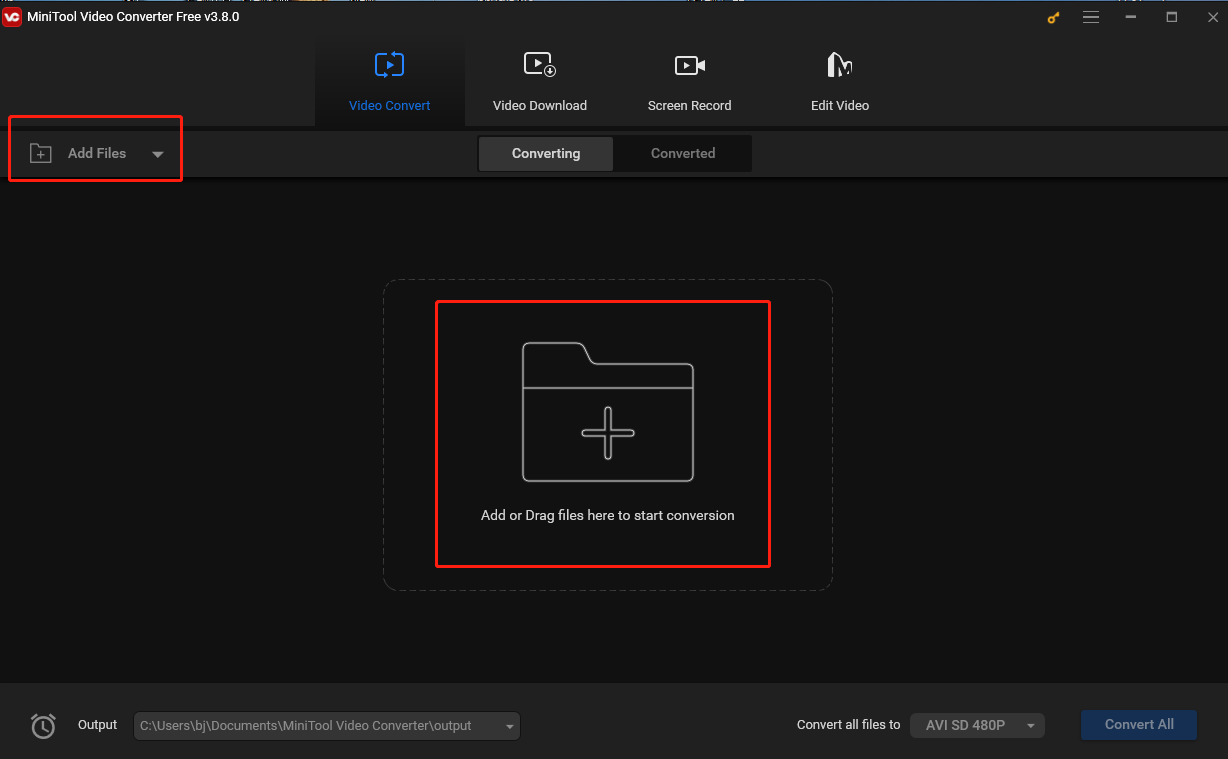
Step 2. Launch this program. Click the Add or Drag files here to start conversion area or Add Files to load the target video.

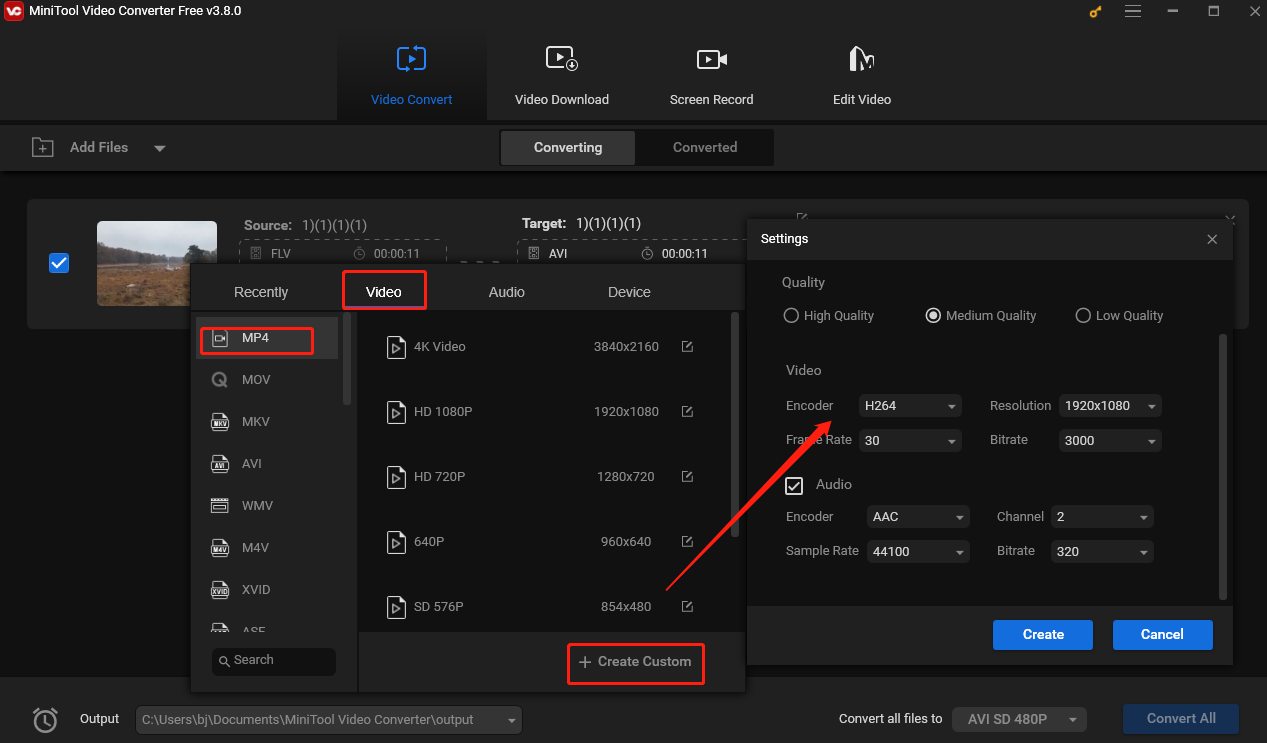
Step 3. Click the diagonal arrow under Target to open the output format window. Go to Video, choose MP4 in the left sidebar, and click Create Custom. In the following popup, you don’t have to change the encoder cause H.264 is the default encoder. Set 1920×1080 as the resolution and choose 30 from the drop-down menu of Frame Rate.
If your video contains audio, go to the Audio section, choose 320 from the list of Bitrate, and you can leave the rest as default. Click Create to save the profile. You will be redirected to the output format window. Click the newly created profile.

Step 4. Click the Convert button to begin the conversion.
How to Upload Videos to Vimeo
Step 1. Visit the Vimeo page and click New in the top right corner. Then select Upload from the drop-down list.
Step 2. Select Choose files to upload a video that is saved on your computer. Alternatively, you can upload videos from services like Dropbox, Google Drive, Box, Zoom, or Webex.
Step 3. Select a destination folder for the uploaded file. After selecting the destination folder and the video file, the upload will begin automatically.
Step 4. Once uploaded, you will be directed to the video settings page.
Conclusion
After reading this post, I guess you may have known the best format for Vimeo, how to create a perfect video for this platform, and how to upload it. I hope you find it useful.


User Comments :