This guide from the free file converter will walk you through the steps on how to screen record AniWave. We’ll cover different methods, ensuring that you can capture the animated content in the best possible way.
AniWave is a popular platform that offers a wide range of animated content. You might want to screen record your favorite moments on AniWave for various reasons, such as creating fan edits, sharing interesting scenes with friends, or simply preserving memories. Here is a guide to teach you how to screen record AniWave videos.
Tip: It’s important to note that while personal use for non-commercial purposes is generally acceptable, any unauthorized distribution or use of copyrighted content from AniWave may violate the law.
How to Screen Record AniWave with MiniTool Video Converter [Windows]
MiniTool Video Converter is a powerful video converter that also offers screen recording capabilities. Here’s a detailed introduction to its screen recording features:
Recording Modes
- Full Screen Recording: Capture the entire screen of your computer, including all open applications and windows.
- Custom Area Recording: Select a specific area of the screen to record, such as a particular window, application, or region of interest.
Audio Options
- System Audio: Record the audio output from your computer, such as music, video playback, or system sounds.
- Microphone Audio: Capture audio from your microphone, enabling you to add voiceovers or commentary to your recordings.
- Both: Record system audio and microphone audio simultaneously for a more comprehensive recording.
- Neither: Only record your screen without any audio at all.
Recording Settings
- Frame Rate: Offer different frame rate options, including 15fps, 20fps, 25fps, 30fps, and 50fps.
- Quality: Offer 3 recording quality options: high, standard, and original.
- Others: Allow you to customize the recording output folder, duration, hotkeys, etc.
Let’s see how to screen record AniWatch with MiniTool Video Converter.
Step 1. Click the button below to download and install MiniTool Video Converter.
MiniTool Video ConverterClick to Download100%Clean & Safe
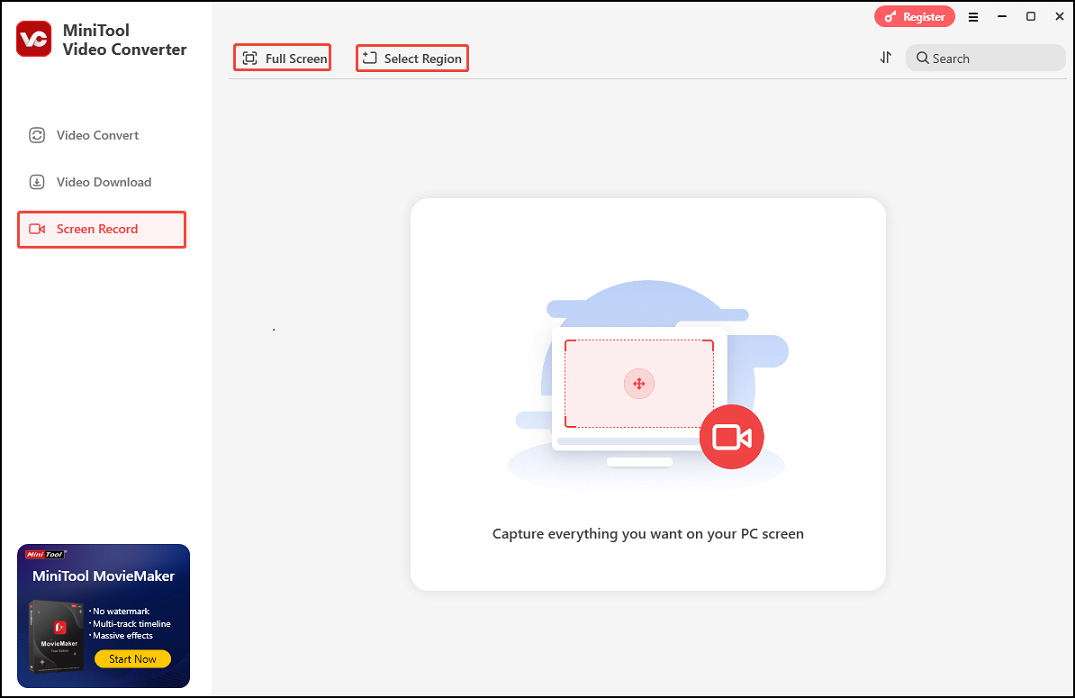
Step 2. Open it. Swift from the Video Convert tab to the Screen Record tab by clicking Screen Record on the left. Click Full Screen to capture the entire screen. You can also click Select Region, left-click your mouse, and then move it to select the recording area.
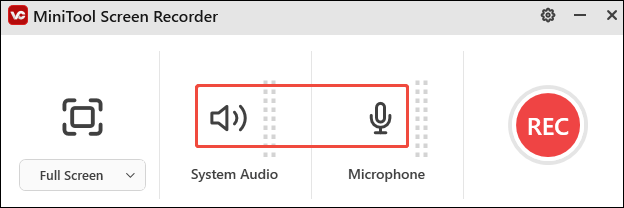
Step 3. Click the System Audio icon or the Microphone icon in the MiniTool Screen Recorder panel to capture the corresponding sound. You can also turn them on/off simultaneously. For more settings, click the Settings icon in the upper right to enter the advanced Settings page.
Step 4. Play the animation you want to record on AniWatch and press the F6 key to start recording. During recording, you can press F9 to pause/resume recording.
Step 5. Once done, press F6 to stop recording.
Step 6. Then, the main interface of the MiniTool Video Converter will appear with your recording listed. Click the play icon beside it to watch it or the file icon to locate it.
How to Screen Record AniWave with Xbox Game Bar
Xbox Game Bar is a built-in recorder for Windows 10 and 11. It can record gameplay and non-gaming activities. However, it doesn’t allow you to customize the recording area.
Step 1. IF you haven’t enabled Xbox Game Bar yet, you need to enable it first. Go to Windows Settings > Gaming > Captures and switch on the Record what happened feature.
Step 2. Press Windows + G on the keyboard to open the Xbox Game Bar.
Step 3. In the Xbox Game Bar, select the settings (gear icon) to customize notifications, audio sources, hotkeys, etc.
You can also turn on microphone recording by clicking the mic icon in the Capture window.
Step 4. Play the video you want to record and press Windows + Alt + R keys to start recording.
Step 5. To stop the Xbox Game Bar recording, just press Windows + Alt + R keys again.
How to Screen Record AniWave with Snipping Tool
The Snipping Tool is a built-in Windows tool for taking screenshots. Now, it offers a screen recording feature for Windows 11 users. It allows you to manually crop the area you want to record.
Step 1. Go to your Windows Search bar, type in Snipping Tool, and select it to open it.
Step 2. Next, click the Record button with the camcorder icon (the camera icon is for screen capture only) to switch to the recording mode. Then click the +New button in the top left corner of the window to begin a new screen recording.
Step 3. Play the animation. Select a recording area by left-clicking your mouse and dragging the white dotted line over the section you wish to record.
Step 4. Click the Start button in the floating window at the top of your screen to initiate the recording.
Step 5. To end the recording, press Stop.
Other Reliable Screen Recorders to Screen Record AniWave
- iTop Screen Recorder [Windows]
It’s a free Screen Recorder that can record any part of your screen with audio and webcam.
- OBS Studio [Windows/Mac/Linux]
It’s a popular free and open-source tool for screen recording and live streaming.
- RecMaster [Windows/Mac]
It offers you an easy and efficient way to record your computer screen.
- QuickTime Player [Mac]
It’s a preinstalled media player on Mac that can also be used for basic video recording.
Conclusion
Screen recording AniWave can be a fun way to save and share your favorite animated moments. By following the methods described above, you can capture high-quality recordings. Remember to always respect the copyright of the content on AniWave.
User Comments :