AniWatch is a free site for watching anime. You may want to screen record AniWatch episodes for future offline watching. This guide from the free file converter will show you 4 easy tools for this task.
Screen recording allows you to capture everything that’s happening on your screen, whether it’s a thrilling anime fight scene or a heartwarming character interaction.
However, it’s important to note that while screen recording can be a great way to enjoy and share content, we need to respect the rights of the content creators. Make sure that your screen recordings are for personal use only and not for any commercial or illegal purposes.
How to Screen Record AniWatch Episodes
Here are 4 methods to help you screen record AniWatch Episodes on Windows.
MiniTool Video Converter
MiniTool Video Converter is the most recommended tool for recording on Windows. It is easy to use and has an intuitive interface. This tool can capture any activity on your screen, like online courses, video calls, streaming content, gameplay, etc.
MiniTool Video Converter offers many custom options to satisfy your various needs. For example, you can choose to record the full screen or a specific area. You can also choose to record the system audio, microphone, or both. What’s more, you can customize the recording frame rate, output folder, etc. Last but not least, this tool is completely free and doesn’t have watermarks or time limits.
Let’s see how to screen record AniWatch with MiniTool Video Converter.
Step 1. Click the button below to download and install MiniTool Video Converter.
MiniTool Video ConverterClick to Download100%Clean & Safe
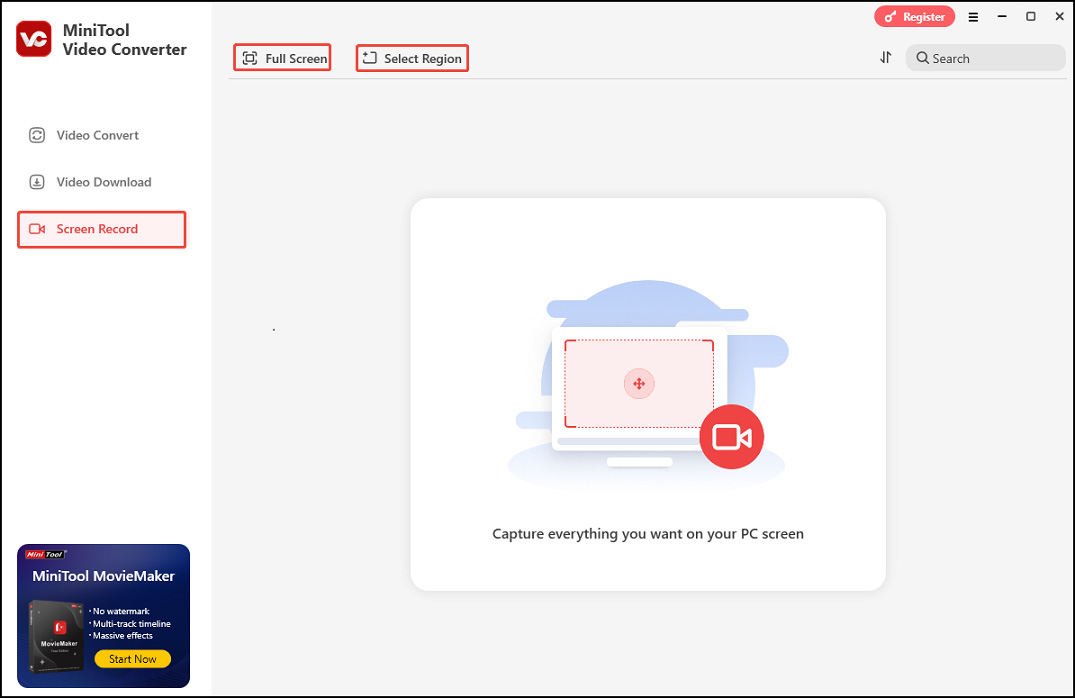
Step 2. Open it. Under the Screen Record tab, click Full Screen to capture the entire screen. You can also click Select Region, left-click your mouse, and then move it to select the recording area.
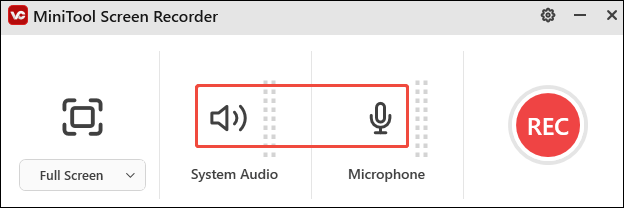
Step 3. Click the System Audio icon or the Microphone icon in the MiniTool Screen Recorder panel to capture the corresponding sound. For more settings, click the Settings icon in the upper right to enter the advanced Settings page.
Step 4. Play the animation you want to record and press the F6 key to start recording.
Step 5. During recording, you can press F9 to pause/resume recording.
Step 6. Once done, press F6 to stop recording.
Step 7. Then, you will be led to the main interface of the MiniTool Video Converter with the recording listed. Click the play icon beside it to watch it or the file icon to locate it. You can also rename it by clicking the current file name or the editing icon next to the current file name.
iTop Screen Recorder
iTop Screen Recorder is also a good and easy option to record AniWatch episodes. It offers several recording modes. You can capture the full screen, part of the screen, or a specific window with different audio sources. You can also add your face to the recording through a webcam.
Step 1. Download and install iTop Screen Recorder, then open it.
Step 2. Go to Record > Screen. Select the recording area. You can also turn on Mic, and Webcam to record yourself and your voice.
Step 3. Click REC or press F9 to Start Recording.
Step 4. Click the red Stop button to record the process.
iToolShare Screen Recorder
iToolShare Screen Recorder is another good option for Windows users to record animation on AniWatch. It is easy to use and allows you to record the full screen or a specific area, capture the system sound, microphone voice, or both.
How to screen record AniWatch with iToolShare Screen Recorder? See as follows.
Step 1. Download and install iToolShare Screen Recorder.
Step 2. Launch it. Select to record the whole screen or a specific area.
Step 3. Play the target animation and click the Start button to begin the recording process.
Step 4. To end the process, click the Stop button.
ShareX
ShareX is also a popular and powerful recorder that can help you record videos on AniWatch with ease.
Step 1. Download, install, and open ShareX. Click Task settings in the left panel.
Step 2. In the next window, select Screen recorder on the left and click the Screen recording option on the right.
Step 3. Choose the recording source.
- Record the Microphone. In the popup, go to the Audio source section, click the inverted triangle, and select the microphone you have set up before from the dropdown.
- Record the System Audio. In the pop-up, click Install recorder devices and follow the on-screen instructions to finish the process. Then, choose virtual-audio-capturer as the audio source.
Step 4. Click the inverted arrow under “Audio encoder” and choose one codec you like from the dropdown.
Step 5. Press Shift + Print Screen. You will see a dotted box, which is the recording area. You can left-click the mouse to choose the recording area you want. After you choose the area, the tool will automatically start recording.
Step 6. To end the process, click the Stop button on the toolbar.
Wrapping It Up
Now you know how to screen record your favorite moments on Aniwatch. Pick one tool you like and begin recording. Do remember to always use screen recording responsibly and respect the rights of the content owners.
User Comments :