Record Schedule I with Game Bar
Game Bar is a built-in screen recording tool natively supported by the Windows system. If you are not concerned about video quality and simply need a quick solution, Game Bar can meet your needs.
Here’s a specific guide:
1: Open the game and make sure it’s ready.
2: When you want to record the game, press Windows + G on your keyboard.
3: Click the Capture button to access the Capture window. Then, click the white dot icon to start recording. Or you can press Windows + Alt + R to start recording.
4: Once you want to stop the recording, just click the Stop Recording icon.

Record Schedule I with MiniTool Video Converter
If you want to create high-quality game recordings or have versatile needs, why don’t you try some third-party screen recorders? For example, MiniTool Video Converter. It is a professional and free screen recorder without time limits with many advanced features, allowing you to capture computer screens with high quality.
Additionally, you can record the full screen or a part of it based on your needs. MiniTool Video Converter also enables you to record with system audio and microphone simultaneously or separately.
Now, you can follow the details below to record Schedule I on Windows with high quality:
1: Click the download button below to download MiniTool Video Converter and install it on your computer.
MiniTool Video ConverterClick to Download100%Clean & Safe
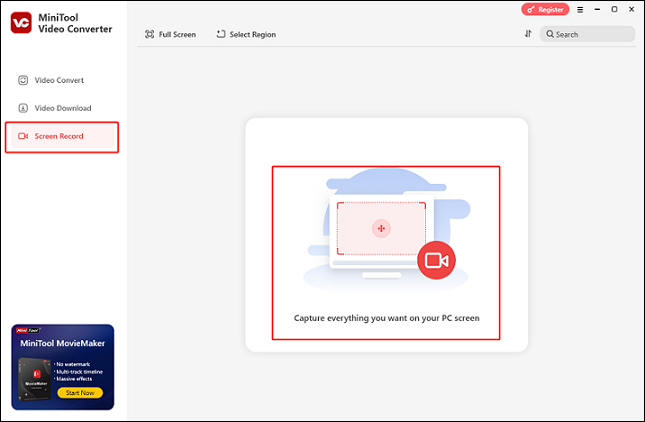
2: Launch MiniTool Video Converter, click the Screen Record tab, and then click on the Capture everything you want on your PC screen region to open the MiniTool Screen Recorder window.
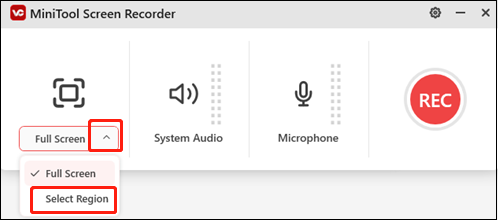
3: You have the option to stick with the default option, which records the entire screen. If you want to designate a recording zone, simply expand the Full Screen option and click the Select Region button. Next, decide which area you want to record.
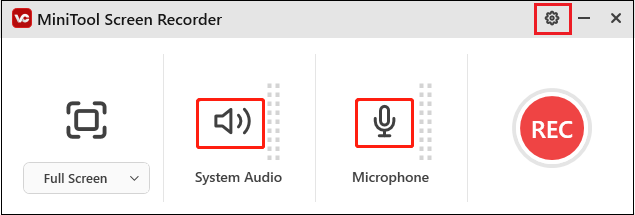
4: By selecting the appropriate icons, you can decide whether to record the microphone and system audio simultaneously or separately, depending on your preferences. To change the hotkeys, quality, frame rate, and other settings, you can click the gear icon in the upper right corner to bring up the Settings box.
5: When everything is ready, click the red REC button to start recording. You will have a three-second buffer time to head to the target interface.
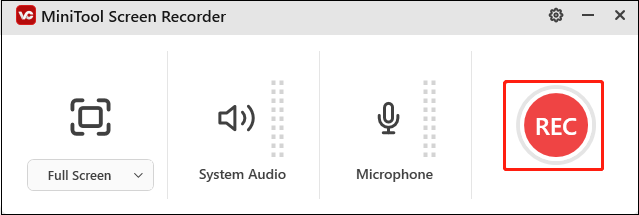
6: To end the recording, press F6 on the keyboard. The recording will be listed in the Screen Record section.
The above instructions will make it easy to record Schedule I gameplay on Windows!
Record Schedule I with EaseUS RecExperts
EaseUS RecExperts is also an ideal choice for screen recording on Windows. It has a straightforward interface, so you can use it effortlessly. This screen recorder has several recording modes, like record screen, record audio, record game, record game, and record webcam. Besides, you can record with or without system audio and microphone sound.
Here’s a step-by-step recording guide:
1: Download and install EaseUS RecExperts from its official website.
2: Launch this program to enter its main interface. If you want to specify a recording area, click the Region tab to select the area.
3: After that, click the System sound, Microphone, and Webcam icons to turn them on or off according to your needs.
4: After everything is settled, click the orange REC button to start recording.
5: To pause or resume the recording, press F10. To end the recording, you can press F9.
Now you can enjoy your Schedule I gameplay recordings!
![Record Commandos: Origins on Windows/PS5/Xbox X/S [Full Guide]](https://images.minitool.com/videoconvert.minitool.com/images/uploads/2025/04/record-commandos-origins-thumbnail.png)
Conclusion
How to record Schedule I gameplay to save the thrilling moments on Windows? This post offers 3 reliable screen recorders and shows you how to perform the recording step by step. Hope this article can help you!
User Comments :