DaVinci Resolve is a professional post-production video editing application that is available on Windows, macOS, Linux, and iPadOS. It enables you to record audio and add voiceovers for your videos to offer extra information about videos. How to record audio in DaVinci Resolve? This MiniTool free video converter post will give you detailed guidance. Meanwhile, we will give you easy ways to record voiceovers for videos and tell you how to screen record on DaVinci Resolve.
In this useful post, we will mainly introduce you to the tutorial on how to record audio in DaVinci Resolve. Only 5 steps can complete the task. For some beginners, it is difficult to master the methods of recording audio in DaVinci Resolve. Don’t worry! This post also offers alternatives to DaVinci Resolve for audio recording. Furthermore, the guidance on how to screen record on DaVinci Resolve is also covered. Let’s delve into this useful post.
How to Record Audio in DaVinci Resolve
Before starting to learn how to record audio on DaVinci Resolve, you need to make sure that your recording devices (like microphones) are connected properly and have a quiet recording environment. Once these preparations are done, you can launch DaVinci Resolve on your PC and import the target video project if you are not working on a project. Next, keep reading the following steps.
Step 1. Create a New Audio Track
Firstly, you need to create a new audio track for the audio recording. Just click the Fairlight tab at the bottom of the screen. You can see an audio track on the timeline if your video project has audio. You can see the track number and other information on the left side of the timeline.
To create a new audio track, right-click on an empty space in the track header area, move to Add Track, and choose the Mono option if you only use one microphone. Or you can choose the Stereo option if you use the stereo microphone.
Then the newly created audio track will appear under the other tracks. If you want to rename the audio track, you can double-click on it and give it a name.
Step 2. Choose the Audio Input
Then you need to set up your microphone and make sure that it is connected to your PC properly. There are 2 options for you to choose from. Let’s have a look.
Option 1. Through the Mixer
Choose the newly created track and click the Mixer tab in the higher right. Then click on No Input to open the menu and choose Input to open the Patch Input/Output window.
On the left Source section, choose the source that will record the audio. On the right Destination section, select the destination for your audio track. Click the Patch button to connect the source and destination and then you can see your microphone appear under Input now.
Option 2. Through the Fairlight Menu
Go to the menu bar, hit the Fairlight option, and choose the Patch Input/Output option. Then refer to Option 1 to choose the microphone or audio interface on the left side and select the audio track dedicated to the voice-over on the right side. Finally, click the Patch button and close the window.
Step 3. Arm the Audio Track for Recording
Next, you can arm the audio track to notify DaVinci Resolve that you are ready for audio recording. If you don’t arm the audio track in advance, nothing can be recorded even if you click the Record button.
On the track, you can see 3 letters including R, S, and M. You can simply click on R to arm the audio track. This operation can also check if your microphone is working properly. Then you can see the levels on the Mixer moving.
Step 4. Record Audio in DaVinci Resolve
With everything done, it’s time to record audio in DaVinci Resolve. You can move the playhead to where you want to add a voiceover and hit the Record button in the middle of the dashboard. When you want to end the audio recording, simply press the space key on the keyboard.
Step 5. Export the Video with Audio Recording
You can edit the audio in DaVinci Resolve. After editing the video project, you can export it to your computer locally. Click the Deliver tab at the bottom of the screen and choose one preset from the left side or choose Custom Export. Personalize the output settings and click on Render All to export the video with audio recording.
MiniTool MovieMakerClick to Download100%Clean & Safe
How to Screen Record on DaVinci Resolve
Sometimes, you may want to record your editing operation in DaVinci Resolve and make these recordings into video tutorials. How to screen record on DaVinci Resolve? MiniTool Video Converter is a free and easy-to-use screen recorder that is worth a try. It supports recording the 4K screen at standard, high, or original quality and saves recordings in MP4 format. Furthermore, it offers multiple frame rate options for recordings, including 50fps, 30fps, 25fps, 20fps, and 15fps.
This screen recorder can help you record any activities happening on the screen with the option to record microphone sounds and system audio. Below is how:
Step 1. Download, install, and run MiniTool Video Converter.
MiniTool Video ConverterClick to Download100%Clean & Safe
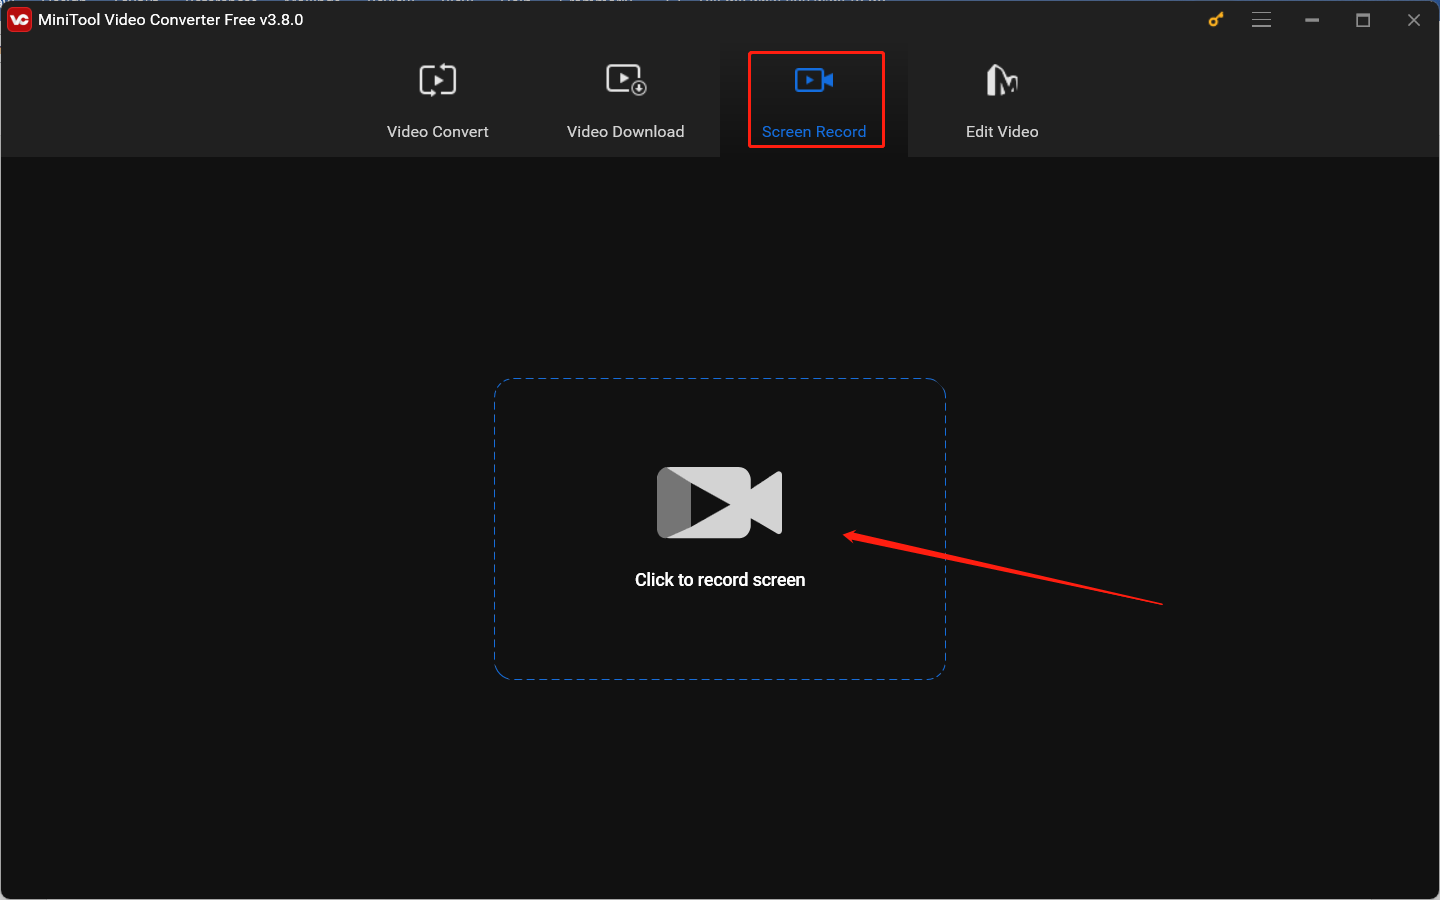
Step 2. Switch to the Screen Record module and hit on Click to record screen to access MiniTool Screen Recorder.

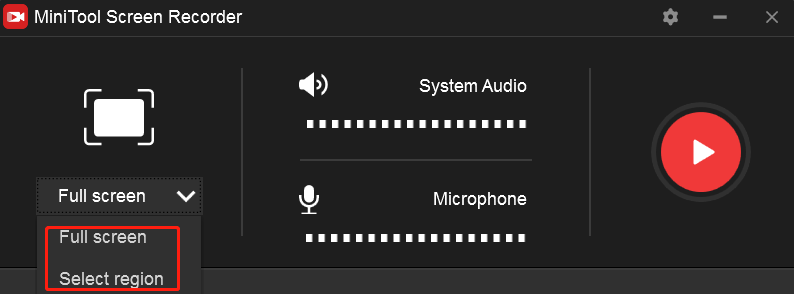
Step 3. Choose the recording area and audio source. By default, it records the full screen. To record a specific window or selected region, click the inverted arrow next to Full screen to choose Select region and then drag the cursor to choose the recording area.

Step 4. Click the speaker and microphone icons to turn on the system and microphone audio on or off. Click the gear icon at the top right corner to further adjust other recording settings.
Step 5. Click the Record button or press F6 to start recording. Press F9 to pause and resume recording. To end the recording, press F6 again.
Conclusion
How to record audio in DaVinci Resolve? The above has shown you the detailed steps. I hope this article has been helpful to you.


![How to Screen Record Snapchat Without Them Knowing [PC/Phone]](https://images.minitool.com/videoconvert.minitool.com/images/uploads/2024/10/how-to-screen-record-snapchat-without-them-knowing-thumbnail.jpg)
User Comments :