Are you trying to figure out how to record screen with Adobe Captivate? How can you perform Adobe Captivate screen recording? This free video converter post from MiniTool will guide you through the recording process using Adobe Captivate.
Is There a Screen Recording Tool in Adobe
Screen recording was not initially integrated into Adobe Premiere Pro or any of the other Adobe applications. Nonetheless, in 2019, Adobe Captivate, a tool for eLearning creation and screen recording, was released. With this authoring and screen-recording program, you can screen record Adobe and other screens on the PC.
Brief Introduction to Adobe Captivate
The authoring tool Adobe Captivate is used to create eLearning materials like software simulations, software demos, branching scenarios, and randomized tests. Especially, it has built-in features for screen recording. You can use both screen capture and webcam while creating video presentations. Moreover, Adobe Captivate offers multiple recording choices, including full-screen, partial-screen, and customizable screen modes.
![How to Record Screen on Panasonic Toughbook Laptops? [Pro Guide]](https://images.minitool.com/videoconvert.minitool.com/images/uploads/2024/12/record-screen-on-panasonic-toughbook-laptops-thumbnail.png)
How to Record Screen with Adobe Captivate
Can Adobe Captivate screen recording? From the above mentioned, we can tell that the answer is yes. The details below will guide you to perform Adobe Captivate screen recording.
Step 1: Go to Adobe Captivate’s official website, download the most recent version, and follow the guidelines to install this program on your computer.
Step 2: Launch this software to enter its main interface. Navigate to the File menu and select the Record Video Demo option.
Step 3: Now, select a recording mode you want. Screen Area: capture a certain area of the screen; Customize Size: select the area of the screen that you wish to record; Full Screen: record the whole screen.
Step 4: If you want to record mouse movements, click the down-arrow button next to Panning to select the appropriate option.
Step 5: Also, you can click the down-arrow button next to Audio to control the microphone sound and system audio.
Step 6: Now, click the Record button to start recording.
Step 7: Press the End key or F10 on your keyboard to end the recording when you’re finished. After stop recording, Adobe Captivate will switch you over to the editing suite.
You can record screen with Adobe Captivate smoothly by following the details above!
Bonus: Best Adobe Captivate Alternative for Screen Recording
MiniTool Video Converter is a professional and user-friendly Windows screen recording tool you can never miss. It allows you to capture any section and activities on the computer screen, including but not limited to games, online lessons, video/audio calls, TV shows, presentations, etc.
Except for capturing your 4K computer screen activities, MiniTool Video Converter also enables you to record with microphone sound and system audio simultaneously or separately. In addition, you can change the output quality, frame rate, and customize the hotkeys as you prefer.
Here’s a quick guide on how to screen record with MiniTool Video Converter:
Step 1: Click the download button below to have MiniTool Video Converter installed on the PC.
MiniTool Video ConverterClick to Download100%Clean & Safe
Step 2: Launch this program and enter its Screen Record section. Then click the Click to record screen area to access MiniTool Screen Recorder.
Step 3: Click the inverted arrow icon next to Full screen to open the drop-down menu and click Select region to specify the recording area. Or you can record the full screen by default.
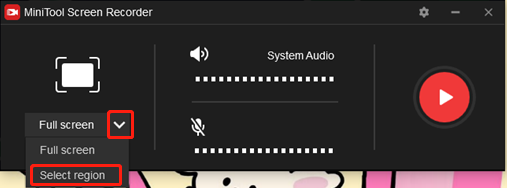
Step 4: Click the Microphone icon and System Audio icon to turn them on or off as you prefer.
Step 5: Now, click the red Record button to start recording. Once done, press F6 to end the recording.
![Proven Methods to Record Adobe Connect Easily [Detailed Guide]](https://images.minitool.com/videoconvert.minitool.com/images/uploads/2024/12/record-adobe-connect-thumbnail.png)
Conclusion
This post gives a specific guide on how to perform Adobe Captivate screen recording. By following the step-by-step guide mentioned above, you can screen record with Adobe Captivate with no effort. In addition, if you are looking for an easier way to capture on-screen activities, just give MiniTool Video Converter a try. Hope this article can help you a lot!
User Comments :