

This post explains four methods to play WMV on Chromebook. You can use a dedicated media player, upload it to cloud storage services for playback, install the necessary codecs, or convert WMV to MP4 using standard H.264 video and AAC audio codecs.
What Is WMV
Standing for Windows Media Video, WMV, which was created by Microsoft, refers to a video format with a compressed nature. Meanwhile, WMV, which gives support for Digital Rights Management (DRM), has much to offer in sustaining copy protection.
Does Chromebook Support WMV
Can Chromebook play WMV files? The answer is no. Specifically, a Chromebook lacks the Windows Media codec, which causes the problem that Chromebooks can’t play WMV. To solve that problem, you can use a WMV player or convert WMV to a Chromebook-supported format, like MP4. Some of you may not know how to do that. Don’t worry. Read on to find out the solutions for WMV videos not working.
How to Play WMV on Chromebook Without Conversion
Want to play WMV on Chromebook without conversion? The following 3 methods can help:
- Use a media player
- Upload WMV files to cloud storage services
- Install necessary codecs
Method 1. Use a Third-Party Player
To play WMV files on a Chromebook, one of the most effortless ways is to use a third-party player that supports WMV. Don’t know which one to choose? Here, I highly recommend the VLC media player.
As a professional-grade media player, VLC media player supports tons of audio/video formats, including WMV, MP4, AVI, VOB, FLV, and so on. Plus, with its open-source nature, it works well on different platforms, including Windows, Mac, Linux, Android, etc.
Below is a detailed guide on how to install the VLC Media Player on your Chromebook.
1. Launch the Google Play Store.
Run the Google Play Store app on your Chromebook.
2. Select the VLC Media Player.
Search for VLC. Then, select the VLC for Android app.
3. Download and install the VLC Media Player.
Click on the Install button to download and install this player.
4. Play WMV Video.
When the installation process is over, open this player and view your WMV file
Simply put, with VLC Media Player, you can effortlessly play WMV on Chromebook without conversion. By the way, MX Player also enables you to play WMV videos on Chromebooks.
Method 2. Use a Cloud Storage Service
How to play WMV files on Chromebook without conversion or downloading a media player? A cloud storage service can help. There are different kinds of cloud storage services, including Google Drive, OneDrive, and more. Here, I highly recommend Google Drive.
As an outstanding cloud storage service, Google Drive enables you to share, access, or store files from a variety of devices. It also has a built-in video playing function, which allows you to view WMV, MP4, AVI, MOV, and other videos online.
To view the WMV video on Google Drive, just launch the web browser on your Chromebook. Then, visit https://drive.google.com/. Next, follow the on-screen prompts to upload and view your WMV file.
Method 3. Install Necessary Codecs
Necessary codecs are an integral part of decoding videos. Hence, you need to install appropriate codecs that enable WMV playback on Chromebooks. Before the codec installation, follow the guidance below to enable Linux (Beta) on your Chromebook.
1. Enter the Settings Menu.
On your Chromebook, at the bottom right of the screen, click on the time. Then, access the Settings menu by clicking on the Gear icon.
2. Enable the Linux development environment.
In the Settings menu, choose the About ChromeOS option. Next, click on the Developers option.
3. Set up Linux.
Choose the Set up option next to Linux development environment. Follow the on-screen instructions to specify the disk size and username. When the installation process ends, the terminal window will pop up automatically.
Finally, download and install codecs, like FFmpeg or GStreamer, via the Linux terminal window. With this method, you can play WMV on Chromebooks without hassle.
How to Play WMV on Chromebook with Conversion
Considering that some of you want to convert WMV to a Chromebook-supported format, like MP4, I recommend MiniTool Video Converter and FreeConvert. They support batch conversion, have no file size limit, and do not have a steep learning curve.
Option 1. MiniTool Video Converter (Offline)
MiniTool Video Converter is one of the best programs that I have used for many years. This free video converter supports a wide range of video formats, including WMV, MP4, MOV, MKV, AVI, 3GP, FLV, M4V, and so on. With it, you can convert up to 5 WMV videos simultaneously. Furthermore, the software empowers you to customize the encoder, frame rate, sample rate, bitrate, and resolution of the output files.
 MiniTool Video Converter
-
 Batch convert video/audio files among 1000+ formats.
- Quickly compress videos for easy storage and transfer.
- Accurately extract subtitles from video/audio files.
- Effectively enhance video quality.
Here is how to convert WMV to MP4:
Fast Track Steps:
- Install MiniTool Video Converter.
- Select the Convert Video module and import the WMV file.
- Set the output format to MP4.
- Start the conversion task.
1. Download and install
Download and install the WMV converter.
2. Import the WMV file
After installation, launch the conversion software, and you will access the Home page. Click the Convert Video module on the left sidebar, then click Add Files at the top to add the target WMV video.
3. Set the output format to MP4
Click the Settings icon on the right-hand side. From the next pop-up window, go to the Video tab and select MP4 in the left sidebar. Next, click the desired resolution profile.
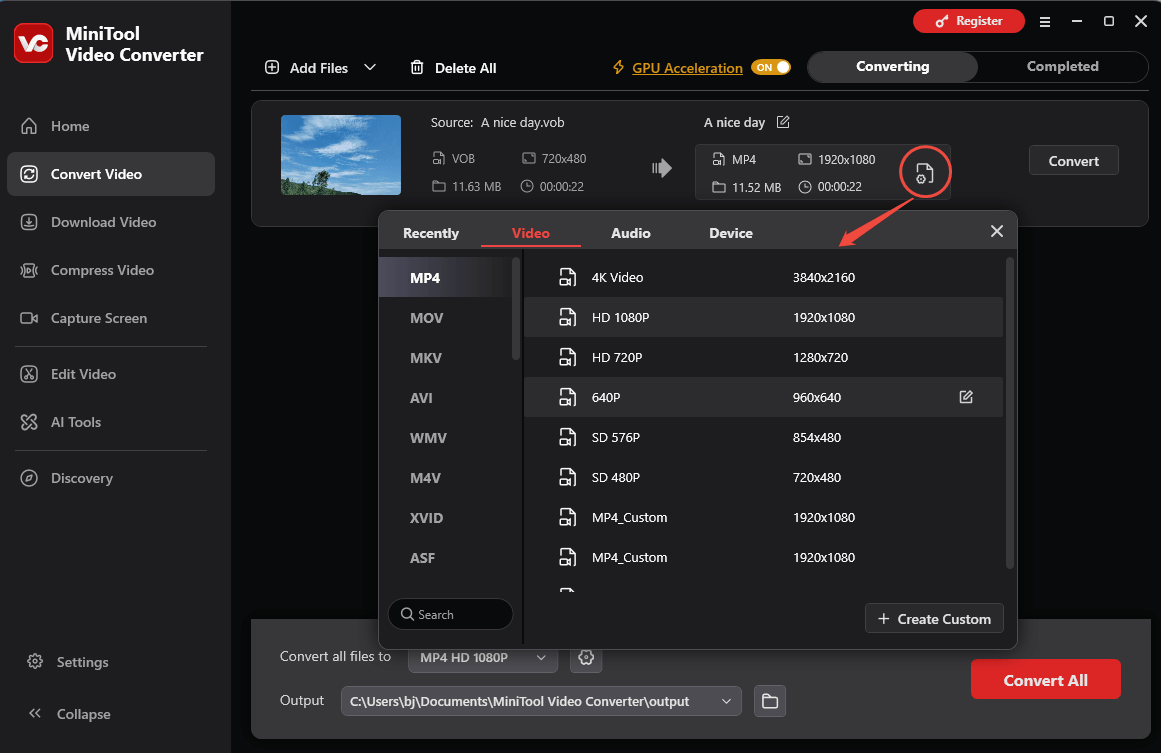
4. Set an output format and start conversion
Expand the Output option to choose a path for the converted files. Then, click on the bottom-right Convert All button to start the conversion process.
5. Check the output files
When the file conversion process ends, this video converter will automatically switch to the Completed section. There, click the Play icon to view the output files. If you want to locate the converted videos, click the Folder icon.
With the above steps, it will never be difficult for you to play WMV on Chromebook. More surprisingly, MiniTool Video Converter also serves as a watermark-free video compressor, a professional video/audio to text converter, and a free screen recorder.
Option 2. FreeConvert (Online)
Some of you may want to convert WMV files without downloading extra software. Here, I highly recommend FreeConvert. FreeConvert is a web-based converter that enables you to upload your WMV videos from multiple sources, including your device, Google Drive, OneDrive, and Dropbox.
Below is a detailed guide on how to convert WMV to MP4 using FreeConvert.
Fast Track Steps:
- Upload the WMV video to FreeConvert.
- Modify conversion settings.
- Start the conversion task.
1. Go to the WMV to MP4 Converter page of FreeConvert
Go to https://www.freeconvert.com/wmv-to-mp4.
2. Upload the WMV video
Click the Choose Files option to import the WMV file that you want to convert.
3. Configure the conversion settings
Click the Settings icon to enter the Advanced Options window. There, you are free to customize the video codec and frame rate. Also, you can choose whether to resize, rotate, or flip the video. In the end, click on the Apply Settings button to save the changes.

4. Start conversion and check the converted file
Begin the conversion process by clicking on the Convert button. When the file conversion process completes, download and check the output file.
Undoubtedly, FreeConvert is a fabulous tool that enables you to play WMV on Chromebook. However, it has some advertisements that may distract your attention.

To Wrap Things Up
How to play WMV on Chromebooks? If you don’t want to convert your files, try VLC Media Player, Google Drive, or additional codec installation. If you want to convert WMV to MP4 for use in Chromebooks, MiniTool Video Converter works as an offline solution. If you desire an online converter, try FreeConvert.
If you have problems using MiniTool Video Converter, email support@minitool.com for help.
People Also Ask
About The Author

Position: Columnist
Cora is a tech writer specializing in digital media workflows, with over six years of hands-on experience in video post-production, media transcoding, and screen capture. Her writing is always clear and practical. Cora also produces in-depth software reviews for users across skill levels to help them find the right tool and enjoy video editing.
User Comments :