This article from the free file converter aims to provide a clear and straightforward guide on how to screen record on an iPod Touch. It will walk you through the necessary steps from preparation to capturing your screen moments. Whether you want to record gameplay, create tutorials, or save interesting app interactions, these instructions will help you achieve it easily.
The iPod Touch is a versatile device with many functions. It is a portable media player and a handheld gaming device, but can also be used as a digital camera, a web browser, etc. How to screen record on an iPod Tough? Keep reading.
How to Screen Record on iPod Touch Using the Built-in Feature
iPod Touch has a screen recording feature, allowing you to capture everything happening on your device’s screen. In the following sections, I will show you how to do it.
Step 1. Open Settings, navigate to Control Center, then tap the green plus button next to Screen Recording to activate the recording feature.
Step 2. Swipe down on the right-hand side of your screen or swipe up (depending on what iOS you’re running) to open the Control Center panel. Tab and hold the gray Record button, then tap Microphone. You can also only tab the button if you don’t want record the microphone sound. After the 3-second countdown, the tool will start recording your screen.
Step 3. To stop recording, open Control Center, tap the Screen Recording button. You can also tap the red status bar at the top of the screen and tap Stop.
Step 4. Once finishes, go to Photos to check your recorded video.
How to Screen Record on iPod Touch Using Third-Party Software
Recording can be space-consuming. What if your iPod doesn’t have enough space? You can mirror your iPod screen to a computer, use a desktop screen recorder to capture the iPod screen, and save the recording
Stage 1. Mirror iPod Tough to PC
Step 1. Download, install, and launch X-Mirage on your PC.
Step 2. Connect your iPod and your PC to the same Wifi.
Step 3. Swipe down from the upper-right corner of the iPod screen and Tap Screen Mirroring.
4. Select your Windows PC from the list. If an AirPlay passcode appears on your TV screen, enter the passcode on your iOS or iPadOS device.
Stage 2. Choose a Reliable Screen Recording Tool
There are many tools available for this task. Here I recommend MiniTool Video Converter.
MiniTool Video Converter is a free Windows screen recorder without time limits or watermarks. It can record the full screen or a specific area. You can also customize the recording audio source. For example, you can record the system audio, microphone, or both. You can also turn them off simultaneously. As a high-quality recorder, it can capture your 4K screen.
Additionally, MiniTool Video Converter allows you to adjust the recording quality, frame rate, etc.
Click the button below to download and install MiniTool Video Converter on your PC.
MiniTool Video ConverterClick to Download100%Clean & Safe
Stage 3. Screen Record iPod Tough on PC
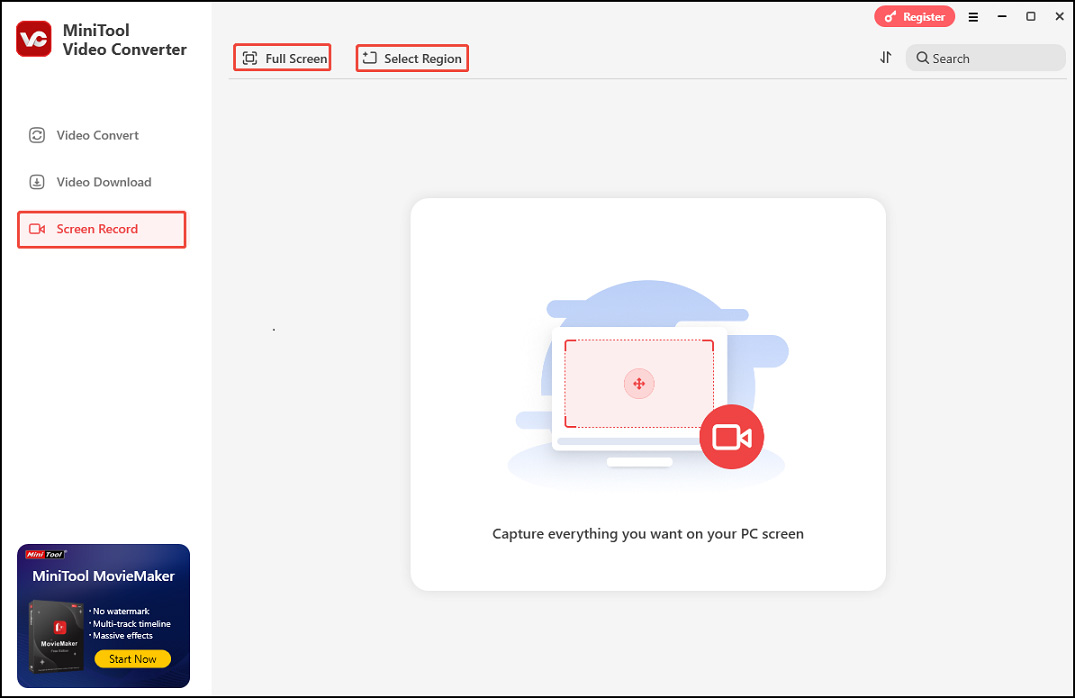
Step 1. Launch MiniTool Video Converter.
Step 2. Click Screen Record on the left. If you want to capture the whole screen, lick Full Screen. Or click Select Region, left-click your mouse, and then move it to select your desired recording area.
Step 3. In the MiniTool Screen Recorder panel, click the System Audio icon or the Microphone icon to capture the corresponding sound. You can also turn them on/off simultaneously. For more settings, click the Settings icon in the upper right.
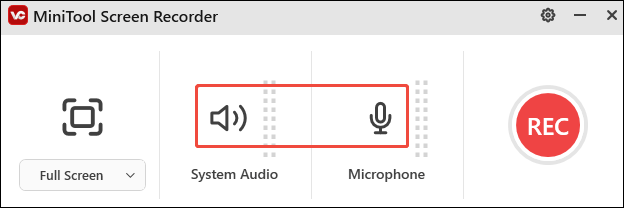
Step 4. Press the F6 key to start recording. Press F9 to pause/resume recording if needed.
Step 5. Once done, press F6 to stop recording.
Step 6. In the MiniTool Video Converter panel, click the play icon beside your recorded video to watch.
Conclusion
Screen recording on an iPod Touch is simple. This post offers detailed instructions to help you accomplish this task using the built-in feature and MiniTool Video Converter. Hope it helps.
User Comments :