How to Change Frame Rate in Premiere Pro
How to change frame rate in Premiere Pro? You can adjust the frame rate in two distinct ways in Premiere Pro. The first way is to change a sequence's frame rate, and the second is to alter the video clip's frame rate. I'll show you how to accomplish both. Read on for more.
# Change the Frame Rate of a Sequence
If you wish to keep the frame rate constant for most of the movie, you can adjust the frame rate of the particular scenes that require adjustments.
Here’s the step-by-step guide:
1: Make sure you already have Adobe Premiere Pro installed on your computer. Then launch this program and open your project.
2: Select the sequence that needs to have its frame rate changed in the Project panel. Then right-click the selected sequence.
3: Choose the Sequence Settings option from the menu that pops up.
4: Then, click the down-arrow icon next to Timebase to open the drop-down menu and choose a frame rate you want.
5: Finally, click OK.
# Change the Frame Rate of a Video
You can follow the instructions below if you want to change the frame rate of a whole video clip in Adobe Premiere Pro.
1: Launch Adobe Premiere Pro, import your video clip, and drag it to the timeline.
2: Head to the Effects tab at the lower left corner of the screen, select Video Effects, click Time, and click Posterize Time.
3: To change the frame rate for a clip, drag and drop the Posterize Time effect onto it.
4: Then select Effect Controls in the upper left corner of the screen.
5: Click the inverted arrow icon next to Frame Rate under Posterize Time. Now you can adjust the frame rate according to your preference.
6: After that, click the Sequence option on the top toolbar and click Render Selection.
How to Convert 30FPS to 60FPS in Premiere Pro
If you have a 30fps video and want to convert it to 60fps in Premiere Pro, how can you do that? The following content offers a step-by-step guide on how to change frame rate with Premiere Pro.
1: Run Adobe Premiere Pro on the computer to enter its main interface. Then click the File tab on the top left, click New, and click the Sequence… option.
2: Select the AVCHD option, click 1080p, click AVCHD 1080p60, and then click OK.
3: Import your 30fps video and drag it to the timeline.
4: When the Clip Mismatch Warning window pops up, click the Keep existing settings option.
5: Right-click the timeline’s video, choose the Time Interpolation option, and click Optical Flow.
6: Press the Enter key and wait until the processing is done.
7: Click File to open the menu, click Export, and click Media.
8: Choose a preset that meets your needs from the options offered.
9: Click Export to export the 60fps video.
Bonus: Easy Way to Change Video Frame Rate
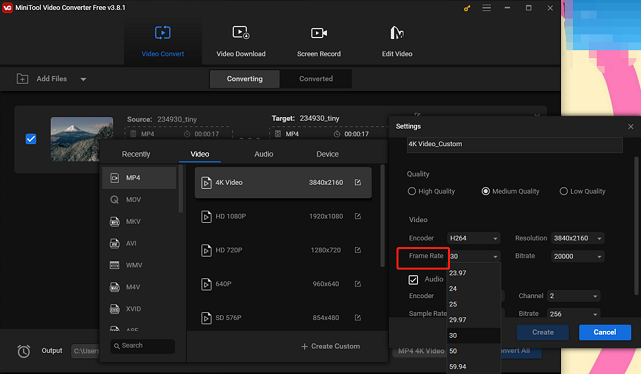
If you find it a bit cumbersome to change the video frame rate in Adobe Premiere Pro, there's an easier way – use MiniTool Video Converter. It has an intuitive interface and allows you to change the frame rate with just a few clicks. In addition to that, MiniTool Video Converter also empowers you to change video bitrate, encoder, resolution, quality, and audio sample rate, channel, etc. With no ads, bundles, watermarks, or size limits, you can have a hassle-free user experience!
Click the download button below and have a try!
MiniTool Video ConverterClick to Download100%Clean & Safe
Conclusion
How to change frame rate in Premiere Pro? This post provides an ultimate guide to show you how to change frame rate in Premiere Pro step by step. Also, you can use MiniTool Video Converter to change frame rate easily and quickly. Hope this article can do you a favor!
User Comments :