Behance has a 1 GB video size limit. This article guides you to find a standout video compressor for Behance. Meanwhile, it shows how to compress video for Behance with MiniTool Video Converter, MiniTool MovieMaker, or Online File Compressor.
What Is Behance Video Size Limit
Behance is a popular platform that is widely used for work display and job opportunities. That is to way, you can share a video with others on it effortlessly. However, Behance has a 1 GB video size limit. As such, if your video file is larger than 1 GB, you can’t upload it to Behance. To solve that problem, you can compress video for Behance.
How to Define an Outstanding Behance Video Compressor
Before the Behance video compression, I will walk you through how to find a fabulous video compressor for Behance.
Advice 1. A High Compression Speed
A high compression speed empowers you to compress multiple videos as quickly as possible. Hence, it is suggested that you find a video compressor that supports batch compression. This way, you can save more time to handle other affairs.
Advice 2. Ease of Use
A well-organized interface is also indispensable for a remarkable video compressor. Some of you may know little about how to compress videos. Given this, a compression tool with an intuitive interface enables you to accomplish the compression tasks more effortlessly.
Advice 3. Advanced Compression Settings
With advanced compression settings, you can compress the Behance videos by customizing various parameters, including resolution, frame rate, sample rate, video encoder, and more. Then, you can better compress the videos based on your needs.
How to Compress Video for Behance
You can reduce the file size of Behance videos with MiniTool Video Converter, MiniTool MovieMaker, or Online File Compressor.
Method 1. Use MiniTool Video Converter (Offline)
Want to compress video for Behance effortlessly? MiniTool Video Converter can help.
Overview of MiniTool Video Converter
MiniTool Video Converter is a watermark-free video compressor that never costs you a dime. Meanwhile, it enables batch compression, empowering you to compress up to 5 files simultaneously. Moreover, MiniTool Video Converter empowers you to compress Behance videos by changing parameters, like video encoder, audio encoder, frame rate, and more.
MiniTool Video Converter also features a well-organized interface. Hence, even if you are a beginner in video compression, you can use MiniTool Video Converter to accomplish the video compression easily and quickly.
How to Compress Video for Behance with MiniTool Video Converter
Below is a detailed guide on how to compress video for Behance using MiniTool Video Converter.
Step 1. Download and install MiniTool Video Converter.
MiniTool Video ConverterClick to Download100%Clean & Safe
Click on the download button above to download and install MiniTool Video Converter on your PC. Then, launch this Behance video compressor.
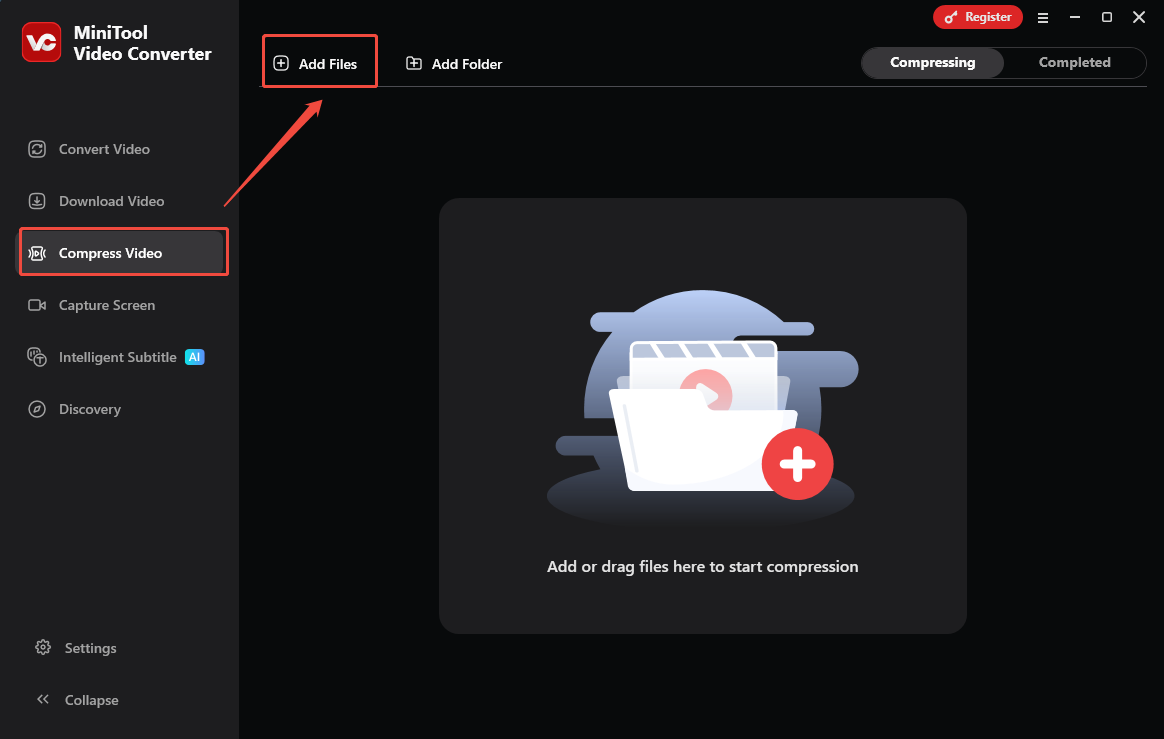
Step 2. Import the Behance videos.
Navigate to the Compress Video tab. There, click on the Add Files option to import the video files that you want to compress.
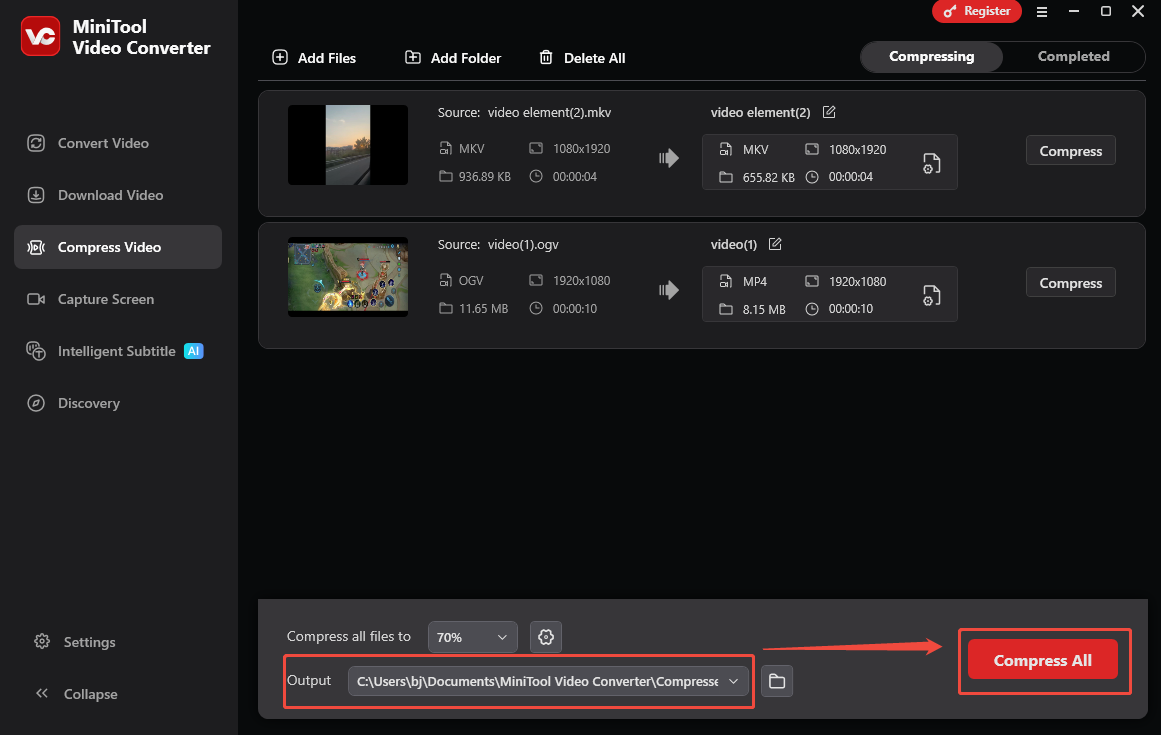
Step 3. Specify the compression settings.
Click on the Settings icon to enter the Compression Settings window. There, drag the red slider to adjust the compression level. Then, expand the Format option and choose an output format. Next, expand the Advanced Settings drop-down menu. There, you can adjust the audio encoder, video encoder, frame rate, and other parameters.
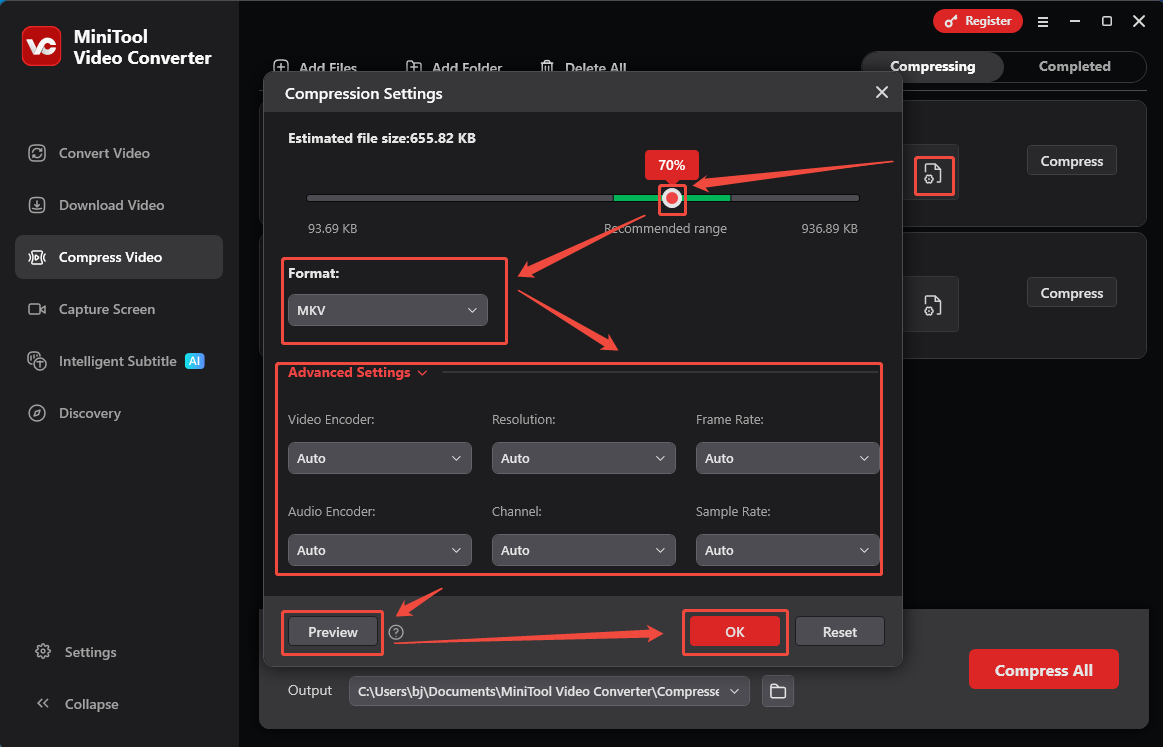
To check whether the compression level is appropriate, click on the Preview button. Then, click on the OK button to apply the compression settings. To configure the compression settings of other videos, repeat the operations above.
Step 4. Set an output folder and start compression.
Expand the bottom Output option to choose a saving path for the compressed videos. Then, begin the compression process by clicking on the Compress All button.
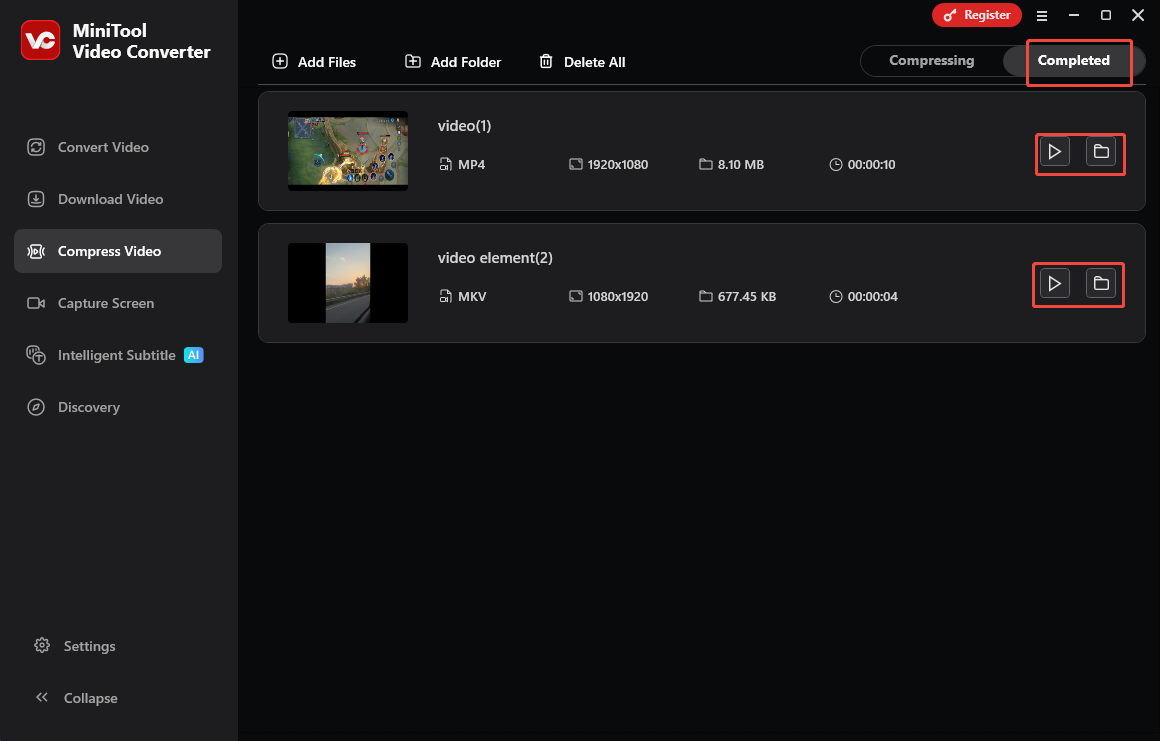
Step 5. Check the compressed videos.
When the file compression process ends, this file compressor will automatically switch to the Completed section. There, click on the Play icon to view the compressed videos. If you want to locate the output videos, click on the Folder icon.
With the above-detailed guidance, it will never be difficult for you to compress video for Behance. More surprisingly, MiniTool Video Converter is also a free screen recorder and video/audio converter. Even if you want to create subtitles automatically from your Behance videos, it can still meet your needs.
Method 2. Use MiniTool MovieMaker (Offline)
If you want to compress the Behance videos while editing them, MiniTool MovieMaker can be a great choice.
About MiniTool MovieMaker
MiniTool MovieMaker is a one-stop solution for video editing, video compression, and video conversion. It enables you to reduce the file size of the Behance videos by changing the frame rate, resolution, and bitrate. Also, MiniTool MovieMaker empowers you to remove the unwanted parts from the Behance videos.
How to Compress a Behance Video with MiniTool MovieMaker
Below is a detailed guide on how to make a Behance video smaller using MiniTool MovieMaker.
Step 1. Download and install MiniTool MovieMaker.
MiniTool MovieMakerClick to Download100%Clean & Safe
Click on the download button above to download and install MiniTool MovieMaker on your computer. Then, run this Behance video compressor.
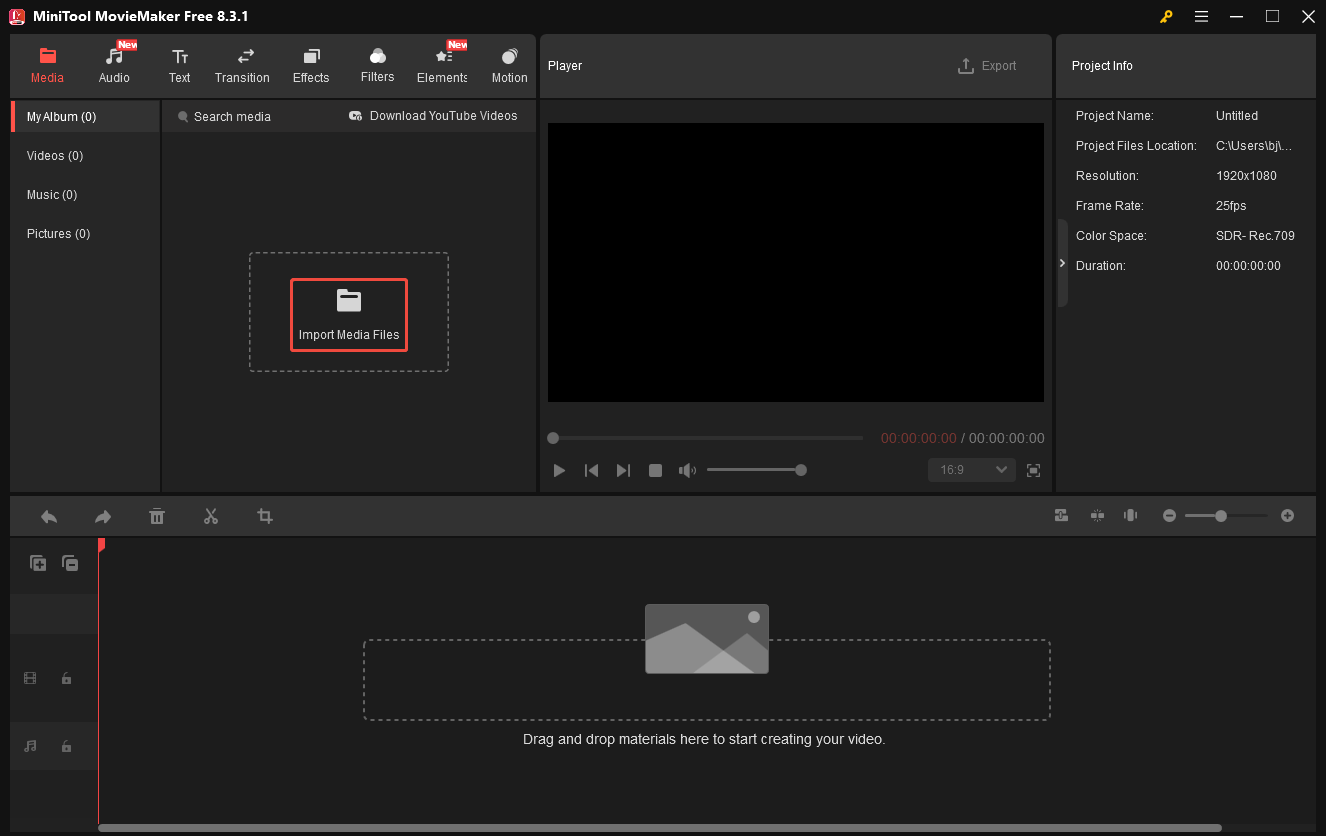
Step 2. Import the Behance video file.
After closing the promotion window, click on the Import Media Files button to import the Behance video that you want to compress. Then drag the video onto the timeline below. If necessary, you can also use the editing functions to trim or speed up your Behance video.
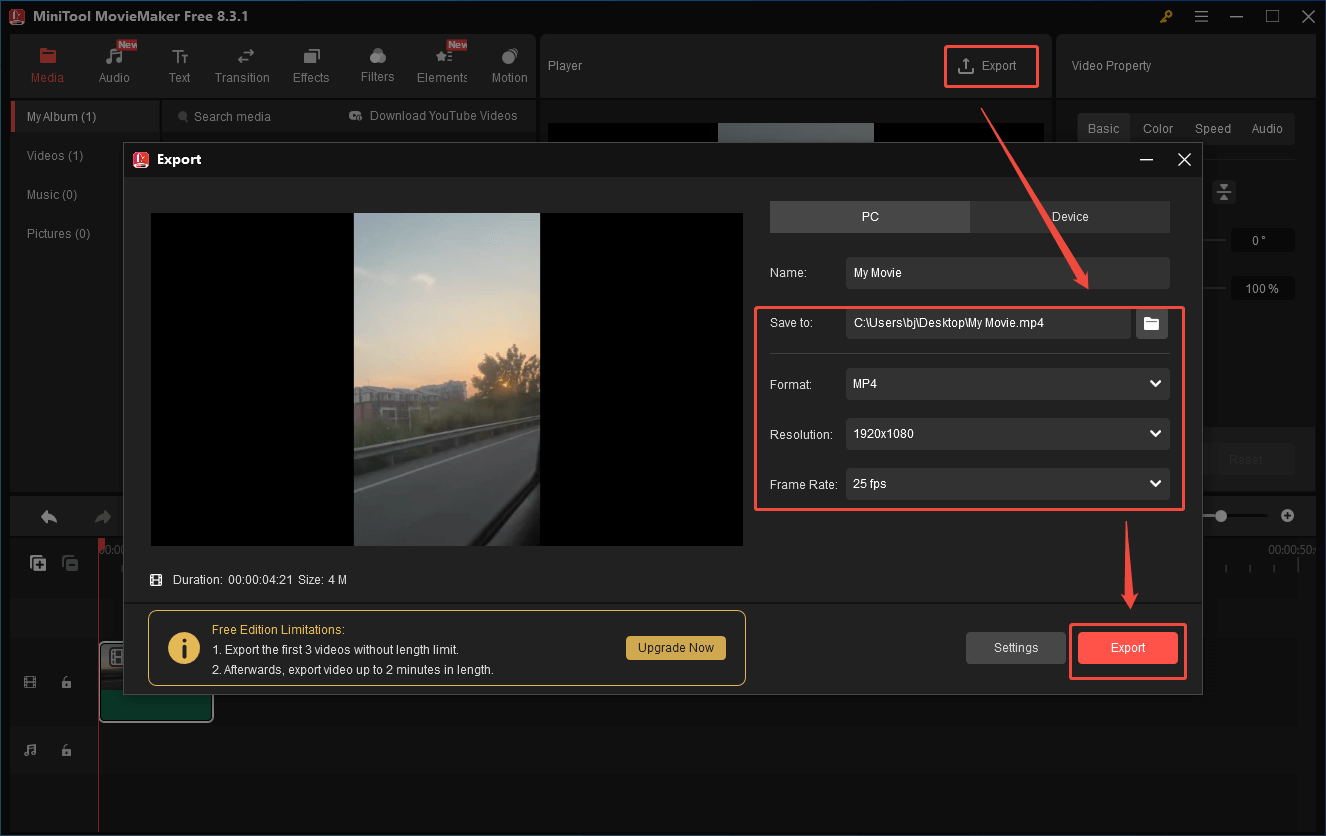
Step 3. Specify the output settings and start compression.
Click on the Export icon at the upper right of the Player section to enter the Export window. There, you can customize the destination folder, frame rate, resolution, and output format. To check whether the compression percentage is OK, pay attention to the bottom left output file size. Then, click on the Export button to save the compressed video.
Step 4. Check the output video.
When the compressed video is saved, click on the Find Target button in the pop-up window to locate and check it.
As you can see, MiniTool MovieMaker is a great video compressor for Behance.
Method 3. Online File Compressor (Online)
If you want to make your Behance video smaller without downloading extra software, never miss Online File Compressor. Online File Compressor is a robust web-based tool that has an intuitive interface. It also allows you to upload your videos from multiple sources, including Google Drive, OneDrive, Dropbox, device, and URL.
Below is a detailed guide on how to compress video for Behance using Online File Compressor.
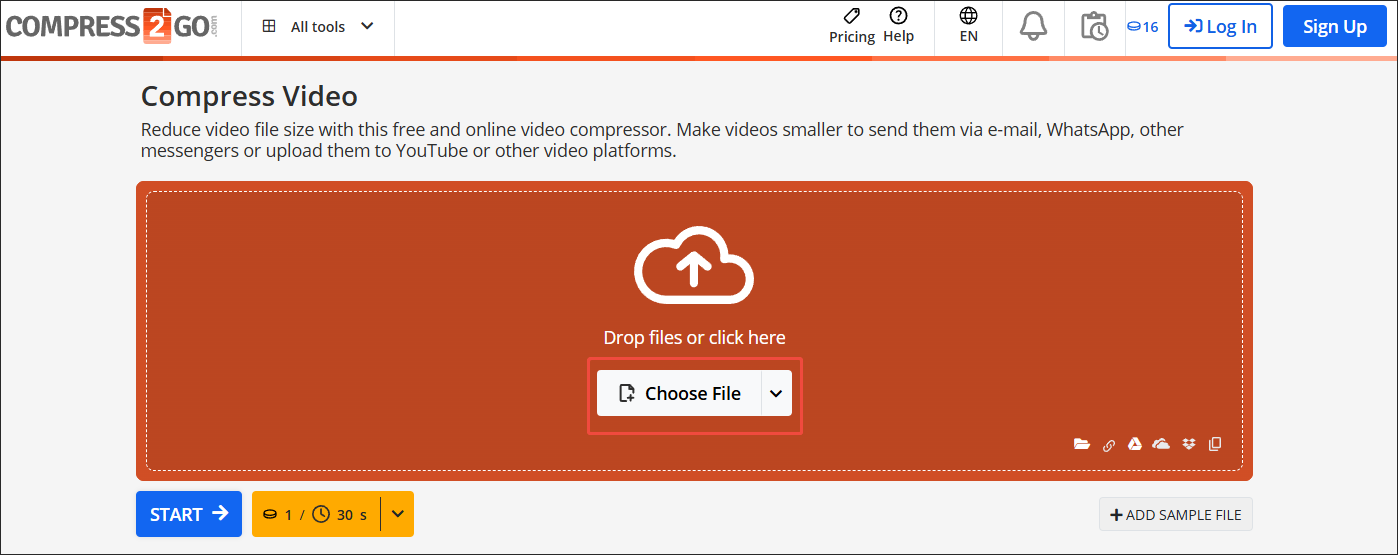
Step 1. Go to the interface of Online File Compressor.
Visit https://www.compress2go.com/compress-video.
Step 2. Import the video file.
Click on the Choose File button to import your Behance video.
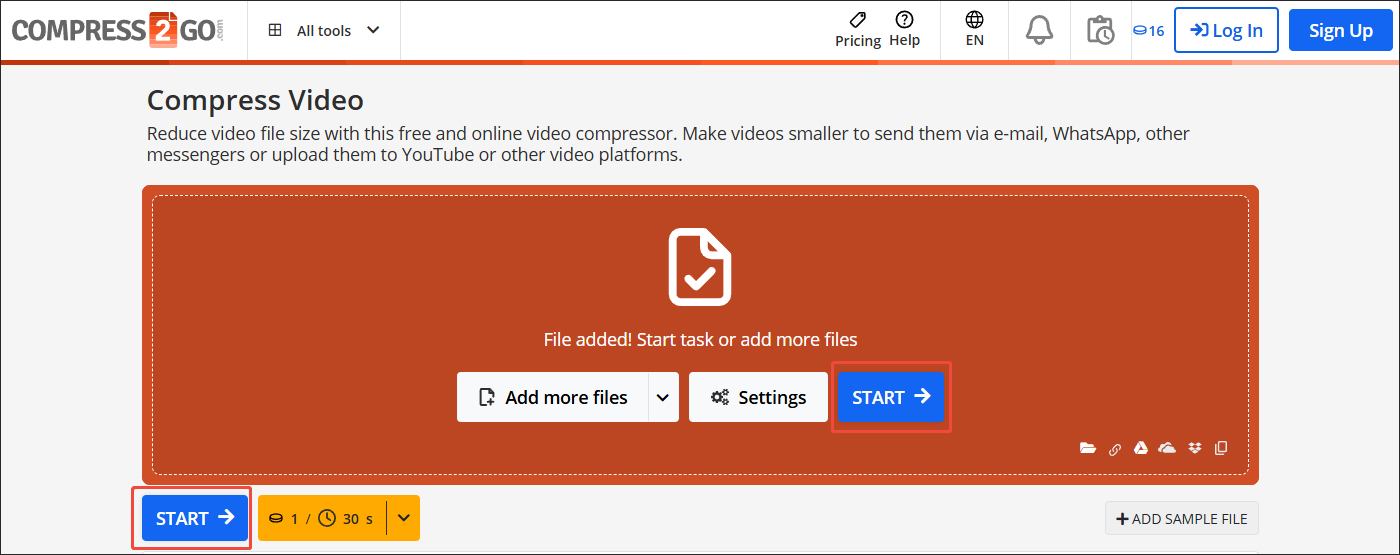
Step 3. Begin compression.
Click on the START button to start the compression process.
Step 4. Check the compressed video.
When the file compression process completes, download and check the compressed video.
Not limited to a video compressor, Online File Compressor also enables you to compress other files, including images and documents.
Bottom Line
To compress video for Behance, MiniTool Video Converter, MiniTool MovieMaker, and Online File Compressor can all do you a favor. If you want more advanced settings and compress multiple files more efficiently, try the first one. On condition that you want to compress the video while editing it, try MiniTool MovieMaker.
If you don’t want to download and install other plug-ins or applications, Online File Compressor can meet your needs.
About The Author

Position: Columnist
With over 6 years of experience as a tech writer, Eien specializes in creating clear, simple guides for video conversion, transcription, screen recording, etc. He stays connected with the tech community and its readers to understand the real-world problems users face. By combining their feedback with his own hands-on testing, Eien always provides proven solutions to complex software problems in time.
User Comments :