Google’s Chromebooks are used by many people, especially those who move around a lot; it’s an excellent choice for work during travel. However, you may sometimes need to take screenshot or even record video on Chromebook. How to screen record on Chromebook? MiniTool answers this question for you carefully in the following content.
Today’s topic is how to screen record on Chromebook and the suggestions on which screen recorder Chromebook to choose. But before talking about them, I’d like to first introduce Chromebook to you.What Is Chromebook
People keep asking this question – what is a Chromebook – since it is not as popular as Windows or Mac. Basically, Chromebook is a laptop running Google’s Chrome OS, which is very speedy, simple, and secure; it is a suitable choice for you if you always need to work online but don’t save files (everything produced while you’re using it will be saved onto the cloud). Google Chrome, one of the most popular browsers in the world is contained in Chromebook as the default browser.All in all, Chromebook can be considered as a platform based on Google's cloud; it doesn’t require much storage or a rapid processor. This is an important reason why Chromebook is always cheaper when compared to normal computers and laptops.DHCP Lookup Failed In Chromebook | How To Fix It?How to Record on Chromebook
In the past, you can write down the useful information you need manually with a pen. However, there are better ways to record information on your device with the progress of times and the development of science and technology. For instance, you can take a screenshot or even record a video to keep important data for later use.A lot of third-party screen recorders are provided on the internet so that you can get them conveniently when necessary. But they’re not available for you if you’re running a Chromebook. Why? That is because the web-browser-based Chromebook doesn’t allow you to install software like that.How to record video on Chromebook? Luckily, you can find many extensions in Chrome that could help you record a video on Chromebook easily. Let’s go to check!
How to Record Your Screen on Chromebook with Extensions
If you search in Chrome, you can find many screen recorders, which are useful for videos recording. This part will first show you how to take a video on a Chromebook with Screencastify (a free screen recorder). After that, it will introduce some popular Chromebook screen recorders for you to choose from.Screencastify: A Good Screen Recorder Chromebook
Step 1: download the recorder.- Open Chrome.
- Sign in with your account.
- Go to https://chromewebstore.google.com/category/extensions.
- Type Screencastify into the Search the store textbox.
- Press Enter to bring up various results.
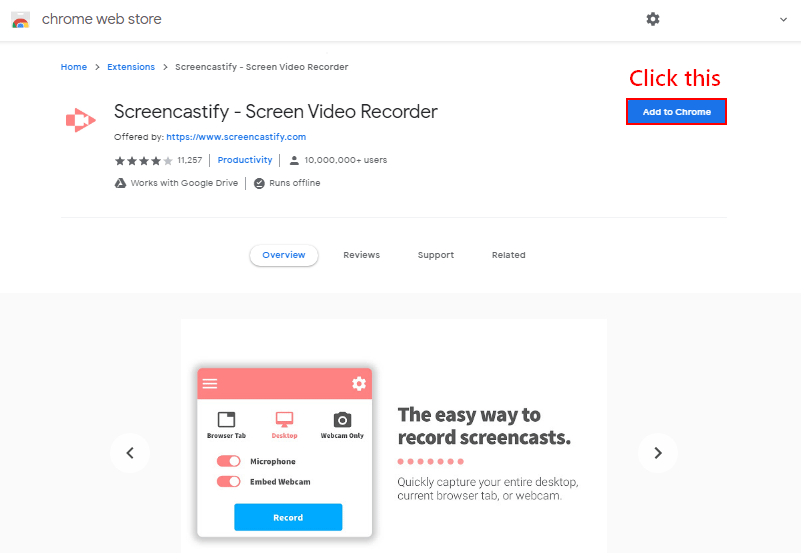
- Click on the first result: Screencastify - Screen Video Recorder.
- Click on the blue Add to Chrome button in the top right corner.
- Click on the Add extension button in the pop-up window to confirm.
- Wait for the checking and downloading process to complete.
- A right arrow icon will be added to the extensions toolbar at top right.
 Step 2: sign in with your Google account and setup your account.You should click on the right arrow icon (representing Screencastify) from the extensions toolbar. If there are too many extensions, some of them may be hidden, so you need to click on the Extensions icon to find all extensions you have and then select Screencastify. After that, please follow this guide.
- Click Sign in with Google and choose an account to continue to Screencastify.
- Click on the Allow button located at bottom right to allow Screencastify to view and manage Google Drive files and folders.
- Again, select Screencastify from the extensions toolbar.
- Check I agree to Screencastify's Terms and Privacy Policy and click Next.
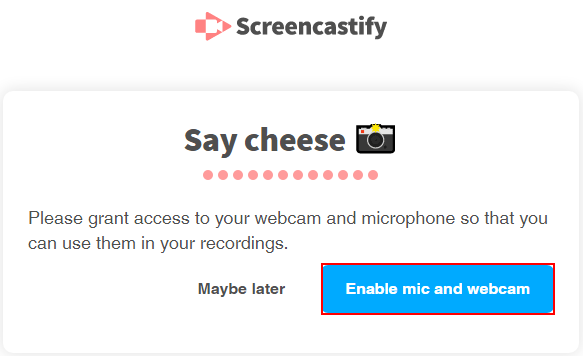
- Fill in some information and then click Enable mic and webcam.
 How To View And Sort Google Drive Files By Size Easily?Step 3: set the recording preferences.
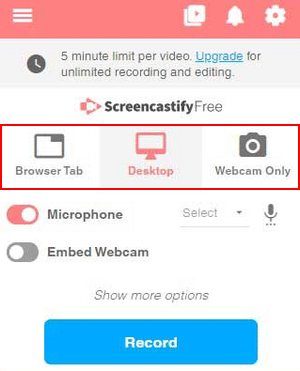
- Click on the Screencastify icon to get a small window.
- There are three options at the top: Browser Tab, Desktop, or Webcam Only. Please select one of the first two options.
- Please enable Microphone and Embed Webcam according to needs.
- You can click Show more options to see hidden features: Countdown, Show Drawing Tools, System Audio, and Show Webcam Preview.
- Please enable/adjust the feature you need to use.
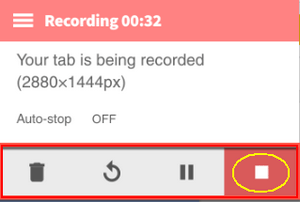
 Step 4: start & end recording your Chromebook.
- Click on the Record button to start recording the screen of your Chromebook.
- When you’re done, please click on the Screencastify extension icon again.
- Click on the Stop button in the lower right corner of the small Recording window to end.
 Step 5: edit & share your video.
- You’ll be brought to the Screencastify window for editing the video recorded just now.
- You can trim the ending & beginning, draw on the video, crop video, crop, and even merge videos according to needs.
- Your video will be saved to Google Drive after editing (it is saved in full HD by default).
- A Drive link to this video will be given to you so that you can share it with others conveniently.
- Besides, you can publish it on YouTube or share it to Google Classroom.
- Also, you can click to download the video to the local drive if you have one.
Other Popular Chromebook Screen Recorders
In addition to Screencastify, there are many other screen recorders you can use to record video on Chromebook. They all have their own advantages and disadvantages, and you should choose according to your circumstances.- Nimbus
- Loom
- Vidyard
- Screen Recorder & Video Editor
- Etc.
Record Video on Chromebook with the New “Capture Mode”
Chromebook is finally getting its new snipping tool and screen recorder – the “Capture Mode”. This new UI for the screenshot and recording tool has been added to the latest Chrome OS build in September 2020.[Update 2020] Top 5 Snipping Tools For Mac You Should Try!How to bring up the new Screen Capture Mode toolbar?- The screen capture icon is added to the Chrome OS taskbar, so that users can access it easily by a click.
- Besides, you may press Ctrl+Shift+overview to open it directly.
- You can drag the option for moveable and resizable screenshots to capture the entire screen or select an area you want to record. In addition, you can click on another button to capture a specific window.
- Wait for the tool to record a movie, a series of actions, or other content.
- Click on the icon in the Chromebook system tray to bring up a window. Then, click on the Stop button to stop recording.
- The video file will be saved to your device in the .webm format.
- You can make use of the Edit or Share button to modify the video or share it with other people directly.
Bonus Tip: Screenshot Chromebook Running Windows
If you also installed Windows operating system on your Chromebook, you’ll have lots of choices in terms of screen recorder. MiniTool Video Converter is a good tool that can help you record your screen easily.First, you should download MiniTool Video Converter to your Chromebook by clicking on the download button below. Or, you may visit https://videoconvert.minitool.com/ to get to know about this program and then click Download Now.
MiniTool Video ConverterClick to Download100%Clean & Safe
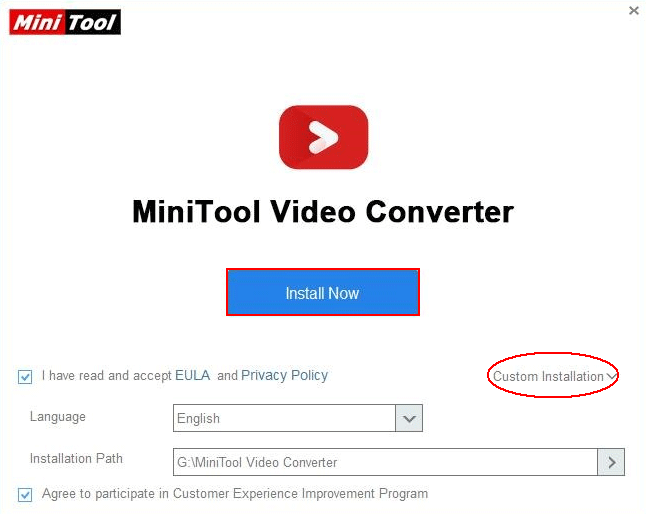
Second, you need to navigate to the location where you saved the program and double click on the setup file to bring up the installation wizard.- Click on the Install Now button to start installation directly. Then, wait for the process to end.
- Also, you can click Custom Installation to change default Language and Installation Path before clicking Install Now. Then, wait for the installation to complete.
 Third, please follow this guide to capture your Chromebook screen.
- Click on the Start Now button or double click on the program icon to launch.
- Shift to the Screen Record tab at the top.
- Click on the Click to record screen section in the middle.
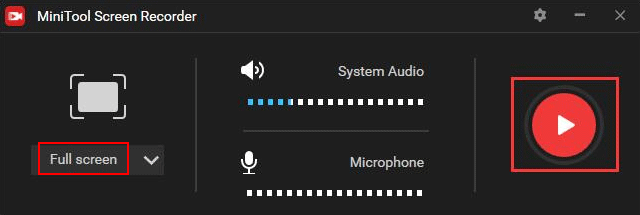
- The MiniTool Screen Recorder panel will appear.
- Choose from Full screen and Select region on the left side.
- Modify the system and microphone audio if you want.
- Click on the Record button on the right side or press F6 to start recording your screen.
- Press F6 whenever you want to stop the recording.
- The recorded video will appear in the tool. You can then preview it or open the storage path to check it.
Should I Buy a Chromebook
Is Chromebook or laptop more suitable when considering buying a new device for work? If you don’t have a clear answer, please get to know the following things first.Pros & Cons of Chromebook
If you are not sure whether to buy a Chromebook or not, you should first get to know the advantages and disadvantages of using it.5 Main Pros of Using a Chromebook
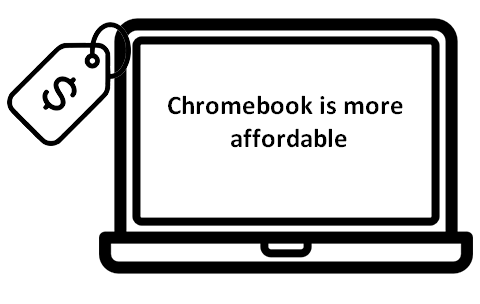
One: it can lower the IT (and hardware) cost.How much do Chromebooks cost? This is a question stuck in many people’s head. In fact, a Chromebook is able to lower the IT (information technology) costs in the following ways.- Generally, a Chromebook is more affordable (much cheaper) than the ordinary computers.
- The Chromebook users are always working online, so they don’t require much physical storage. This can save a lot of money.
- The IT department’s demands for installing, updating, or supporting software are less since Chromebook is independent from installed programs.
- The chances of mechanical faults appearing on Chromebook are much lower than that on other computers and laptops since there’s no moving part in it. This means it’s more reliable; the service life is longer; and users don’t need to prepare much repair bills.
 Two: it can lower the software cost.G Suite, the Google's set of productivity apps, can be used on Chromebook to deal with core computing needs and it’s very cheap.Three: it is very secure, less vulnerable to viruses.One highlight of Chromebook is the cloud-based working, which doesn’t require much software. This reduces the chance to get infected by virus. Besides, the automatic updates, and secure features like 'sandboxing' & 'verified boots' are able to prevent virus from infecting your system.Four: it works well in encouraging collaboration & improving productivity.
- The startup process of Chromebook can be finished very quickly (in about 5 ~ 10 seconds).
- The Chrome OS is clutter-free, stable, and more importantly, free of the 'bloat' or 'lag' issue.
- Multiple users are allowed to access and edit files together to enhance collaborative possibilities and improve productivity.
4 Main Cons of Using a Chromebook
One: you can’t use Microsoft Office.Chromebook doesn’t allow you to install Microsoft Office (including Word, Excel, PowerPoint, Outlook, and so on). You have to switch to G Suite, which is capable of creating, editing and saving MS Office files.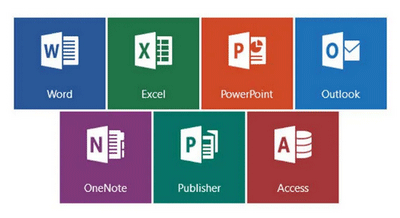 Extended reading:
- How To Recover Unsaved Word Document (2020) - Ultimate Guide?
- How To Recover Unsaved Or Deleted PowerPoint Files?
User Comments :