What is Steps Recorder? How to use it on Windows? Besides, there are some Steps Recorder alternatives for you. Now, you can continue to read this post from MiniTool to get more details about Steps Recorder.
What Is Steps Recorder
Steps Recorder is a system built-in program in Windows 11/10 and it is called Problems Steps Recorder (PSR) on Windows 7/8/8.1.
Steps Recorder helps you solve problems on your Windows computer. It does this by recording the steps you take when an error occurs on your PC. Then, it will save your steps as a single file with detailed information and screenshots of each step. After that, you can send the file to the technician to help you diagnose the problem.
Steps Recorder must be started and stopped manually by you. It doesn’t run in the background and it doesn't collect or send information to anyone automatically.
How to Use Steps Recorder
Follow the Guide below:
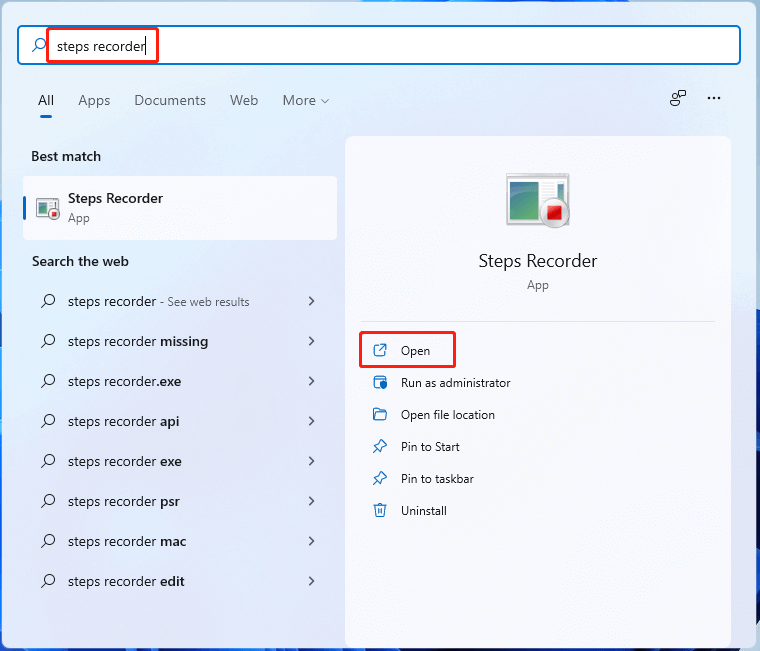
Step 1: Type Steps Recorder (in Windows 10/11), or Problem Steps Recorder (in Windows 7/8/8.1) in the Search box. Click Open in the right panel to open Steps Recorder.
Step 2: After opening it, you will see a small window as shown below.
Start Record/Stop Record: You can click the Start Record button to start the recording process. You can click the Stop Record button to finish the process.

Pause Record/Resume Record: You can click the Pause Record button if you want to pause the process after starting the process. Click Resume Record to continue to record.
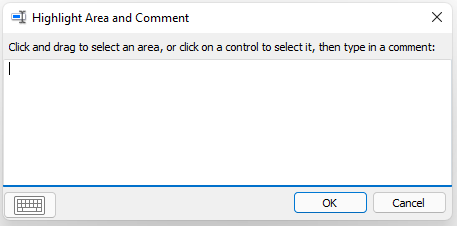
Add Comment: The program will not record what you type. To add data about what you typed to the recording, click Add Comment at the appropriate step. Then, click and drag to select an area and add a comment in the Highlighted Area and Comment box. After completing the input, click OK to continue recording.
Step 3: To adjust some settings, you need to click the inverted triangle icon to open the Steps Recorder Settings window.
Output File: You can click Browse… to set a default location and file name.
Screen Capture: You can choose to enable or disable screen capture by clicking Yes or No. You can also change the number of recent screen capture to store. The default number is 25.
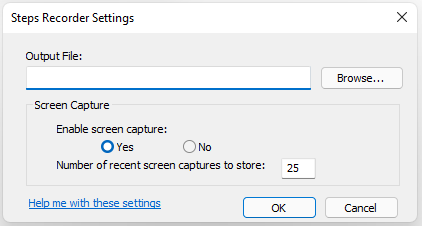
Any settings you adjust here are temporary - when you close and reopen the program, they will revert to their default values.
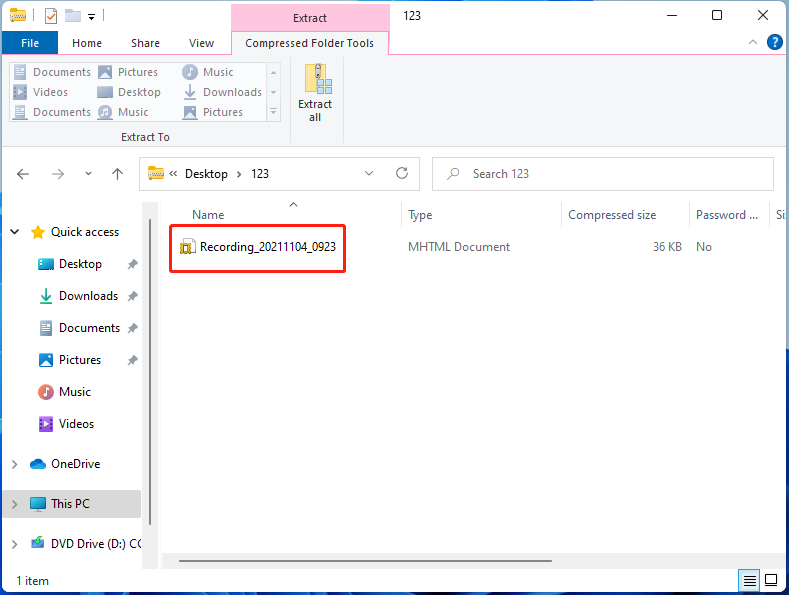
Step 4: After finishing the recording process, you can go to File Explorer to find your recording file. The recording file is in MHTML format and can be viewed in any Windows operating system of Internet Explorer 5 and higher.
Steps Recorder Alternatives
From the content above, you may find that Steps Recorder has some shortcomings. Except for function keys and shortcut keys, Steps Recorder will not record the text you type (such as passwords). Some programs (such as full-screen games) may not be able to capture accurately. The recorded files will not be displayed in the form of video.
Thus, you may want to find a Steps Recorder alternative for your Windows 11/10/8/7. This part introduces several Steps Recorder alternatives for you. You can choose one of them based on your needs.
MiniTool Video Converter
MiniTool Video Converter is a great alternative to Steps Recorder Windows 11. It supports Windows 7/8/10/11 and has three main features – converting videos, downloading videos, recording videos.
If you want to edit your images or videos, you can try another MiniTool program – MiniTool MovieMaker.
MiniTool Video Converter supports automatically stopping and saving the recording process when the scheduled duration is reached. You can also choose to record full screen or selected region.
Now. let’s see how to use MiniTool Video Converter to record the screen.
Step 1: Download and install MiniTool Video Converter. After installing, launch it to enter its main interface.
MiniTool Video ConverterClick to Download100%Clean & Safe
Step 2: Click the Screen Record tab and click the Click to record screen area.
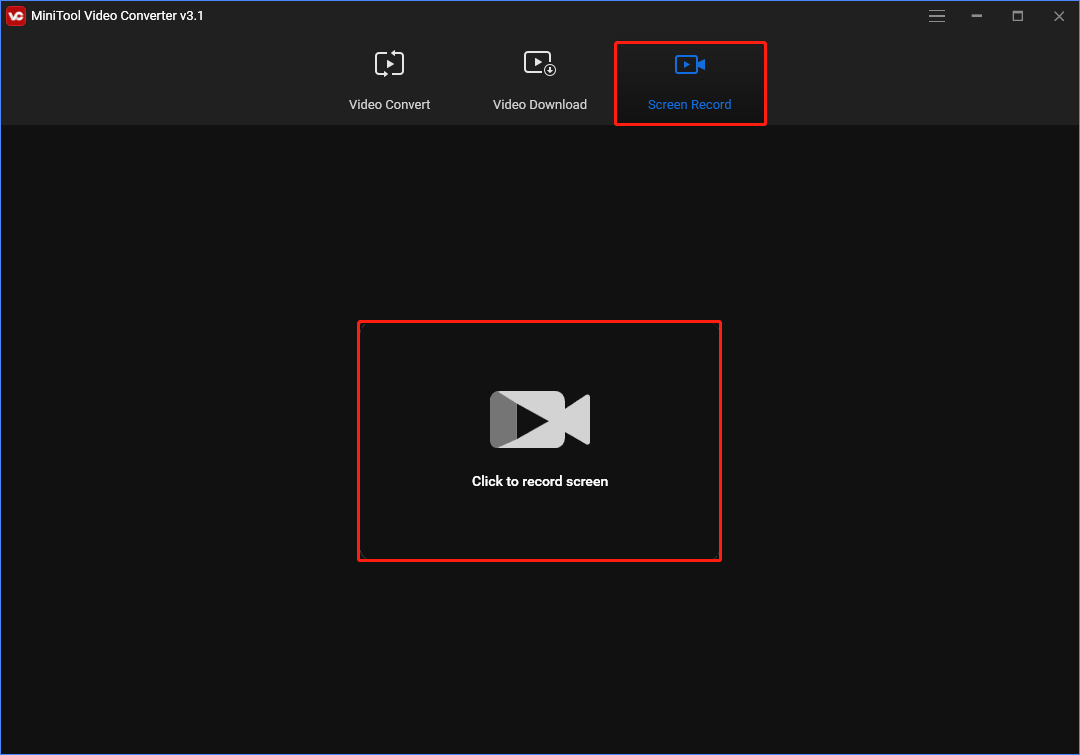
Step 3: On the MiniTool Screen Recorder window, enable either or both of the system audio and microphone. Then choose the desired recording option – Full screen or Select region.
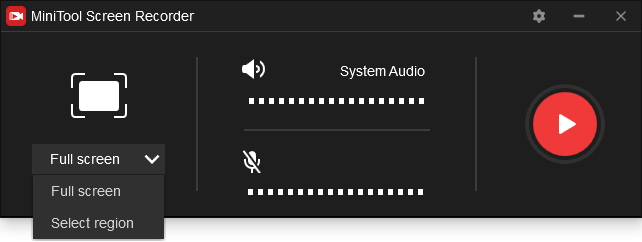
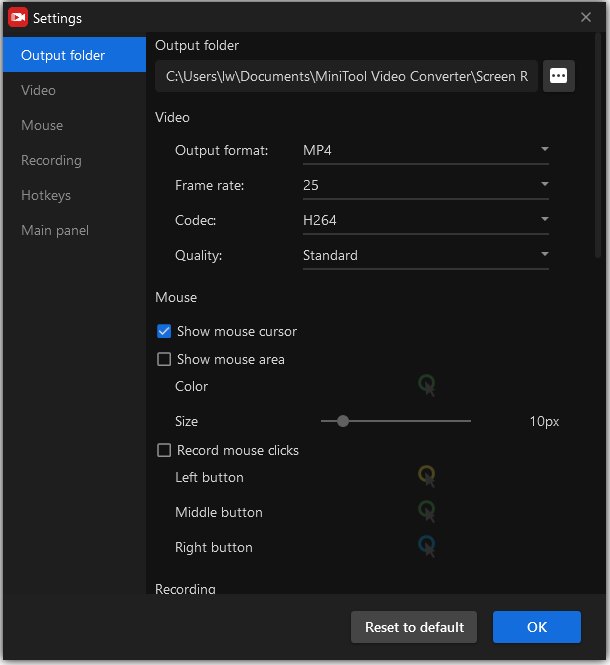
Step 4: Then, you can click the Settings icon to do some changes. Here, you can set the output location, video output format/frame rate/codec/quality, hotkeys, mouse, etc.
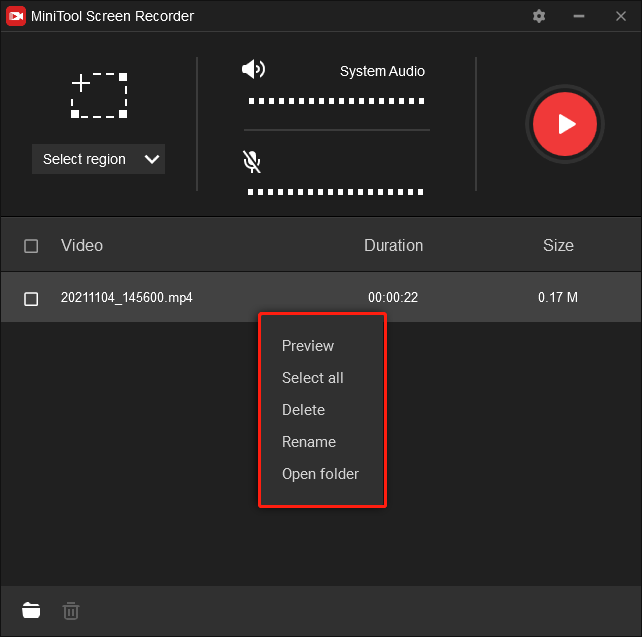
Step 5: Now, you can click the red icon or press the F6 key to start the recording process. Press the F6 key to end the recording and right-click the recorded file. From the drop-down menu, you can preview, delete, rename the recorded file.
Features:
- Free, no hidden costs, no ads, and no watermarks.
- No recording time limit.
- Record video in various formats.
VideoSolo Screen Recorder
The next Steps Recorder alternative is VideoSolo Screen Recorder. It can record steps on your computer to help you collect problems for troubleshooting or create useful tutorials for sharing. It has two editions – Free and Pro. Both of the two editions have no watermarks, however, the free edition doesn’t support recording the screen for more than three minutes.
Here is how to use VideoSolo Screen Recorder to record your screen on Windows.
Step 1: Download and install VideoSolo Screen Recorder on your computer. Then, launch it to enter its main interface.
Step 2: Then, you can choose Video Recorder or Audio Recorder, or Game Recorder.
Step 3: Next, select a recording area. You can click the Full option or the Custom option. Or, you can directly set an accurate figure as your requirement.
Step 4: You can adjust audio settings. Then, you can click the REC button to start recording your screen.
Step 5: When you finished the recording, save it to your computer and you can send it to others to help you solve your problem.
Windows 10 Game Bar
The third Windows Steps Recorder alternative is Xbox Game Bar. It is a pre-installed screen recorder on Windows 10/11, which is free and can be used to record game clips, screenshots, and broadcasts. If your computer is running Windows 10/11, then you can record your problem.
It should be noted that the game bar is a non-desktop screen recorder, so you can only use the default shortcut to launch it. And it only allows you to capture the entire computer screen and you cannot change any record configuration, except for shortcuts. Here is how to use it.
Step 1: Click the Start menu on your Windows and choose Settings. Select the Gaming option and then toggle on Record game clips, screenshots, and broadcast using the Game bar.
Step 2: Press the Windows + G keys simultaneously to run the Xbox Game bar.
Step 3: Click the gear icon to set up the shortcuts if needed. Select Capture > Start recording, and then start recording.
Step 4: When it is finished, click the Stop Recording button.
Step 5: Then a notification will pop up, informing you that the recorded video is saved on your computer. Click Game Clip Recorded to view the recorded video.
Related article: Is Windows 11 Xbox Game Bar Not Working? Try to Fix It!
Camtasia
Another Windows 10 Steps Recorder alternative is Camtasia. You can record any activity on your computer screens, such as websites, software, video calls, and customize the capture area.
Step 1: Download Camtasia from the official site and then get it installed on your PC.
Step 2: Launch it to enter the main interface, and click the Record button at the top.
Step 3: The program is set to record the full screen by default. You can click the dropdown and select the standard recording dimension.
Step 4: Select other inputs to record along with your screen, including webcam, microphone audio, and system audio.
Step 5: Click the rec icon (Windows) to start the recording.
Step 6: When you are finished, click the square Stop button (Windows).
Step 7: The recording file will be added to the Media Bin in Camtasia Editor. You can either edit the according or save it on your computer.
Apowersoft Free Online Screen Recorder
Unlike the above 4 screen recorders, Apowersoft Free Online Screen Recorder is a free web-based screen recorder. Just open it on your web browser, you can easily record your screen. You can capture the entire screen or customize the recording area.
The highlight of this web-based screen recorder is that it does not limit what or how long you record. However, you will be asked to install a launcher if this is your first use.
Step 1: Visit Apowersoft Free Online Screen Recorder on your browser.
Step 2: Tap on the Start Recording button in the middle of the interface.
Step 3: Hit Download Launcher to download a launcher and install it on your PC if prompted.
Step 4: Click Full screen, or click Region to select the area to be recorded.
Step 5: Enable the Microphone option to capture your narration.
Step 6: Go to More > Settings to modify the recording parameters.
Step 7: Click the REC button. Click the red square icon to stop recording, and then click Save video > Save as Video File.
Screencastify
The last Steps Recorder alternative is Screencastify. It is a Chrome extension that enables you to capture your tab, whole screen, or webcam only, and then save the recording in GIF, MP4, or MP3 format. In addition, its free plan only allows you to record videos up to 10 minutes in length and all recorded videos will come with a watermark. Follow the guide to use it.
Step 1: Enter Screencastify in the search box of Chrome Web Store. Click it to select Add to Chrome > Add extension.
Step 2: Once installed, you’ll see the Screencastify icon in the top right of your Chrome browser. Click the icon and sign in with your Google account to continue.
Step 3: Choose Enable mic and webcam to grant access to your microphone and webcam. Now, you can choose Browser Tab, Desktop, or Webcam Only.
Step 4: Turn on Microphone and Embed Webcam if needed. Click Show more options to set additional parameters for your recording.
Step 5: Click the blue Record button to start your recording. To end a recording, click the extension icon again and hit the Stop button.
Step 6: Then you will be taken to a new page, where you can edit, save and share your recording.
Bottom Line
After reading this post, you must know how to use the Steps Recorder and Steps Recorder alternatives. You can choose a screen recorder for your PC. If you have questions about this post or encounter problems when using MiniTool Video Converter, please feel free to contact us via [email protected] or leave comments below.


User Comments :