OBS Studio has added a new built-in feature - OBS Virtual Camera that allows you to use the OBS output as a camera in other applications on your computer. This post from MiniTool tells you how to download/install/use OBS Virtual Camera.
There is a growing need for remote meetings. Thus, there is more and more video calling software such as Zoom, Skype, etc. Some users need to record their meeting process and they need professional recording tools.
One of the best tools is OBS. It has a new feature named OBS Virtual Camera, which can be added to video calling software like Zoom to help you create custom scenes from OBS. This post teaches you how to use the OBS Virtual Camera.
Also see:
- How to Fix the OBS Recording Choppy Issue (Step by Step Guide)
- 5 Useful Methods to Fix the OBS Not Recording Audio Issue
How to Set up OBS Virtual Camera on Windows/Mac
How to Set up OBS Virtual Camera on Windows
This part is about how to set up OBS Virtual Camera on Windows.
Step 1: You need to go to OBS Studio's official website to download OBS Studio. If you have installed it, you can open it directly.
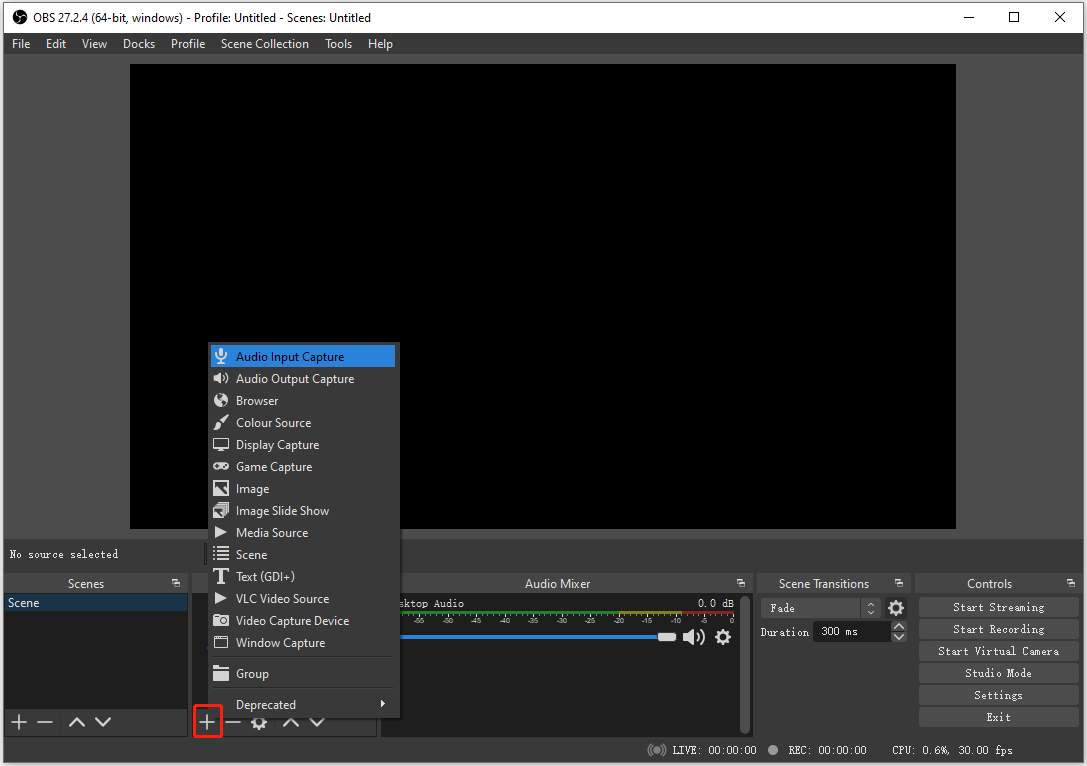
Step 2: Launch it to enter its main interface. Under the Source part, you need to click the + icon to choose the source you want to add. OBS Virtual Camera allows you to add your current monitor display, media source, connected webcam, etc. to your OBS Virtual Camera.
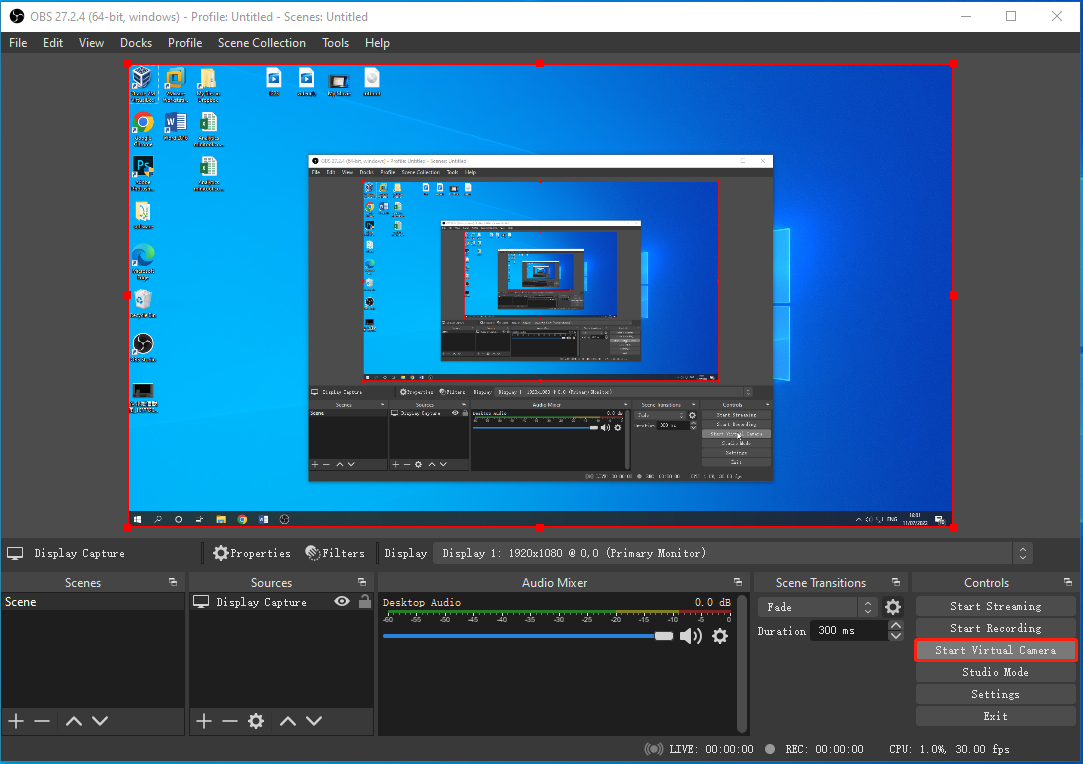
Step 3: Then, you can click the Start Virtual Camera button to boot it.
How to Set up OBS Virtual Camera on Mac
This part is about how to set up OBS Virtual Camera on Mac.
Step 1: Go to OBS Studio's official website to download OBS Studio on your Mac. If you have installed it, you can open it directly.
Step 2: Then, go to the Sources box at the bottom and click + to select a source you wish to add such as Media Source or Display Capture.
Step 3: Once you have configured the settings, you can click the Start Virtual Camera button to enable it.
How to Make Your Webcam Look Better in OBS Studio
If you want to make your webcam look better in OBS Studio, you can set the following advanced parament.
- In the Sources part, click the + button.
- Select Video Capture Device.
- Select the Create New checkbox and type a new name.
- Choose your webcam in the Device drop-down box.
Now, you can either click OK or continue to make some settings. If you click OK first, you can get back to this same menu by right-clicking your webcam in the Sources part and choosing Properties.
There are many settings you can change, but these are the most important ones to look at. On Windows you'll first need to select Custom under Resolution/FPS type, then change these settings:
- Resolution - If your webcam supports 1080p resolution and you want the sharpest image, it’s recommended to use it.
- Frame rate - This will be dependent on your webcam. Many only support 30 FPS at 1080p, needing a drop to 720p to get to 60 FPS. You can try them one by one and choose one of them.
For most purposes, you can leave the rest of the initial settings on their default values. Now it's time to get into the camera controls. On Windows, you'll first need to click the Configure Video button, while on Linux the controls will be in the same window. Try adjusting these settings in this order:
- Exposure - By default, your webcam may be overexposed, making the image somewhat overexposed. With manual control, you can adjust the slider to something more natural looking. This can be used in combination with gain for the best balance.
- Zoom and Pan - Not all webcams allow this, although it's not really zooming either. If enabled for you, you can use these to better frame yourself, effectively cropping out unwanted white space to make yourself appear larger and more centered in the frame.
- Focus - If you find that your webcam is constantly looking for focus, set it manually. It's on the slider again, but unless you're actually moving in the demo, you'll get a sharper, more stable look by setting the focus yourself.
- Brightness, Contrast, Saturation, and White Balance - All of these have separate settings, but if you change one, you will most likely need to change the other one. All four settings allow you to adjust the look of your image, depending on your webcam and room lighting.
How to Use OBS Virtual Camera
This part will introduce how to use OBS Virtual Camera in Google Meet, Skype, Teams, and Zoom.
How to Use OBS Virtual Camera in Google Meet
If you want to use OBS Virtual Camera in Google Meet, this part is suitable for you.
Step 1: Open OBS Studio.
Step 2: Then, click the + icon in the Sources box and add each source individually. You can add Display Capture, for example, to capture the feed from a connected display.
Step 3: Open Google Meet. Next, head to the Settings menu. In the camera option, click OBS Virtual Camera as your chosen camera. You should immediately see a static image showing your current OBS window.
Step 4: Back to OBS Studio and click the Start Virtual Camera button.
Step 5: Return to Google Meet, begin a call or meeting with your friends or colleagues, and they'll be able to see whatever you have selected for the virtual camera. Then, it will start to record your Google Meet.
Related post: What To Do When Google Meet Camera Not Working (Failed)
How to Use OBS Virtual Camera in Skype
If you want to use OBS Virtual Camera in Skype, this part is suitable for you.
Step 1: Open OBS Studio.
Step 2: Then, click the + icon in the Sources box and add each source individually. This is where you can add sources to show to your friends or family or other people on Skype.
Step 3: Next, go to Skype, click Settings. Then, click Calling and Advanced, and click to Allow NDI Usage. Then go to Audio & Video in the Settings menu and select OBS Virtual Camera from the Camera menu.
Step 4: Back to OBS Studio and click the Start Virtual Camera button. Then, all you have to do is start a call on Skype and the person you call will see whatever you have chosen to share with them via the virtual camera.
How to Use OBS Virtual Camera in Teams
If you want to use OBS Virtual Camera in Teams, you can refer to this part.
Step 1: Open OBS Studio.
Step 2: Then, click the + icon in the Sources box and add each source individually. This is where you can add sources to show to your friends or family or other people on Teams.
Step 3: Open Microsoft Teams. Go to Settings > Devices. Select OBS Virtual Camera as the camera option you wish to use.
Step 4: Next, go back to OBS and click on Start Virtual Camera in the bottom right.
Step 5: Launch a meeting in Teams. All the meeting members will see your virtual camera feed instead of your webcam in the Teams meeting.
How to Use OBS Virtual Camera in Zoom
If you want to use OBS Virtual Camera in Zoom, you can refer to this part.
Step 1: Open OBS Studio.
Step 2: Then, click the + icon in the Sources box and add each source individually. This is where you can add sources to show to your friends or family or other people on Zoom.
Step 3: Once your OBS is set up as you like, open a Zoom meeting and set up the virtual camera as your webcam feed. To do this, go to Settings in Zoom and then click Video. In the Camera drop-down menu, select OBS Virtual Camera.
Step 4: Next, go back to OBS and click Start Virtual Camera in the bottom right.
Step 5: The OBS virtual camera in Zoom should now be set up and ready to display whatever you want to your fellow Zoom callers. You can then use the OBS window to switch between sources and show off different content or media to your colleagues or friends.
OBS Virtual Camera Alternative
If you want to find a alternative to OBS Virtual Camera to record your Google Meet, Teams, Skype or Zoom, there is a great recording tool for you - MiniTool Video Converter. MiniTool Video Converter is a free screen recorder, video converter, and video downloader. It can be used on Windows.
- Record screen– You can use MiniTool Video Converter to record all activities that occur on your computer screen without a time limit and watermark.
- Convert video- You can use the program to easily convert any video or audio file to a preferred format for free. This best free video converter supports 1000+ video and audio formats. It possesses an extremely intuitive interface, fast conversion speed, and high output quality.
- Download video– This software can be used to download YouTube videos for free so that you can watch YouTube videos or listen to YouTube music offline. You can download YouTube videos in MP4, WebM, MP3, or WAV format.
Downloading these videos may involve copyright issues, please confirm that the resources you want to download are legal.
MiniTool Video ConverterClick to Download100%Clean & Safe
Now, let’s see how to record the screen with MiniTool Video Converter.
Step 1: Download and install MiniTool Video Converter to enter its main interface.
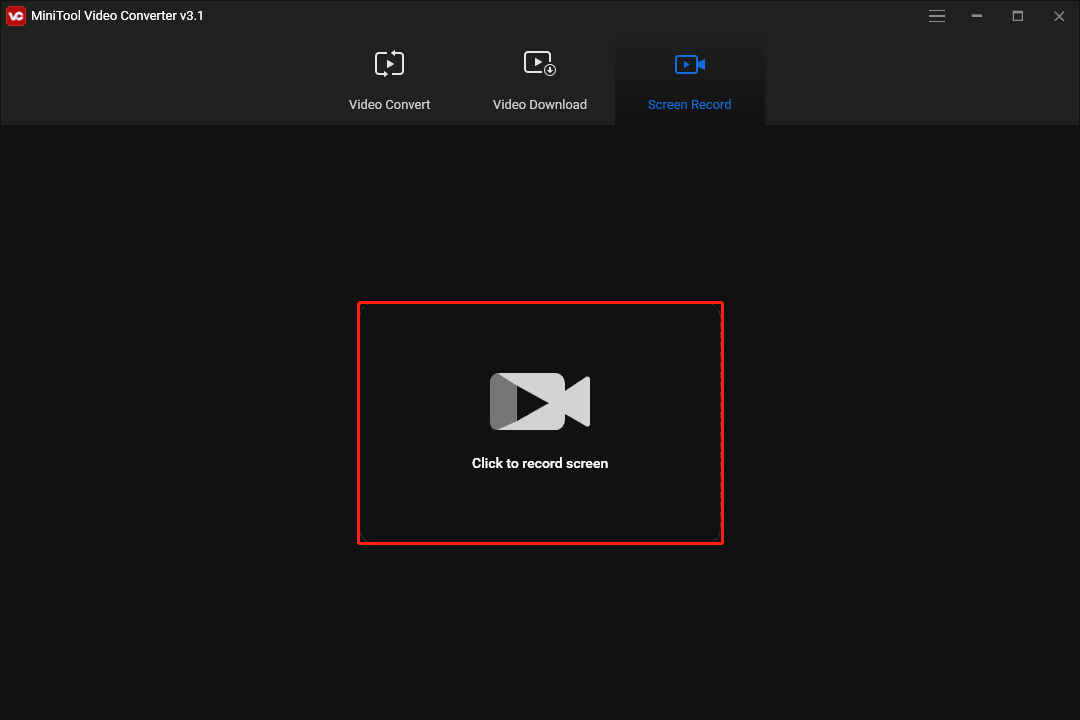
Step 2: Navigate to the Screen Record tab and click the Click to record screen area to enter the screen recording window.
Step 3: Open the Full-screen drop-down list to select the area to be recorded. You can choose Full screen or Select region.
Step 4: Determine if you want to record sound from the system or microphone. Just click the icon to turn on or off the sound.
Step 5: Click the Settings icon to enter the advanced settings page, where you can modify the output folder, output format, video frame rate, video quality, choose whether to display the floating toolbar when recording and much more. Then, click OK to save your changes.
Step 6: Press the red Record button or F6 to start capturing your screen activity.

Step 7: During recording, you can press F9 to pause/resume recording. Once done, press F6 to stop recording.
Step 8: Then the video you record will appear on the list. You can right-click it to preview, delete, rename the recording, or check its folder.
Pros
- 100% clean and free.
- No watermark.
- Simple operation.
- High recording quality.
Cons
- Lack of video editing features. But you can use another 100% clean and free program - MiniTool MovieMaker - to edit the video.
Bottom Line
How to use OBS Virtual Camera? This post provides a full guide for you. Besides, if you have any questions or suggestions about MiniTool software, please let us know via support@minitool.com or share them in the comments section below.
About The Author

Position: Columnist
Daisy graduated with a major in English and then joined MiniTool as an editor. She specializes in writing articles about backing up data & systems, cloning disks, and syncing files, etc. She is also good at writing articles about computer knowledge and computer issues. In daily life, she likes running and going to the amusement park with friends to play some exciting items.
User Comments :