A Brief Introduction to Kodi
Kodi, previously known as XBMC, is a free and open-source media player developed by the Kodi Foundation. With a software 10-foot user interface for usage with televisions and remote controls, Kodi is accessible for a variety of hardware platforms and operating systems.
Along with all conventional digital media files from local and network storage media, Kodi enables users to play and view most streaming media, including music, movies, podcasts, and videos from the Internet.
However, it doesn’t have a built-in recording tool so you have to find other ways to do it. The first method is to install a PVR add-on. Keep reading and see the details.
Record Kodi with PVR
With PVR add-ons, Kodi can interact with your TV tuner and set up records. Let’s see how to install the PVR and record Kodi with the specific steps below.
Step 1: Use an internal tuner card or a USB tuner to connect the TV tuner device to your computer.
Step 2: Click the gear icon on the main interface to enter the Kodi settings. Next, choose the installed PVR add-on and click Configure to view the TV tuner device, channel lineup, and more configuration options.
Step 3: Navigate to the PVR add-on settings and choose the channel scanning option.
Step 4: Head to Kodi’s TV section, and pick the show you wish to record from the TV guide. Then, change the recording options. Once the recording has been saved, you can view it using the Kodi library or the PVR add-on.
There is an easier way to record Kodi – using a third-party Kodi recorder. Please read on.
Record Kodi with MiniTool Video Converter
MiniTool Video Converter is a professional and easy-to-use screen recorder that allows you to record any activity on your Windows PC screen, including Kodi content. You can choose to turn on the system audio and microphone or not when start recording. Besides, it is your choice to record the entire screen or specify an area. And this Kodi recorder allows you to customize the parameters as you like.
Apart from the recording function, this full-featured software has other two functions: convert and download video. This application supports various popular video or audio formats including MP4, MKV, MOV, AVI, MP3, AAC, WAV, WMA, OGG, and more, allowing you to convert media files to a range of formats. Moreover, you can download YouTube videos, Shorts, playlists, music, and even subtitles for free.
Now, please follow the specific steps below to see how to record Kodi on PC:
Step 1: Click the download button below to download this wonderful Kodi recorder.
MiniTool Video ConverterClick to Download100%Clean & Safe
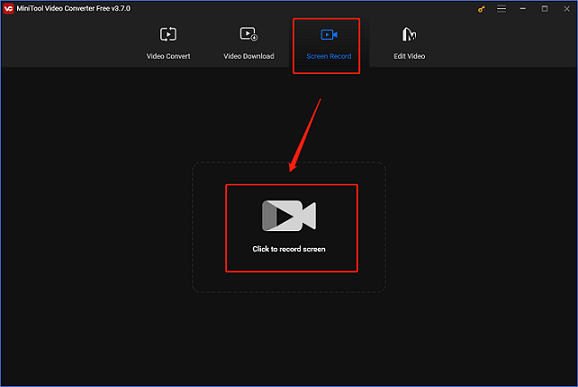
Step 2: Launch this software to enter its main interface. Then enter the Screen Record section and click the camera icon.

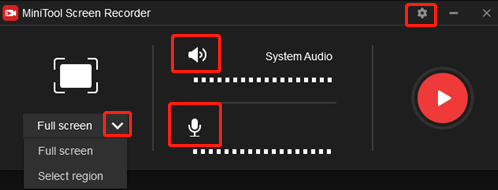
Step 3: Then the MiniTool Screen Recorder window will pop up, you can click the down-arrow button next to the Full screen button to select whether to specify a recording area or not. Next, choose whether to turn on the system audio and microphone or not. Then, you can click the Settings icon on the top to customize the parameters.

Step 4: Open the Kodi and find the video you want to record, then open the MiniTool Screen Recorder again to click the red Record button. The recorder will give you a three-second buffer so you can go back to Kodi and play your video.
Step 5: Lastly, press F6 to stop recording. The following interface will list this recording, which you can check.
Bonus: Edit Recordings with MiniTool MovieMaker
After getting your Kodi recording, perhaps you’re thinking about making the recorded video more stylish. In that case, MiniTool MovieMaker is highly recommended.
It is a robust editing tool that can help you edit your videos by cropping, trimming, splitting, adding filters, transitions, effects, etc. Its intuitive interface allows a beginner to use it with no tech-knowledge base.
Click the download button below to have a try!
MiniTool MovieMakerClick to Download100%Clean & Safe
Conclusion
This article offers 2 ways to record Kodi on PC. Hope this post can help you a lot.


User Comments :