Macros in Excel are powerful tools that can help you automate repetitive tasks, saving you time and effort. Knowing how to record a macro can streamline your workflow. In this post from the free video converter, I’m going to walk you through the steps to record macros in Excel.
Say you regularly organize data in an Excel spreadsheet for your sales team. Every time, you have to sort the product sales figures from highest to lowest, then calculate the total sales amount for each category and insert a pie chart showing the proportion of each product’s sales.
You can record a macro to handle all these steps. Once the macro is created, instead of going through each operation manually every time new data comes in, you just run the macro. It will rapidly perform the sorting, calculation, and chart insertion for the relevant data ranges you specify. This not only saves you a ton of time but also reduces the chance of making manual errors. Isn’t that super useful?
How to Record a Macro in Excel
Let’s see how to record a Macro in Excel.
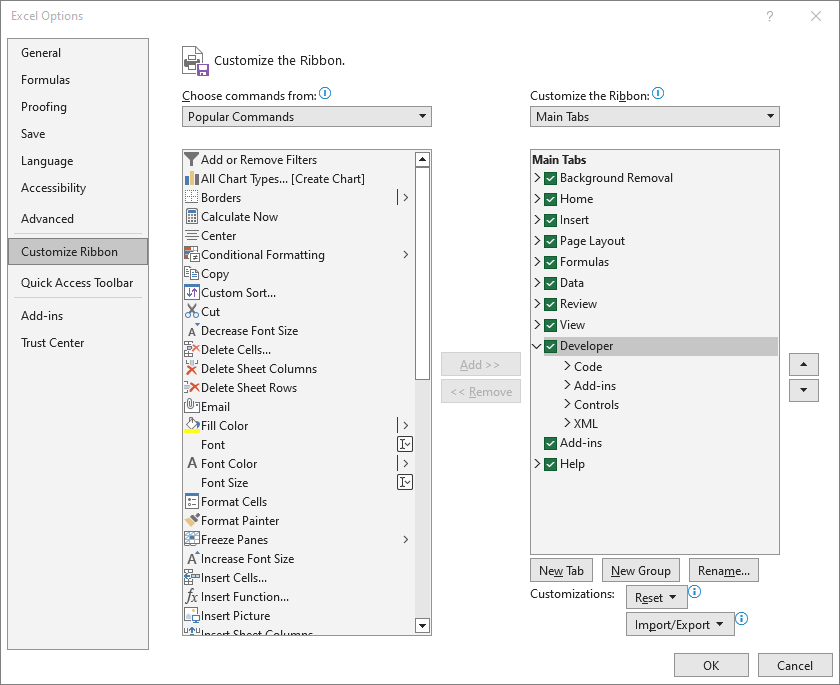
Step 1. First off, you need to ensure that the Developer tab is visible in Excel. Normally, the Develop tab is hidden by default. To enable it, click File and choose Options on the left sidebar. If you don’t see Options, you can select More and choose Options from the dropdown.
In the following window, click Customize Ribbon on the left sidebar. On the right side, under Main Tabs, check the box next to Developer and click OK. Then, the Developer tab will appear in the Excel ribbon.

Step 2. Click the Developer tab in Excel and choose the Record Macro button. Then the Record Macro dialog box will immediately appear on your screen. Here, you can do the following adjustments.
- Name the macro. Simply type the name into the box below Macro name. Note that the name starts with a letter or underscores (_) and doesn’t include spaces or special characters.
- Customize a shortcut key. Type a shortcut key into the box next to “Ctrl +”. Make sure that’s easy to remember and doesn’t conflict with existing Excel shortcuts.
- Choose a destination. Click the inverted arrow in the Store macro in box. Select your desire destination from the dropdown. Storing it in the current workbook is usually the most convenient option for personal use.
- Write a description. Write a brief description of what the macro does in the Description box. This will be helpful when you review or share the macro later.
Step 3. Click OK to start recording. Then the Record Macro button will turn into the Stop Recording button.
Step 4. Carry out the tasks you want to automate. Be precise and efficient in your actions, as Excel will record every keystroke and mouse click.
Step 5. Once you’ve completed all the actions you want to include in the macro, click the Stop Recording button under the Developer tab to end the process.
How to Run a Macro
Now that you’ve recorded the macro, you can run it whenever you need to perform the same set of actions. There are several ways to run a macro:
- Using the Macros Dialog Box. Open the workbook that contains the macro. Go to the Developer tab and click Macros. In the following popup, select the macro you want to run and click Run.
- Using the Shortcut Key. If you have customized a shortcut key to the macro during the recording process, just press the key combination to run the macro.
MiniTool Video ConverterClick to Download100%Clean & Safe

Conclusion
Knowing how to record a macro in Excel can enhance your work efficiency. This post explains the steps for this task. I hope you find it helpful.


User Comments :