

Screencasting is the process of capturing activities on a computer screen, often with spoken commentary. People often use the built-in Windows screen recorder, OBS Studio, or other screen-recording software to capture their computer screens.
Screencasts are commonly used to demonstrate how to perform specific tasks, explain software operations, or present on-screen content. They are widely used for creating video tutorials, online courses, and presentations.
Why Convert Screencast to MP4?
- Better compatibility
- Easier sharing
- Smaller file size
Some screen-recording software, such as OBS Studio, saves recordings in the MKV format by default. In such cases, it is best to convert these MKV files to MP4, as MKV is not as widely compatible as MP4.
Additionally, videos in MP4 format can be uploaded to various social media platforms—such as YouTube and Facebook—making them easy to share.
Furthermore, MP4 files have a smaller file size. If you have a large number of recordings, using the MP4 format makes the content easier to store and transfer.
How to Convert Screencast to MP4?
If you want to convert your screen recording to MP4 format, here are three methods you can try:
- Use MiniTool Video Converter
- Use VLC Media Player
- Use CloudConvert
| Pros | Cons | |
| MiniTool Video Converter | Batch conversion, customizable settings, no watermark, beginner-friendly | Windows only |
| VLC Media Player | Open-source, cross-platform, built-in conversion | Limited output customization |
| CloudConvert | Online, no installation, customizable settings | Internet required, free usage limits |
Method 1: Use MiniTool Video Converter
Fast steps:
- Open the video converter.
- Import the screencast files.
- Select MP4 as the output format.
- Choose a destination folder.
- Start converting your video to MP4.
- Find the converted MP4 file.
MiniTool Video Converter is a free video converter that supports almost all the popular video and audio formats. It lets you convert screencast to MP4 in batches and customize output settings such as video resolution, encoder, and frame rate. This software also converts videos without watermarks.
 MiniTool Video Converter
-
 Batch convert video/audio files among 1000+ formats.
- Quickly compress videos for easy storage and transfer.
- Accurately extract subtitles from video/audio files.
- Effectively enhance video quality.
Here is a guide to show you how to convert your recording to MP4:
1. Open the video converter.
Download MiniTool Video Converter and install it on your computer. Then, launch it.
2. Import the screencast files.
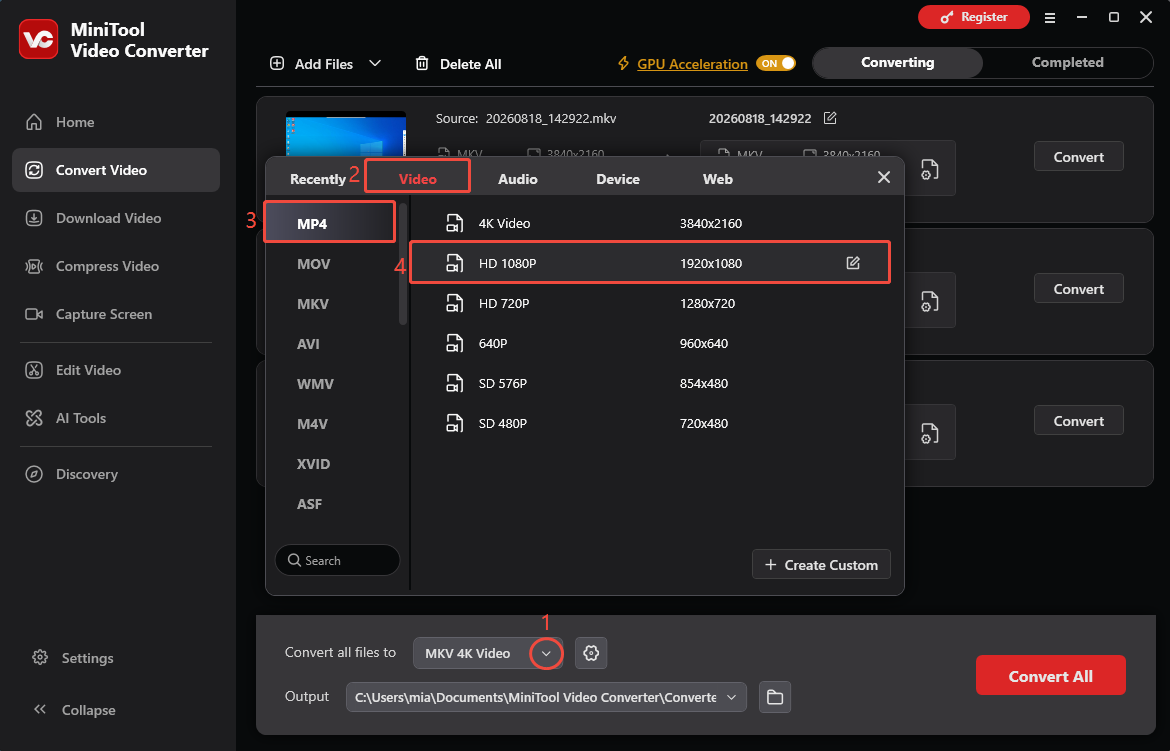
Choose the Convert Video tab on the left menu. Then, click Add Files to add the recording. You can also import multiple files at once.
3. Select MP4 as the output format.
Expand the list next to Convert all files to. Then choose Video, select MP4 in the left menu, and choose the video quality on the right.
4. Choose a destination folder.
Expand the Output menu and choose a save folder.
5. Start converting your video to MP4.
Click the Convert All option to start all the conversion tasks.
6. Find the converted MP4 file.
On the Completed page, click the folder icon next to the converted file to open its save location.
Method 2: Use VLC
Fast steps:
- Open VLC Media Player.
- Click Media > Convert/Save.
- Add the screencast file.
- Select Convert/Save.
- Choose MP4 as the output profile.
- Set the destination file and click Start.
VLC is a video player that can play any video and audio files. It is free, open-source, lightweight, and supports converting a wide range of multimedia formats. This software works on Windows, macOS, Linux, Android, and iOS. If you already have VLC installed on your computer, follow the steps below to convert your screencast to MP4:
1. Open VLC Media Player.
Launch VLC on your computer.
2. Click Media > Convert/Save.
Click Media in the top menu bar and select Convert/Save from the dropdown menu.
3. Add the screencast file.
In the Open Media window, click the Add button to browse all files on your computer. Select the screencast video you want to convert and click Open.
4. Select Convert/Save.
Click the Convert/Save option at the bottom of the window to open the Convert window.
5. Choose MP4 as the output profile.
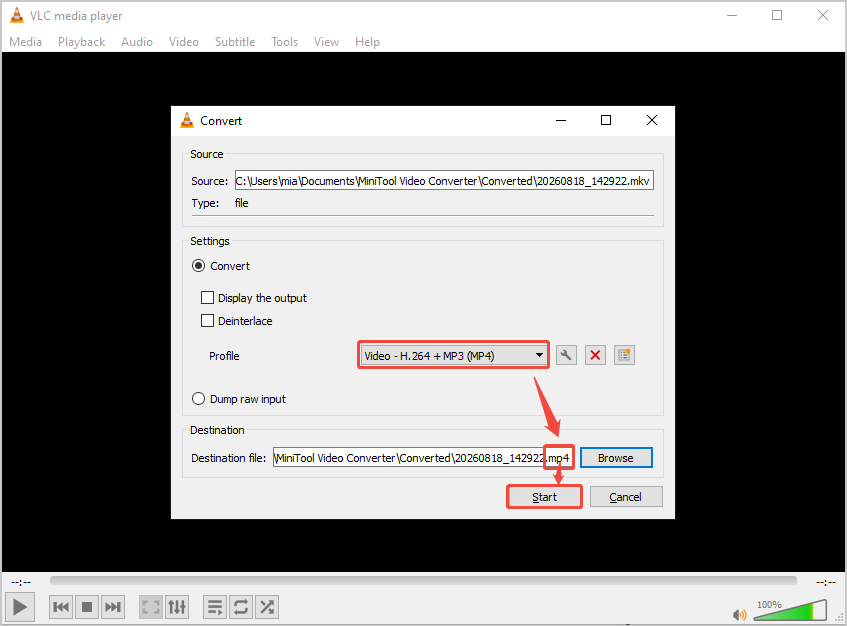
Expand the Profile dropdown menu and select Video - H.264 + MP3 (MP4).
6. Set the destination file and click Start.
Click Browse next to the Destination file box. Choose a folder for the converted video, enter a file name ending in .mp4, and click Save. Then, click Start to begin converting the screencast to MP4.
Method 3: Use CloudConvert
Fast steps:
- Go to cloudconvert.com.
- Import the screen recording.
- Select MP4 as the output format.
- Start conversion.
CloudConvert is an online file conversion service that supports various video, audio, image, document, and archive formats. It allows users to convert screen recordings to MP4 directly in a web browser without installing desktop software.
How to convert screencast to MP4 with CloudConvert? Follow the steps below:
1. Go to cloudconvert.com.
Visit the official website of CloudConvert. (https://cloudconvert.com/)
2. Import the screen recording.
Drag and drop the screen recording file into the file upload area.
3. Select MP4 as the output format.
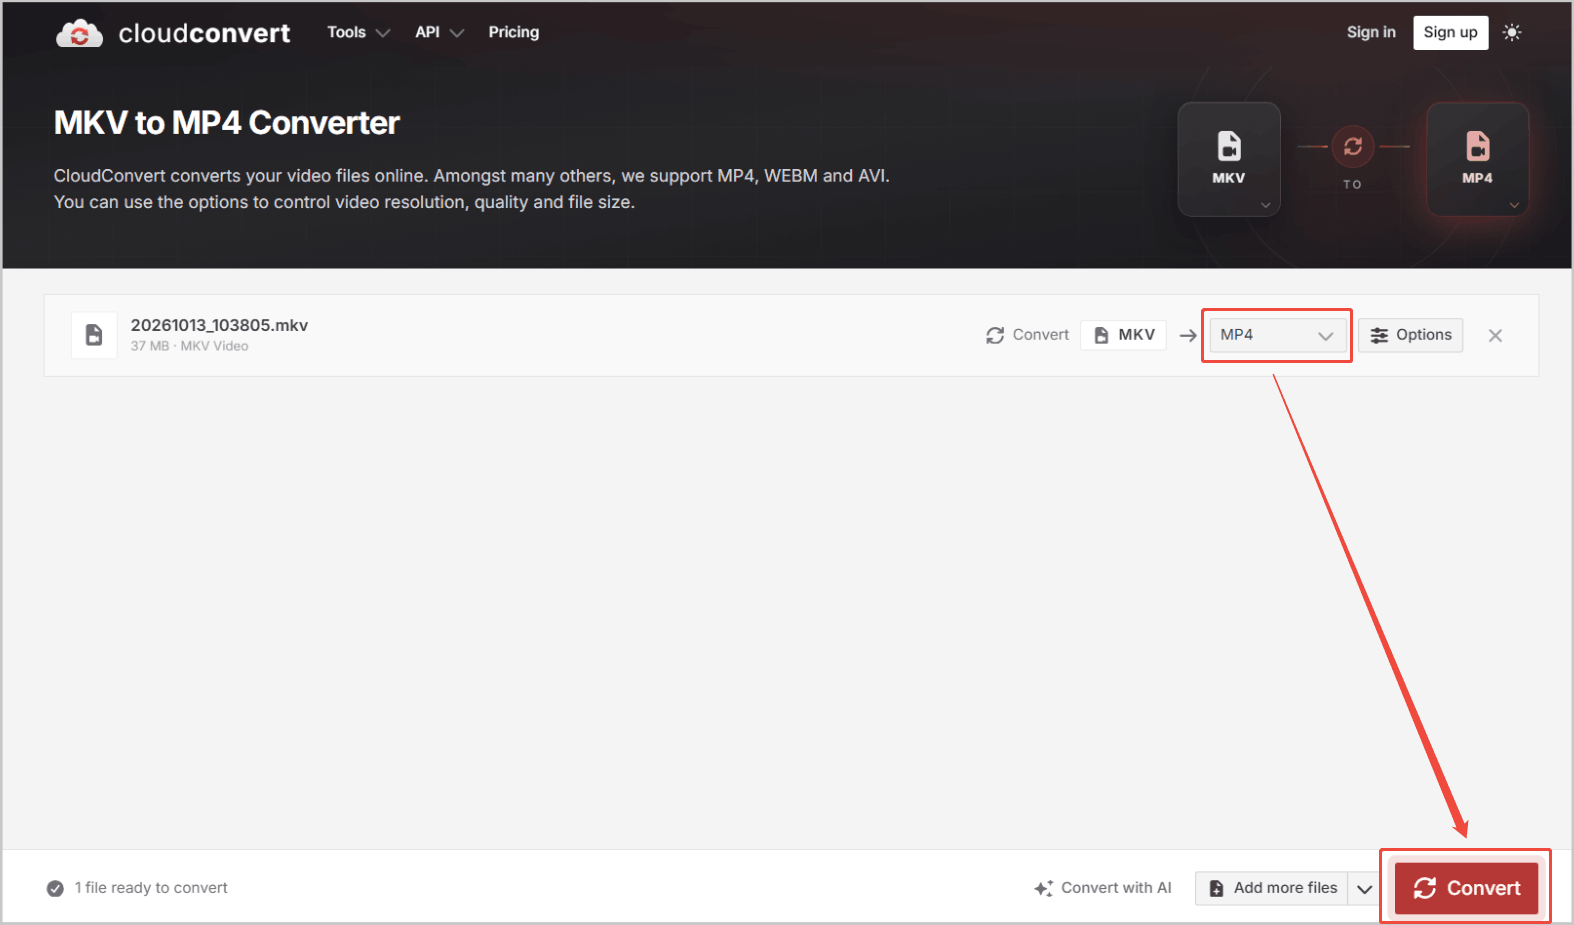
Expand the Select Format menu, choose Video, and select MP4 as the output format.
4. Start conversion.
Click the Convert option to start conversion.
How to Record a Screencast Directly as MP4
To save screencasts directly as MP4 files, choose a screen recording tool that supports MP4 output. For example, MiniTool Screen Recorder lets you capture your computer screen in MP4 format without watermarks. It also supports webcam recording and screen capture across multiple monitors.
MiniTool Screen RecorderClick to Download100%Clean & Safe
Conclusion
MiniTool Video Converter, VLC Media Player, and CloudConvert all offer convenient ways to convert screencast to MP4. Choose a desktop converter for batch processing or an online tool for quick conversions without software installation.
If you experience any difficulties with MiniTool Video Converter, contact the support team at support@minitool.com.
User Comments :